Smart Stepper - calibration and control modes (sPID mode, pPID mode and torque mode)
Smart Stepper command line interface
Docs from https://github.com/Misfittech/nano_stepper
The smart stepper uses a command line interface where the prompt is “:>”
|
help |
The help command will return a list of commands that the smart stepper supports. |
|---|---|
|
getcal |
This command will print out the 200 point calibration table. This is useful if you are doing firmware development and do not want to calibrate each time you update firmware. You can take this table and copy it into the nonvolatile.cpp file as shown below |
|
calibrate |
This will run a 200 point calibration of the encoder. Should be done with motor disconnected from machine |
|
testcal |
This will test the calibration and report the maximum error in degrees. |
|
microsteps |
This command gets/sets the number of microsteps the smart stepper will use for the step command and the step pin. The number of microsteps does not affect the resolution of the controller but rather how fine you can set the position. |
|
step |
This will move the motor one step clockwise, the step size is based on the current microstep setting. To move the motor counterclockwise use “step 1”. To move the motor clockwise 16 steps used “step 0 16” to move motor counterclockwise 16 steps use “step 1 16” |
|
feedback |
This commands disable/enables feedback control loop. 'feedback 0' - disables, 'feedback 1' - enables The plan is to discountinue this command in the future and use the “controlmode” command to put controller in open or one of the many closed loop operational modes. |
|
readpos |
Reads the current motor position and reports it as degrees (current angle as 16bit number) applies calibration if valid |
|
encoderdiag |
This command will read and report the AS5047D internal registers for diagnostic purposes. |
|
spid |
This command sets the Kp, Ki, and Kd terms for the simple positional PID controller. The default values are:
|
|
ppid |
This command sets the Kp, Ki, and Kd terms for the positional PID controller. The default values are:
|
|
vpid |
This command sets the Kp, Ki, and Kd terms for the velocity PID controller. The default values are:
|
|
velocity |
This sets the velocity in RPMs to rotate motor when unit is configured for velocity PID mode of operation. |
|
boot |
This command will put the microprocessor in the boot loader mode. Alternatively this can be done by double pressing the reset button. |
|
factoryreset |
This erases the calibration and other system and motor parameters such that unit is reset to the factory ship state. After this command the unit will need to be calibrated to the motor again. |
|
dirpin |
This command sets which direction the motor will rotate when direction pin is pulled high. The direction pin is only sampled when the step pin has a rising edge. ‘dirpin 0’ will set the motor to rotate clockwise when dir pin is high ‘dirpin 1’ will set the motor to rotate counter-clockwise when dir pin is high |
|
errorlimit |
Gets/sets the maximum number of degrees of error that is acceptable. Any posistioning error about the error limit will assert the error pin, when error pin is set as error output. For example: Will set the error limit to 1.8 degrees. |
|
ctrlmode |
Gets/Sets the feedback controller mode of operation. The command takes an integer from 0 through 4 to set the control mode per table below:
If you are unsure what you are doing leave unit in the Simple PID mode of operation. |
|
maxcurrent |
This sets the maximum current that will be pushed into the motor. To set the current for maximum of 2.0A you would use command “maxcurrent 2000” as the argument is in milliAmps. |
|
holdcurrent |
For the Simple Positional PID mode the minimal current (ie current with no positional error) is the hold current. You set this current based on the required holding torque you need for your application. The higher the hold current, the hotter and noisier the motor will be but also the larger the holding torque. For the Positional PID mode the PID tuning params have to be set correctly such that the control loop will dynamically determine the holding torque. This tuning of the PID can be difficult, hence the simple PID mode will work most of the time out of the box by setting maximum current and holding current. |
|
motorwiring |
The firmware always uses a positive angle as a clockwise rotation. A stepper motor however could have wiring done with one coil reversed wired, which will cause motor to normally operate in opposite direction. The Smart Stepper firmware will detect the motor wiring direction, using the encoder, and the firmware will compensate for a reverse wired motor. The reverse or forward wiring of a motor is detected on first power up after factory reset. If the wiring changes after that you can compensate using this command. HOWEVER it is better to do a factory reset and recalibrate motor if wiring changes. |
|
stepsperrotation |
The Smart Stepper firmware will with first power on after factory reset detect the number of full steps per rotation for the stepper motor and store in flash memory. This command will read this parameter from flash and allow user to change this parameter if motor is changed. HOWEVER it is better to do a factory reset and recalibrate motor if motorchanges. |
|
move |
The move command will request the motor to move to an absolute angle position. Optionally the user can specify the rotational speed (RPMs) by which the move should happen. For example if the current motor position is at angle 0 and you issue ‘move 3600” the motor will turn 10 rotations clockwise to angle of 3600 degrees. If issue the ‘move 3600’ again nothing will happen as motor is already at angle 3600. If motor is at angle 0 and user issues the command ‘move 3600 20’ then motor will move to 10 rotations clockwise to angle of 3600 at a rate of 20 RPMs. |
|
stop |
If user issues a move command that takes a long time and wants to stop the move before completion then user can issue the stop command command which will stop a move operation. This stops the motion planner |
|
setzero |
This command will take the current motor position and set it to absolute (reference) angle of zero. Note that if you are in the middle move it will take the position at the time of the command and use it, thus it is recommend a move be stopped or wait for completion before issuing the setzero. Note: this does not reset the error which gets reporterd by geterror. If you want to null this value you need to reboot the motor! |
|
data |
This command will toggle output of binary data. |
|
looptime |
This command will display the time it takes for a single processing (control) loop to execute. |
|
eepromerror |
This command displays the motor error in degrees difference from the stored eeprom value at motor power up. |
|
eepromloc |
Displays the location of the shaft angle in degrees at motor power on. |
|
eepromwrite |
Forces the eeprom to store all current values (location) in ram to eeprom. |
|
eepromsetloc |
Forces the eeprom to write the current shaft angle overwriting the stored location from powerup. |
|
setpos |
Overwrites the current shaft angle (degrees) in the motion planner. |
|
reboot |
Forces the smart stepper to reboot |
|
homecurrent |
If using built in homing routine (command "home") this will specify the amount of current applied when motor is moving during homing operation when homepin is logic active.EXPERIMENTAL USE WITH CAUTION gets/set the motor moving and holding currents that will be used when pin A3 is low |
|
homepin |
Allows setting of pin for current limited enable for homing. This triggers a current drop during homing movements. Current set using command "homecurrent". This pin is pulled low to activate. EXPERIMENTAL USE WITH CAUTION |
|
homeangledelay |
sets the angle delay in dropping to homing current Currently unused. |
|
home |
Tells the motion controller to move motor until the home switch (enable pin) is pulled low. (Only on boards 3/21/2017 or newer) (Must be enabled in firmware). For example: Will move up to 360 degrees at 0.5 RPM. EXPERIMENTAL USE WITH CAUTION |
|
pinread |
reads pins as binary (bit 0-step, bit 1 - Dir, bit 2 - Enable, bit 3 - Error, bit 4 - A3, bit 5- TX, bit 6 - RX |
|
errorpinmode |
Sets or displays the error pin mode. Allows someone to swap usage of the error pin as an enable pin on older boards. (Not compiled for use on boards 3/21/2017 or newer since they have separate enable and error pins) (Must be enabled in firmware) Modes are:
|
|
errorpin |
Sets or displays the binary state of the enable pin. Acceptable values are 0 or 1 For example: Will set the error pin on the terminal block to output a logic high when the error level is reached |
|
enablepinmode |
Sets or displays the enable pin mode. Allows someone to swap usage of the enable pin as an error pin on older boards. (Only on boards 3/21/2017 or newer since they have separate enable and error pins) (Must be enabled in firmware) Modes are:
|
|
geterror |
Displays the current motor shaft error in degrees. |
|
getsteps |
Displays the number of steps that have been seen from the DIR pin. |
|
debug |
Sets if syslog debugging will be output on USB serial. Allowed values are 0 for disable, 1 for enable. |
| torque |
prints torque parameter, with argument sets 'torque t' Where torque is an integer between -128 and 127. The special value CUSTOM COMMAND FROM FORK REPO |
How to access Smart Stepper by USB serial from bash
Using "screen"
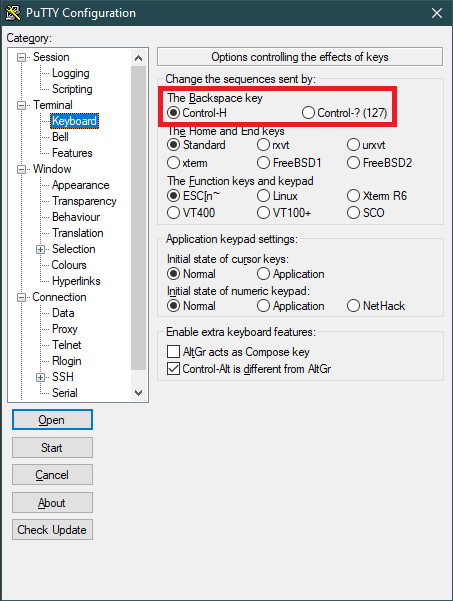
If the backspace button does not work, then the control key in PuTTY/KiTTY has to be switched to "Control-H". Otherwise "screen /dev/ttyUSB-SMART-A-AXIS" does not work correctly, because entered input cannot be deleted.
This script is not used for Trikarus project but it was worked out while trying to find working solutions with Smart Steppers.
https://unix.stackexchange.com/questions/13953/sending-text-input-to-a-detached-screen
repetier-smartstepper.sh
#!/bin/bash
# this script sends commands to MisfitTech Smart Stepper controller via USB. screen tool is used because passing and reading values is not that easy with cat and echo. There is place to make it better e.g. using minicom or cu. tmux was tested but it figured out that there's no serial device support.

source "/opt/repetier-conf.sh" # source config for Repetier Server instance
source "/opt/urlcoder.sh"      # source methods to use them in this script

AXIS=$1 # should be A,B,C or D

SCREEN_NAME="screen_AXIS"
LOG_FILE="/opt/${SCREEN_NAME}_${AXIS}.log"

# remove old log file if existent
rm "${LOG_FILE}" > /dev/null 2>&1

# send "smart stepper command + enter (^M) keystroke" to first window (-p 0 could be applied) in a new screen called "screen_AXIS_<Nr>" by stuffing (https://www.gnu.org/software/screen/manual/html_node/Command-Summary.html) the string into input; log the output to file
screen -d -m -L ${LOG_FILE} -S ${SCREEN_NAME}_${AXIS} /dev/ttyUSB-SMART-${AXIS}-AXIS 115200

declare -a cmdArray=("getcal" "microsteps" "readpos" "encoderdiag" "spid" "vpid" "ppid" "dirpin" "enablepinmode" "errorlimit" "ctrlmode" "maxcurrent" "holdcurrent" "homecurrent" "motorwiring" "stepsperrotation" "velocity" "looptime" "eepromerror" "eepromloc" "geterror" "getsteps" "torque" "pinread")
for val in ${cmdArray[@]}; do
        screen -S ${SCREEN_NAME}_${AXIS} -X stuff "${val}^M"
done

sleep 1
screen -S ${SCREEN_NAME}_${AXIS} -X quit

# clean up the log with ^M symbols
sed -i 's/\r//g' ${LOG_FILE}
Manual parallel working with multiple sessions
Using sreen sometimes misses some input/output with the used configuration. Some fine tuning for input and output buffers and timeouts is required!
#general
screen /dev/ttyUSB-SMART-A-AXIS

#all in one - #attaches to the created session with 4 tabs
vim /opt/controlSmartSteppers.sh

#/bin/bash
screen -AdmS SmartStepperControlScreen -t A /dev/ttyUSB-SMART-A-AXIS
sleep 1
screen -S SmartStepperControlScreen -X screen -t B /dev/ttyUSB-SMART-B-AXIS
sleep 1
screen -S SmartStepperControlScreen -X screen -t C /dev/ttyUSB-SMART-C-AXIS
sleep 1
screen -S SmartStepperControlScreen -X screen -t D /dev/ttyUSB-SMART-D-AXIS
sleep 1
screen -r SmartStepperControlScreen

chmod +x /opt/controlSmartSteppers.sh
/opt/controlSmartStepper.sh

#now press 1x enter per tab to get input/output ":>"

#do some commands

#to leave
"CTRL  + A", then "\" to quit all tabs (acknowledge with "Y"), or
"CTRL  + A", then "SHIFT + K" to quit current tab (acknowledge with "Y")
Using PySerial and Python 3.7
This is the thing we use in production. The following script can be used as service (one service per motor) or as regular script.
To make this script working we need different timeouts for serial input/output buffering. Good working values are
- timeout=0.1 (lowest fine working value is 0.2) → changed from 0.4 at
- write_timeout=0.5 (lowest fine working value is 1.0) → changed from 1.5 at
- wait_interval = 0.1 (lowest fine working value is 0.05 )→ changed from 0.4 at
pip3.7 install pyserial
vim /opt/smartStepper.py
import serial
import sys
import argparse
import time
import termios  # workaround for IOError on resetting input/output buffers
import re
import os
import logging
from systemd.journal import JournaldLogHandler
from influxdb import InfluxDBClient
from datetime import datetime  # required for InfluxDB data pushing
from time import sleep  # required for InfluxDB data pushing

# note that when defining serial.Serial will automatically open the port!
ser = None
parser = argparse.ArgumentParser()
parser.add_argument(
    "-d",
    "--dev",
    help=
    "specify the Smart Stepper /dev/tty* by entering the axis letter --dev <A, B,C or D>"
)
parser.add_argument(
    "-c",
    "--getcal",
    action='store_true',
    help="print calibration values from Smart Stepper and exit the program"
)

parser.add_argument(
        "-m",
        "--manual",
        action="store_true",
        help="console mode"
)

args = parser.parse_args()
#too short intervals result in failing to pass the information to serial which leads to no returning values
#lowest fine working value is 0.05
wait_interval = 0.4

#exit if no device was given
if args.dev == None:
        print("Missing drive input. Please use --dev argument")
        quit()

#init logger
logger = logging.getLogger("Smart Stepper - Drive " + args.dev)
logger.addHandler(JournaldLogHandler())
logger.addHandler(logging.StreamHandler(sys.stdout))
#logger.setLevel(logging.DEBUG)
logger.setLevel(logging.INFO)

logger.info("Logger initialized for Drive " + args.dev)

# build some database connection with max 1 seconds timeout (lowest value possible)
client = InfluxDBClient(host='localhost', port=8086, username='username', password='password', timeout=1, ssl=False, verify_ssl=False)
#client.ping()
client.switch_database('trikarus')
#print(client.query('SHOW DATABASES'))
#print(client.query('SHOW MEASUREMENTS'))


def createSerial():
    global ser, args
    time.sleep(
        1)  # always wait one second before re-opening. This prevents hiccups
    try:
        #print("trying to open serial connection")
        logger.info("Trying to create serial connection")
        ser = serial.Serial(
            port="/dev/ttyUSB-SMART-" + args.dev + "-AXIS",
            baudrate=115200,
            bytesize=serial.EIGHTBITS,
            parity=serial.PARITY_NONE,
            stopbits=serial.STOPBITS_ONE,
            timeout=
            #the lower this is set the quicker you can read values but with higher drop rate - lowest tested fine value is 0.01
            0.2,
            xonxoff=False,
            rtscts=False,
            write_timeout=1.5,
            dsrdtr=False,
            inter_byte_timeout=None,
            exclusive=True
        )  # force to get behaviour "Cannot open line '/dev/ttyUSB-SMART-A-AXIS' for R/W: open() blocked, aborted." or "Error: read failed: device reports readiness to read but returned no data (device disconnected or multiple access on port?)"

    except IOError as e:  # the serial creation may fail if device not connected or not ready
        logger.error("Error:" + str(e))
        json_body = [{
            "measurement":
            "SmartStepper" + args.dev,
            "tags": {
                "host": "hangdevice.fablabchemnitz.de"
            },
            "time":
            datetime.utcnow().strftime('%Y-%m-%dT%H:%M:%SZ'),
            "fields": {
                "serialError": 1
            }
        }]
        try:
            client.write_points(json_body)
        except NameError as e: #catch if db connection is null and body cannot be written
            pass
        pass


if args.dev:
    # remove old command list file on this script restart to prevent catastrophes
    try:
        os.remove(args.dev + ".cmdlist")
        logger.info("Removed old cmdlist file")
    except FileNotFoundError as e:
        pass  #do nothing

    while True:
        logger.debug("Jumping into the main loop")
        if ser == None:
            #print("serial is set to None. Creating new serial connection")
            createSerial()
        else:
            try:  # main loop
                if args.getcal:
                    ser.reset_input_buffer()  #maybe obsolete
                    ser.reset_output_buffer()  #maybe obsolete
                    ser.write("getcal".encode() + b'\r')
                    time.sleep(wait_interval)
                    while ser.inWaiting() > 0:
                        line = ser.readline().decode()
                        p = re.compile(r'[0-9].*', re.M)
                        m = p.search(line)
                        if m:
                            logger.info("getcal = " + m.group(0))
                    quit()

                if args.manual:
                    while True:
                        cmd = input(":>")
                        if cmd == 'exit':
                            ser.close()
                            quit()
                        else:
                            ser.write(cmd.encode() + b'\r')
                            out = ''
                            time.sleep(wait_interval)
                            while ser.inWaiting() > 0:
                                out += ser.read(1).decode()
                            if out != '':
                                print(":>" + out)
                # cycle through given cmd lists > this should be prioritized always (interrupt other monitoring calls then!)
                try:
                    cmd_list_file = open(args.dev + ".cmdlist", 'r')
                    cmd_list = cmd_list_file.readlines()
                    cmd_list_file.close()
                    # first read the file, then "consume" it be deleting it
                    os.remove(args.dev + ".cmdlist")
                    for cmd in cmd_list:
                        logger.info("command from list: " + cmd)
                        ser.reset_input_buffer()  #maybe oboslete
                        ser.reset_output_buffer()  #maybe obsolete
                        ser.write(cmd.encode() + b'\r')
                        time.sleep(wait_interval)
                except FileNotFoundError as e:
                    pass  # do nothing

                #-----------------------------------------------------------

                # readpos
                ser.reset_input_buffer()  #maybe oboslete
                ser.reset_output_buffer()  #maybe obsolete
                ser.write("readpos".encode() + b'\r')
                time.sleep(wait_interval)
                #logger.info(ser.inWaiting()) - prints the number of bytes in the output buffer
                while ser.inWaiting() > 0:
                    #logger.info("getting readpos")
                    line = ser.readline().decode()
                    #print(line)
                    p = re.compile(
                        r'^encoder\s(([0-9]+\.?[0-9]*)|([0-9]*\.[0-9]+)|([-][0-9]+\.?[0-9]*)|([-][0-9]*\.[0-9]+))$',
                        re.M)
                    m = p.search(line)
                    if m:
                        logger.info("readpos = " + m.group(1))
                        json_body = [{
                            "measurement":
                            "SmartStepper" + args.dev,
                            "tags": {
                                "host": "hangdevice.fablabchemnitz.de"
                            },
                            "time":
                            datetime.utcnow().strftime('%Y-%m-%dT%H:%M:%SZ'),
                            "fields": {
                                "readpos": float(m.group(1))
                            }
                        }]
                        try:
                            client.write_points(json_body)
                        except NameError as e: #catch if db connection is null and body cannot be written
                            pass

                #-----------------------------------------------------------

                # geterror
                ser.reset_input_buffer()  #maybe oboslete
                ser.reset_output_buffer()  #maybe obsolete
                ser.write("geterror".encode() + b'\r')
                time.sleep(wait_interval)
                while ser.inWaiting() > 0:
                    #logger.info("getting geterror")
                    line = ser.readline().decode()
                    #print(line)
                    p = re.compile(
                        r'^error\s(([0-9]+\.?[0-9]*)|([0-9]*\.[0-9]+)|([-][0-9]+\.?[0-9]*)|([-][0-9]*\.[0-9]+))\sdeg$',
                        re.M)
                    m = p.search(line)
                    if m:
                        logger.info("geterror = " + m.group(0).split(' ')[1])
                        json_body = [{
                            "measurement":
                            "SmartStepper" + args.dev,
                            "tags": {
                                "host": "hangdevice.fablabchemnitz.de"
                            },
                            "time":
                            datetime.utcnow().strftime('%Y-%m-%dT%H:%M:%SZ'),
                            "fields": {
                                "geterror": float(m.group(0).split(' ')[1])
                            }
                        }]
                        try:
                            client.write_points(json_body)
                        except NameError as e: #catch if db connection is null and body cannot be written
                            pass

                #-----------------------------------------------------------

                # torque
                ser.reset_input_buffer()  #maybe oboslete
                ser.reset_output_buffer()  #maybe obsolete
                ser.write("torque".encode() + b'\r')
                time.sleep(wait_interval)
                while ser.inWaiting() > 0:
                    #logger.info("getting torque")
                    line = ser.readline().decode()
                    #print(line)
                    p = re.compile(
                        r'^torque\s(([0-9]+\.?[0-9]*)|([0-9]*\.[0-9]+)|([-][0-9]+\.?[0-9]*)|([-][0-9]*\.[0-9]+))$',
                        re.M)
                    m = p.search(line)
                    if m:
                        logger.info("torque = " + m.group(1))
                        json_body = [{
                            "measurement":
                            "SmartStepper" + args.dev,
                            "tags": {
                                "host": "hangdevice.fablabchemnitz.de"
                            },
                            "time":
                            datetime.utcnow().strftime('%Y-%m-%dT%H:%M:%SZ'),
                            "fields": {
                                "torque": float(m.group(1)),
                            }
                        }]
                    try:
                        client.write_points(json_body)
                    except NameError as e: #catch if db connection is null and body cannot be written
                        pass
                #-----------------------------------------------------------

            except (
                    IOError, termios.error
            ) as e:  # in case the USB device was removed or buffer reset fails try to close and re-open serial port
                logger.error("Error:" + str(e))
                ser.close()
                ser = None  #unset
                createSerial()
                pass
else:
    sys.exit(2)
Remove old/unrequired InfluxDB data
influx
use trikarus
show series
drop series from SmartStepperA
drop series from SmartStepperB
drop series from SmartStepperC
drop series from SmartStepperD
show measurements
General information about control modes for Hangprinters
Hangprinters do not have absolute position control. Modern Hangprinters use closed loop systems to ensure exact relative positions using encoders and to have better handling in general. By using such closed loop systems it's easy to implement a special torque mode (custom firmware implementation from Torbjørn Ludvigsen) for each motor. This enables to tension all lines to a constant tension. Then you can drag the effector around with your hands and save a lot of time calibrating the machine. So the torque mode is a special calibration mode. Trikarus uses Smart Stepper from MisfitTech. It makes use of torque mode with the following mimimum and maximum values: +127 / -128 (the sign inverts the direction of movement - clockwise or counterclockwise). The special value 0 exits the torque mode to jump back to regular mode (sPID or pPID).
Smart Stepper usually run in Simple/Hybrid PID mode when shipped ("spid" → this can be enabled by serial interface command "ctrlmode 2"). However, it is also a good idea to use Positional PID mode instead of the factory setting ("ppid" → this can be enabled by serial interface command "ctrlmode 3"). To use ppid mode the PID values have to be adjusted properly.
More information about Smart Stepper modes can be found at Smart Stepper rev 1/20/2019 by MisfitTech documentation manuals.
Swichting between default mode (simple PID) and torque mode
The switching the modes is explained in Smart Stepper - flashing the firmware and polling data.
- This action can be done either by
- clicking the rotary encoder knob at the effector 5 times in a row quickly (1.0 second), or by
- triggering the button from Repetier Server GUI, or by
- calling the torque command on USB serial (e.g. using "screen /dev/ttyUSB-SMART-?-AXIS"
- To switch between torque mode and sPID mode we simply call only a single command: "torque 0" (to go back to sPID) or "torque <value != 0>" (to enter torque mode). Please explicitely do not set ctrlmode from 2 to 5 by hand using that "ctrlmode" command, because this leads to unforeseen stepper movements at the switch, which can ruin your line guidings (painfully tested). The cause might be some previously saved position values.
The behaviour in your hands → Moving the stepper motor shaft back and forth by hand, you can feel little "ticks" as you move across motor poles. Getting rid of those would make fully automatic data collection much easier.
The regular torque mode for effector dragging
Torque mode for "clean" effector dragging only works fine if it is enabled to all four drives. If you forget any of them it will do not perform. Dragging the effector by hand may require a bit of manual power because this mode is really strong. If you use doubled lines feature and a lot of bearings and ceramic inserts the friction is much higher than using single lines. Move the effector with love and touch it safely. The value you choose for torque highly depends on your installed motors and the configured currents. While having motor current at 800 mA torque of 50 is good, but changing to 1500 mA a torque value of 35 is already enough to have the same force in your hands.
Do not ever use torque mode if drives are not mounted correctly. In case the motors are not mounted to spools and/or the spool lines are not tied, the motors will turn infinite without stopping. In this scenario you will reach the maximum of encoder pos. This cannot be resetted using the "setzero" command. Instead you need to perform a full reboot of the Smart Stepper which is the same like having a power loss. It's a high risk to set torque values higher than the given counter weight. The higher the value the quicker the drive will move. It might cause unwinding all the line from your spools.
Calibration and important adjustments for Smart Steppers
Basic calibration
Remember to run "calibrate" and "testcal" to have clean settings for each Smart Stepper. Otherwise the Stepper will run bad or it will stand still. The documentation says that a maximum angle degree error is 0.1 deg. If the motor current is set too low the motor will not move correctly (e.g. motor steps forward and backward alternating) and is going to miss steps. This will also lead to bad calibration values. If you adjust the motor current a re-calibration might be a good idea.
Adjusting the motor currents
Basically the current values are all the same because all drives have same motors attached, with nearly same amount of line on it. They drive in the same direction by wiring and roughly symmetric forces grab on it except D drive (a little higher force). Higher torque values work for different situations but have no better effect on the regular torque mode for effector dragging. But you can use higher torque values for moving up and down the effector without any GCode command. I successfully tested torque mode up to +127 without any parts falling off the machine and no cracking sounds. So everything looks really stable. This was tested with default Smart Stepper values maxcurrent = 800 mA and holdcurrent = 500 mA. The mounted stepper motors can run up to 2.0 A so there's a lot more power possible. The torque mode settings depend on your motor power. if you raise the current it will behave not the same as before. if you adjust one motor you will need to adjust all other motors too to get equivalent behaviour (having the same motor types for all four drives. Trikarus uses Stepper Motors MT-1705HS200AE by Motech Motors).
Finally after some tests with Trikarus the configuration is
- maxcurrent = 1600 mA (Adjusted the max current from 1500 to 1600 mA at , set back from 1600 mA to 1500 mA again at )
- holdcurrent = 800 mA
The currents are preconfigured and can easily be applied using sms_preconfigure.sh (the smartStepper Python services need to run)
vim /opt/sms_modes/sms_preconfigure.sh#!/bin/bash
#same max current for ABCD - we use default of 1500
CUR_MAX=1500
#hold current for ABC and D - we use default of 800
CUR_HOLD_ABC=800
CUR_HOLD_D=800
#default error is 1.8
ERRORLIMIT=5.0
#spid values - defaults ae 0.900 0.000 0.010
SPID="0.050 0.000 0.300"
echo "maxcurrent $CUR_MAX" > /opt/A.cmdlist
echo "holdcurrent $CUR_HOLD_ABC" >> /opt/A.cmdlist
echo "errorlimit $ERRORLIMIT" >> /opt/A.cmdlist
echo "spid $SPID" >> /opt/A.cmdlist
echo "maxcurrent $CUR_MAX" > /opt/B.cmdlist
echo "holdcurrent $CUR_HOLD_ABC" >> /opt/B.cmdlist
echo "errorlimit $ERRORLIMIT" >> /opt/B.cmdlist
echo "spid $SPID" >> /opt/B.cmdlist
echo "maxcurrent $CUR_MAX" > /opt/C.cmdlist
echo "holdcurrent $CUR_HOLD_ABC" >> /opt/C.cmdlist
echo "errorlimit $ERRORLIMIT" >> /opt/C.cmdlist
echo "spid $SPID" >> /opt/C.cmdlist
echo "maxcurrent $CUR_MAX" > /opt/D.cmdlist
echo "holdcurrent $CUR_HOLD_D" >> /opt/D.cmdlist
echo "errorlimit $ERRORLIMIT" >> /opt/D.cmdlist
echo "spid $SPID" >> /opt/D.cmdlist
echo "Please rerun calibrate + testcal"PID values
As we do not make use of pPID but sPID we do not need any PID value adjustments
Error limit
The default value each Smart Stepper tolerates 1.8 degrees of error until it triggers the error pin. Trikarus does not make use of that function but it could be used for brake mechanisms for example!
vim /opt/sms_modes/sms_calibrate.sh#!/bin/bash
echo "calibrate" > /opt/A.cmdlist
echo "calibrate" > /opt/B.cmdlist
echo "calibrate" > /opt/C.cmdlist
echo "calibrate" > /opt/D.cmdlistBash scripts for daily use (mode switches)
The following scripts are worked out to be really useful for calibration and printing. They can be used by command line, by Repetier Server GUI command list drop down menu (see Repetier Server) or by the rotary encoder button (mode switch).
mkdir -p /opt/sms_modes
cd /opt/sms_modes
sms_reboot.sh
#!/bin/bash
echo "reboot" > /opt/A.cmdlist
echo "reboot" > /opt/B.cmdlist
echo "reboot" > /opt/C.cmdlist
echo "reboot" > /opt/D.cmdlist
sms_setzero.sh
Setting zero does only reset positions to 0. It does not set the error to 0. Cleaning the error can be done by recalibrating and/or rebooting the motor!
#!/bin/bash
#reset the encoders to pos 0
echo "setzero" > /opt/A.cmdlist
echo "setzero" > /opt/B.cmdlist
echo "setzero" > /opt/C.cmdlist
echo "setzero" > /opt/D.cmdlist
sms_smooth_all.sh
#!/bin/bash
#make all drives behave totaly smooth (no feelable force on it)
echo "torque 1" > /opt/A.cmdlist
echo "torque 1" > /opt/B.cmdlist
echo "torque 1" > /opt/C.cmdlist
echo "torque 1" > /opt/D.cmdlist
sms_smooth_a.sh
#!/bin/bash
# this smoothes Drive A for line winding issue fixing
echo "torque 1" > /opt/A.cmdlist
sms_smooth_b.sh
#!/bin/bash
# this smoothes Drive B for line winding issue fixing
echo "torque 1" > /opt/B.cmdlist
sms_smooth_c.sh
#!/bin/bash
# this smoothes Drive C for line winding issue fixing
echo "torque 1" > /opt/C.cmdlist
sms_smooth_d.sh
#!/bin/bash
# this smoothes Drive D for line winding issue fixing
echo "torque 1" > /opt/D.cmdlist
sms_spid_a.sh
#!/bin/bash
echo "torque 0" > /opt/A.cmdlist
sms_spid_b.sh
#!/bin/bash
echo "torque 0" > /opt/B.cmdlist
sms_spid_c.sh
#!/bin/bash
echo "torque 0" > /opt/C.cmdlist
sms_spid_d.sh
#!/bin/bash
echo "torque 0" > /opt/D.cmdlist
sms_spid_all.sh
#!/bin/bash
echo "torque 0" > /opt/A.cmdlist
echo "torque 0" > /opt/B.cmdlist
echo "torque 0" > /opt/C.cmdlist
echo "torque 0" > /opt/D.cmdlist
sms_torque_all.sh
If you cannot properly drag the effector into origin reduce the torque values. It's possible that you configured to high values. When you push down the effector it might bump up again. You might also check the motor currents.
#!/bin/bash
#regular torque mode
echo "torque 42" > /opt/A.cmdlist
echo "torque 42" > /opt/B.cmdlist
echo "torque 42" > /opt/C.cmdlist
echo "torque 28" > /opt/D.cmdlist #slightly lower value to leave effector at the bottom

source "/opt/repetier-conf.sh" #source config for Repetier Server instance
send_gcode "M106 P2 S255" #turn on the laser pointers for placing
sms_torque_a.sh
#!/bin/bash
#regular torque mode
echo "torque 42" > /opt/A.cmdlist
sms_torque_b.sh
#!/bin/bash
#regular torque mode
echo "torque 42" > /opt/B.cmdlist
sms_torque_c.sh
#!/bin/bash
#regular torque mode
echo "torque 42" > /opt/C.cmdlist
sms_torque_d.sh
#!/bin/bash
#regular torque mode
echo "torque 42" > /opt/D.cmdlist
sms_tighten_abc.sh
#!/bin/bash
echo "step 1 50" > /opt/A.cmdlist
echo "step 1 50" > /opt/B.cmdlist
echo "step 1 50" > /opt/C.cmdlist
sms_tighten_d.sh
#!/bin/bash
echo "step 0 50" > /opt/D.cmdlist
sms_release_abc.sh
#!/bin/bash
echo "step 0 50" > /opt/A.cmdlist
echo "step 0 50" > /opt/B.cmdlist
echo "step 0 50" > /opt/C.cmdlist
sms_release_d.sh
#!/bin/bash
echo "step 0 50" > /opt/D.cmdlist
sms_zdown.sh
#!/bin/bash
#lower Z quickly
echo "torque 35" > /opt/A.cmdlist
echo "torque 35" > /opt/B.cmdlist
echo "torque 35" > /opt/C.cmdlist
echo "torque 1" > /opt/D.cmdlist
sms_zup.sh
#!/bin/bash
#raise +Z by pro-actively winding down drives - do not get lower than -10 (e.g. -30 will remove windings from the spools without any pull force). Note that these settings highly depend on your motor currents
echo "torque -10" > /opt/A.cmdlist
echo "torque -10" > /opt/B.cmdlist
echo "torque -10" > /opt/C.cmdlist
echo "torque 90" > /opt/D.cmdlist
Make them executable
chmod +x *.sh
Script as service
Install this script four times by just replacing the Drive letter accordingly
vim /opt/smartStepperA.service[Unit]
After=network.target
Description=Smart Stepper - A Drive - PySerial
[Service]
Type=simple
#this might also be "/usr/local/bin/python3.7". Check "which python3.7"
ExecStart=/usr/bin/python3.7 /opt/smartStepper.py --dev A
WorkingDirectory=/opt/
KillMode=process
Restart=on-failure
RestartSec=10
RemainAfterExit=no
User=root
Group=root
[Install]
WantedBy= multi-user.targetsystemctl enable /opt/smartStepperA.service
systemctl start smartStepperA.service
#restart
systemctl stop smartStepperA.service && systemctl start smartStepperA.service
journalctl -f -u smartStepperA.serviceOutput checking
#get specific Drive information - example for A drive
journalctl -f -u smartStepperA.service  | grep "Drive.*geterror"
journalctl -f -u smartStepperA.service  | grep "Drive.*readpos"
journalctl -f -u smartStepperA.service  | grep "Drive.*torque"

#filter out all regular stuff - this will filter out "command from list" too if same type
journalctl -f -u smartStepperA.service | grep -v "readpos*\|torque*\|geterror*"

#filter out processed commands from /opt/A.cmdlist
journalctl -f -u smartStepperA.service | grep "command from list"

#filter errors/exceptions
journalctl -f -u smartStepperA.service | grep "error\|Error" | grep -v "geterror = "
Mode switch recognizing with the KY040 rotary encoder button
vim /opt/gpio/rotaryButton.pyimport pigpio
import time
import sys
import subprocess
import logging
from systemd.journal import JournaldLogHandler
#init logger
logger = logging.getLogger("Smart Stepper mode switch button listeneristener")
logger.addHandler(JournaldLogHandler())
logger.addHandler(logging.StreamHandler(sys.stdout))
logger.setLevel(logging.DEBUG)
sw_debounce = 300
sw = 5 #GPIO Pin
hit_last_time = time.time()
hit_elapse = 0
hit_counter = 0 #init counter. gets resetted after each trigger
hit_time = 1.0 #the time the hits have to happen to trigger
hit_target = 5 #the amount until it triggers (e.g. 5 times in 1 second)
sw_input = pigpio.pi()
sw_input.set_pull_up_down(sw, pigpio.PUD_UP)
sw_input.set_glitch_filter(sw, sw_debounce)
def sw_fall(gpio, level, tick):
global hit_counter, hit_target, hit_last_time, hit_elapse
this_time = time.time()
hit_elapse = this_time - hit_last_time
hit_last_time = this_time
if hit_elapse < hit_time:
hit_counter = hit_counter + 1
if hit_counter >= hit_target:
short_press()
hit_counter = 0 #reset
else:
hit_counter = 0 #reset
sw_falling = sw_input.callback(sw, pigpio.FALLING_EDGE, sw_fall)
def short_press():
logger.info("mode switch recognized")
subprocess.call("/opt/sms_modes/sms_torque_all.sh")
while True:
a=0 #just some line to allow while loop
time.sleep(1)
#print("hello")
vim /opt/gpio/rotaryButton.service[Unit]
After=network.target
Description=Rotary Button Service (Smart Stepper Mode Switch)
[Service]
Type=simple
ExecStart=/usr/bin/python3.7 /opt/gpio/rotaryButton.py
WorkingDirectory=/opt/
KillMode=process
Restart=on-failure
RestartSec=10
RemainAfterExit=no
User=root
Group=root
[Install]
WantedBy= multi-user.targetsystemctl enable /opt/gpio/rotaryButton.service
systemctl start rotaryButton.service
#restart
systemctl stop rotaryButton.service && systemctl start rotaryButton.service
journalctl -f -u rotaryButton.service
Keine Kommentare vorhanden
Keine Kommentare vorhanden