# Projekte und Anleitungen

# 3D-Drucker - "Aurica" (Ultimaker Clone)

3D Drucker sind eine Errungenschaft der Gesellschaft, die bei uns ein besonderes Augenmerk trägt. Das Bauprojekt “Aurica” war der erste Versuch, einen eigenen 3D Drucker zu bauen, der kostengünstig ist (Einkaufspreis der Teile unter 800 €), jedoch kein Low-Budget, und trotzdem hohe Ansprüche an die Druckqualität und Zuverlässigkeit erfüllt. Ausgestattet mit einer schnellen 32 Bit Elektronik begannen wir Mitte August 2015 die Entwicklung auf Basis des Designs vom Ultimaker Original. Allerdings steckt hinter der Ultimakerfassade eine Charge neuer Features und Feinheiten, die einen komplett neuen Drucker ergeben.

<s>Mittlerweile ist</s> Früher war der Drucker auf ziemlich vielen Messen und Veranstaltungen ein treuer Wegbegleiter von unserem Mitglied Maik. Das FabLab Dresden hat außerdem jede Menge tolle Zusatzfeatures an den Drucker angebracht, sodass er nun mittlerweile sogar eine echte Wasserkühlung hat. <s>Aurica ist nicht bei uns im FabLab, sondern stets irgendwo auf Achse </s>

[![image.png](https://wiki.stadtfabrikanten.org/uploads/images/gallery/2025-08/scaled-1680-/E6sD0xzZWoJzApyQ-image.png)](https://wiki.stadtfabrikanten.org/uploads/images/gallery/2025-08/E6sD0xzZWoJzApyQ-image.png) [![image.png](https://wiki.stadtfabrikanten.org/uploads/images/gallery/2025-08/scaled-1680-/KzZ257B3J8eJ82hC-image.png)](https://wiki.stadtfabrikanten.org/uploads/images/gallery/2025-08/KzZ257B3J8eJ82hC-image.png)

# BrailleRAP XL - OSH Prägemaschine für Braille-Schrift

[![grafik.png](https://wiki.stadtfabrikanten.org/uploads/images/gallery/2025-07/scaled-1680-/O7dL5lDepWMSjAjX-grafik.png)](https://wiki.stadtfabrikanten.org/uploads/images/gallery/2025-07/O7dL5lDepWMSjAjX-grafik.png) [![grafik.png](https://wiki.stadtfabrikanten.org/uploads/images/gallery/2025-07/scaled-1680-/EfT6ePHc4tbbSKux-grafik.png)](https://wiki.stadtfabrikanten.org/uploads/images/gallery/2025-07/EfT6ePHc4tbbSKux-grafik.png)

## Über

Vom 18.-20.07.2025 haben wir zusammen mit Hugues Aubin vom Climate Change Lab im FabLab zusammen im Rahmen [eines Workshops](https://stadtfabrikanten.org/article/lab-accessible-cest-possible-17-2007) einen eigenen BrailleRAP XL Embosser gebaut. Geplant war der Bau zweier Geräte. Aus Zeitgründen haben wir uns jedoch letztlich auf den Bau einer Einzelmaschine fokussiert.

<p class="callout success">**Aktuell** (20.07.2025) haben wir noch genügend Hardware zum Bau eines zweiten Gerätes in XL-Größe (A3 Format) auf Lager.</p>

## Links

- Homepage des BrailleRAP: [https://www.braillerap.org](https://www.braillerap.org)
- [Inventar-Auflistung](https://things.fablabchemnitz.de/#/document/view/510b27e0-7f8c-478b-847b-548742fdea74/content)
- Gitea Projekt: [https://gitea.fablabchemnitz.de/FabLab\_Chemnitz/BrailleRAP-XL](https://gitea.fablabchemnitz.de/FabLab_Chemnitz/BrailleRAP-XL) (enthält konkrete Nutzteile und Stücklisten für unsere gebaute Version)
- Öffentlichkeitsarbeit: 
    - [https://stadtfabrikanten.org/article/inklusive-zukunft-selbst-machen-ein-resuemee](https://stadtfabrikanten.org/article/inklusive-zukunft-selbst-machen-ein-resuemee)
    - [https://stadtfabrikanten.org/article/lab-accessible-cest-possible-17-2007](https://stadtfabrikanten.org/article/lab-accessible-cest-possible-17-2007)
    - [https://stadtfabrikanten.org/article/tour-de-france-sued-route](https://stadtfabrikanten.org/article/tour-de-france-sued-route)
    - [https://stadtfabrikanten.org/article/im-norden-frankreichs-ein-reisebericht](https://stadtfabrikanten.org/article/im-norden-frankreichs-ein-reisebericht)
- [https://liblouis.io/downloads](https://liblouis.io/downloads)

## Stückliste

[https://braillerap-en.readthedocs.io/en/latest/bom.html](https://braillerap-en.readthedocs.io/en/latest/bom.html)

## Aufbauanleitung

[https://braillerap-en.readthedocs.io/en/latest/assemblage.html](https://braillerap-en.readthedocs.io/en/latest/assemblage.html)

## Firmware

Wir nutzen einen Controller vom Typ <span data-huuid="15095028655373320040">MKS Gen 1.4 mit einer Marlin Fimware. Die Parametrierungsdatei findet sich unter:</span>

## Software

- [AccessBrailleRAP](https://accessbraillerap.readthedocs.io/fr/latest/)
- [DesktopBrailleRAP](https://desktopbraillerap.readthedocs.io/fr/latest/)
- [OpenStreetTouch](https://openstreettouch.readthedocs.io/fr/main/)

Wir nutzen diese Programme auf einem extra für BrailleRAP bereitgestellten Laptop (Latitude 7490 von Dell). Dort sind alle Programme fertig eingerichtet und funktionsfähig. Das Betriebssystem ist Linux Mint. Danke an den [Computertruhe e.V. Stützpunkt Chemnitz](https://computertruhe.de/tag/chemnitz/) für die Beiretstellung inklusive Vorinstallation des Notebooks.

Der Standardbenutzer `oem` wurde der `dialout` Gruppe hinzugefügt, um USB-Geräte bedienen zu können:

```bash
sudo usermod -a -G dialout oem
```

## Danksagung

Das Projekt "Inklusive Zukunft selbst machen" des Stadtfabrikanten e.V. wurde unterstützt vom [Deutsch-Französischen Bürgerfonds](https://stadtfabrikanten.org/tag/dfbffcfa).

<figure class="wp-block-gallery has-nested-images columns-default is-cropped" id="bkmrk--2">[![grafik.png](https://wiki.stadtfabrikanten.org/uploads/images/gallery/2025-07/scaled-1680-/smnz6XgTverW1NTd-grafik.png)](https://wiki.stadtfabrikanten.org/uploads/images/gallery/2025-07/smnz6XgTverW1NTd-grafik.png)

</figure>

# CoBox - Building blocks for a co-operative cloud

<p class="callout info">Diese Dokumentation ist eine alte Legacy-Dokumentation und dient nur als Referenz! Wir nutzen CoBox selbst nicht.</p>

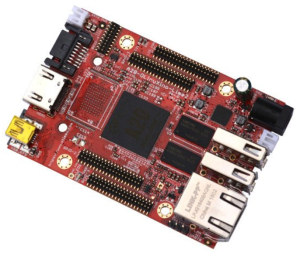
CoBox is a distributed, encrypted, offline-enabled data hosting cloud platform. It's software! But each software needs to run on a hardware platform. For your own mini CoBox cloud you can create one with ease using an Olimex A20 Olinuxino Lime 2 and some hard disk. This page describes how to do this plus some basic information for installing the software. For more details about CoBox in general please see the dedicated project page of the developers at [https://cobox.cloud.](https://cobox.cloud/)

Some more special links:

- [README](https://gitlab.com/coboxcoop/readme/)
- [Project Wki](https://gitlab.com/coboxcoop/readme/-/wikis/home)
- [contact: info@cobox.cloud](mailto:info@cobox.cloud)
- [docs.cobox.cloud (Step by Step guide)](https://docs.cobox.cloud)
- [Guestbook](https://gitlab.com/coboxcoop/guestbook)

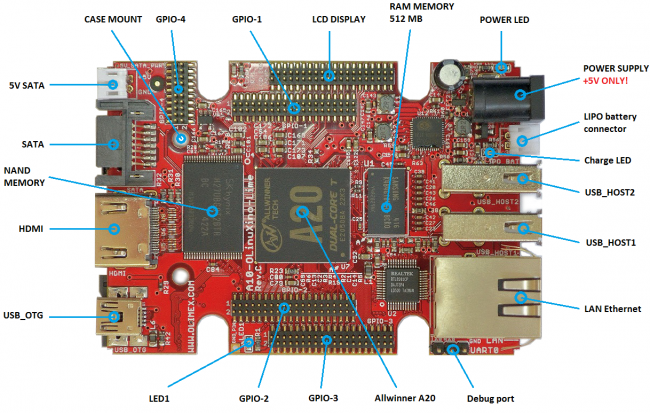
## The possible heart of your own CoBox solution: Olimex A20 Olinuxino Lime 2 in a self-made housing

Front view (image from [https://www.olimex.com)](https://www.olimex.com/wiki/A20-OLinuXino-LIME2)

[![grafik.png](https://wiki.stadtfabrikanten.org/uploads/images/gallery/2025-10/scaled-1680-/rtBGRWj7bg1QFipz-grafik.png)](https://wiki.stadtfabrikanten.org/uploads/images/gallery/2025-10/rtBGRWj7bg1QFipz-grafik.png)
Back view (image from [https://www.olimex.com)](https://www.olimex.com/wiki/A20-OLinuXino-LIME2)

[![grafik.png](https://wiki.stadtfabrikanten.org/uploads/images/gallery/2025-10/scaled-1680-/GxaYrBnbYsuMkArN-grafik.png)](https://wiki.stadtfabrikanten.org/uploads/images/gallery/2025-10/GxaYrBnbYsuMkArN-grafik.png)
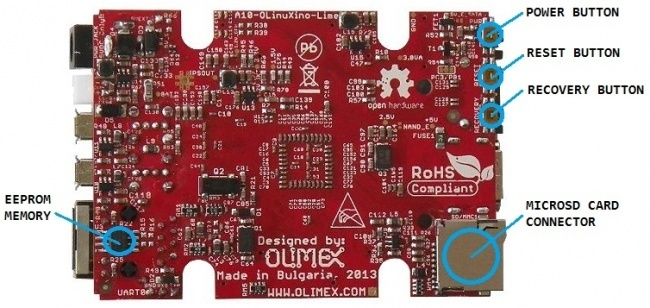
Product manual: [A20-OLinuXino-LIME2-UM.pdf](https://wiki.stadtfabrikanten.org/attachments/105)

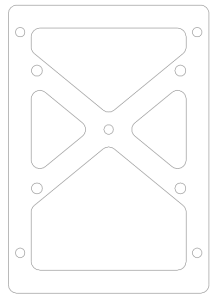
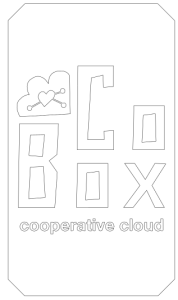
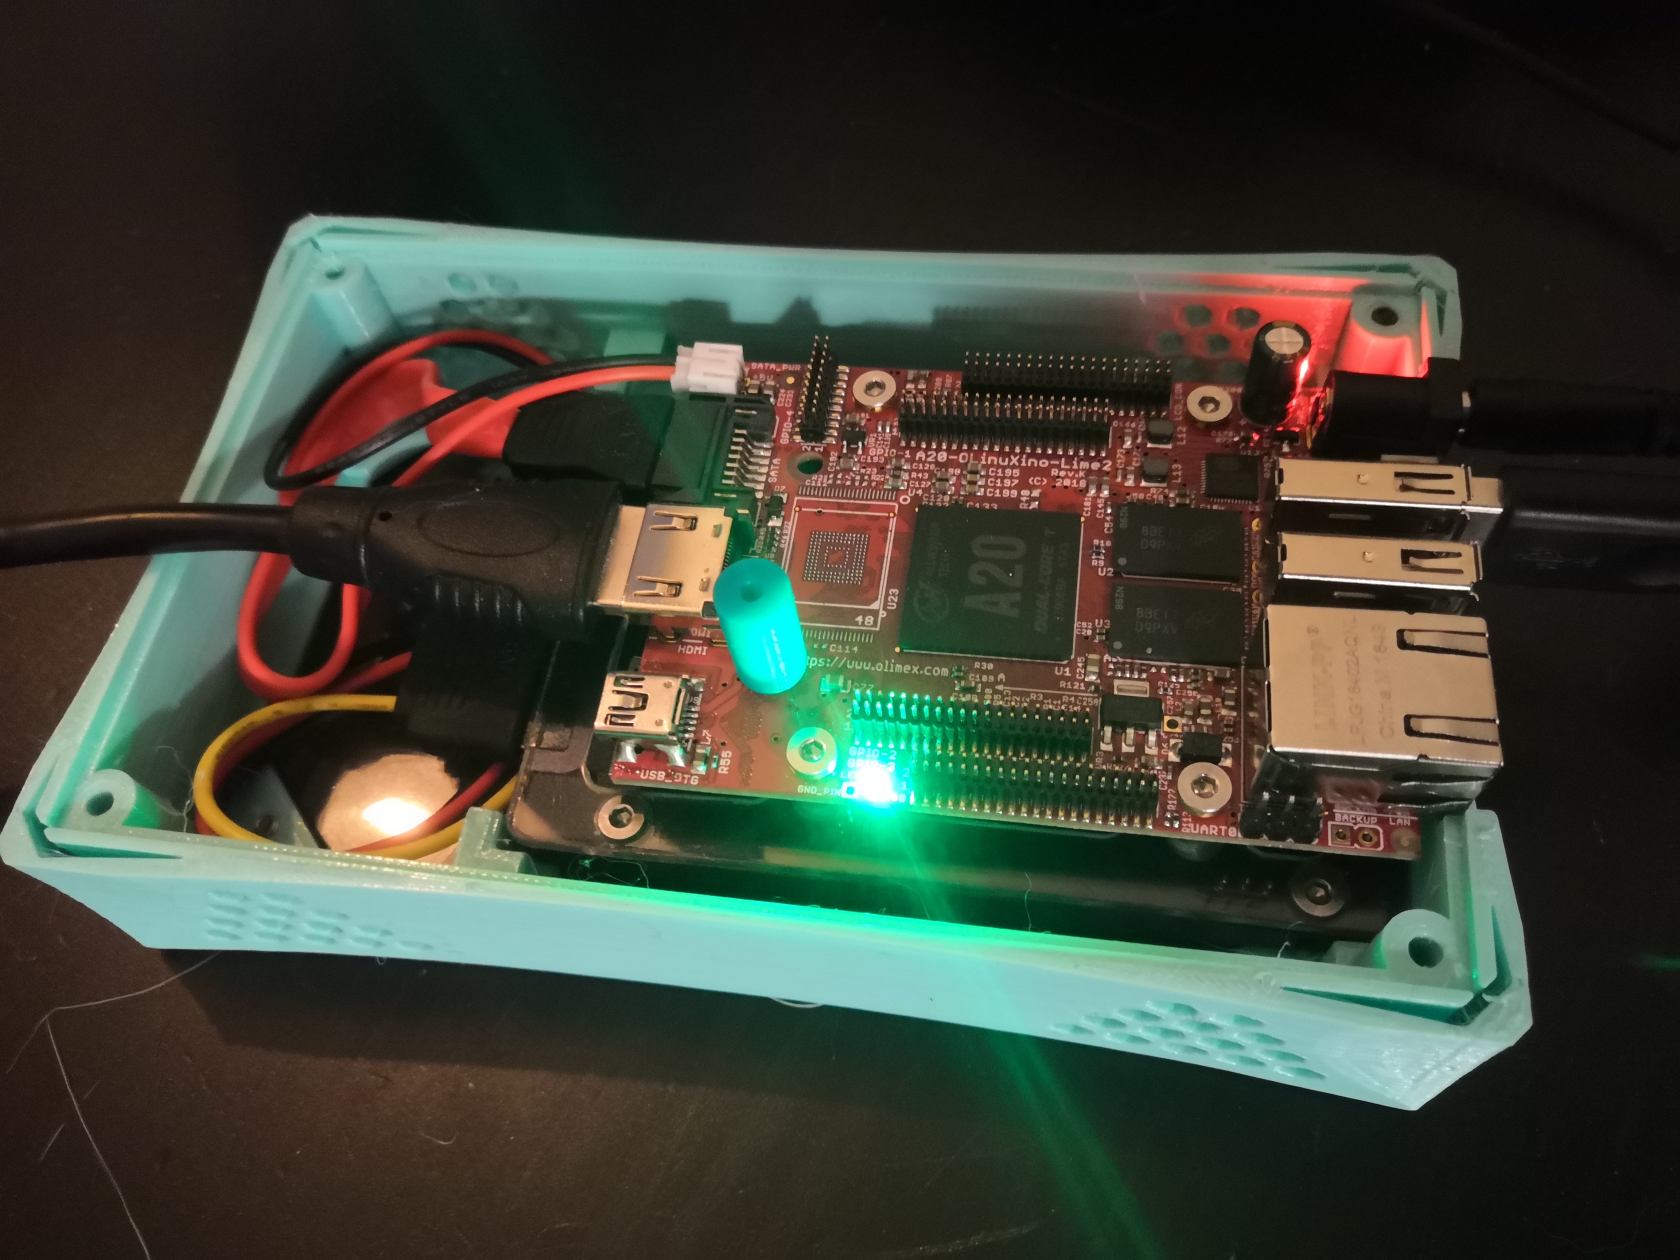
For CoBox we made a small housing which can be produced using a laser cutter and a 3d printer.

[![grafik.png](https://wiki.stadtfabrikanten.org/uploads/images/gallery/2025-10/scaled-1680-/cIXMnY2mCehWTEHD-grafik.png)](https://wiki.stadtfabrikanten.org/uploads/images/gallery/2025-10/cIXMnY2mCehWTEHD-grafik.png) [![grafik.png](https://wiki.stadtfabrikanten.org/uploads/images/gallery/2025-10/scaled-1680-/95kiZPeWEGWaRonn-grafik.png)](https://wiki.stadtfabrikanten.org/uploads/images/gallery/2025-10/95kiZPeWEGWaRonn-grafik.png)
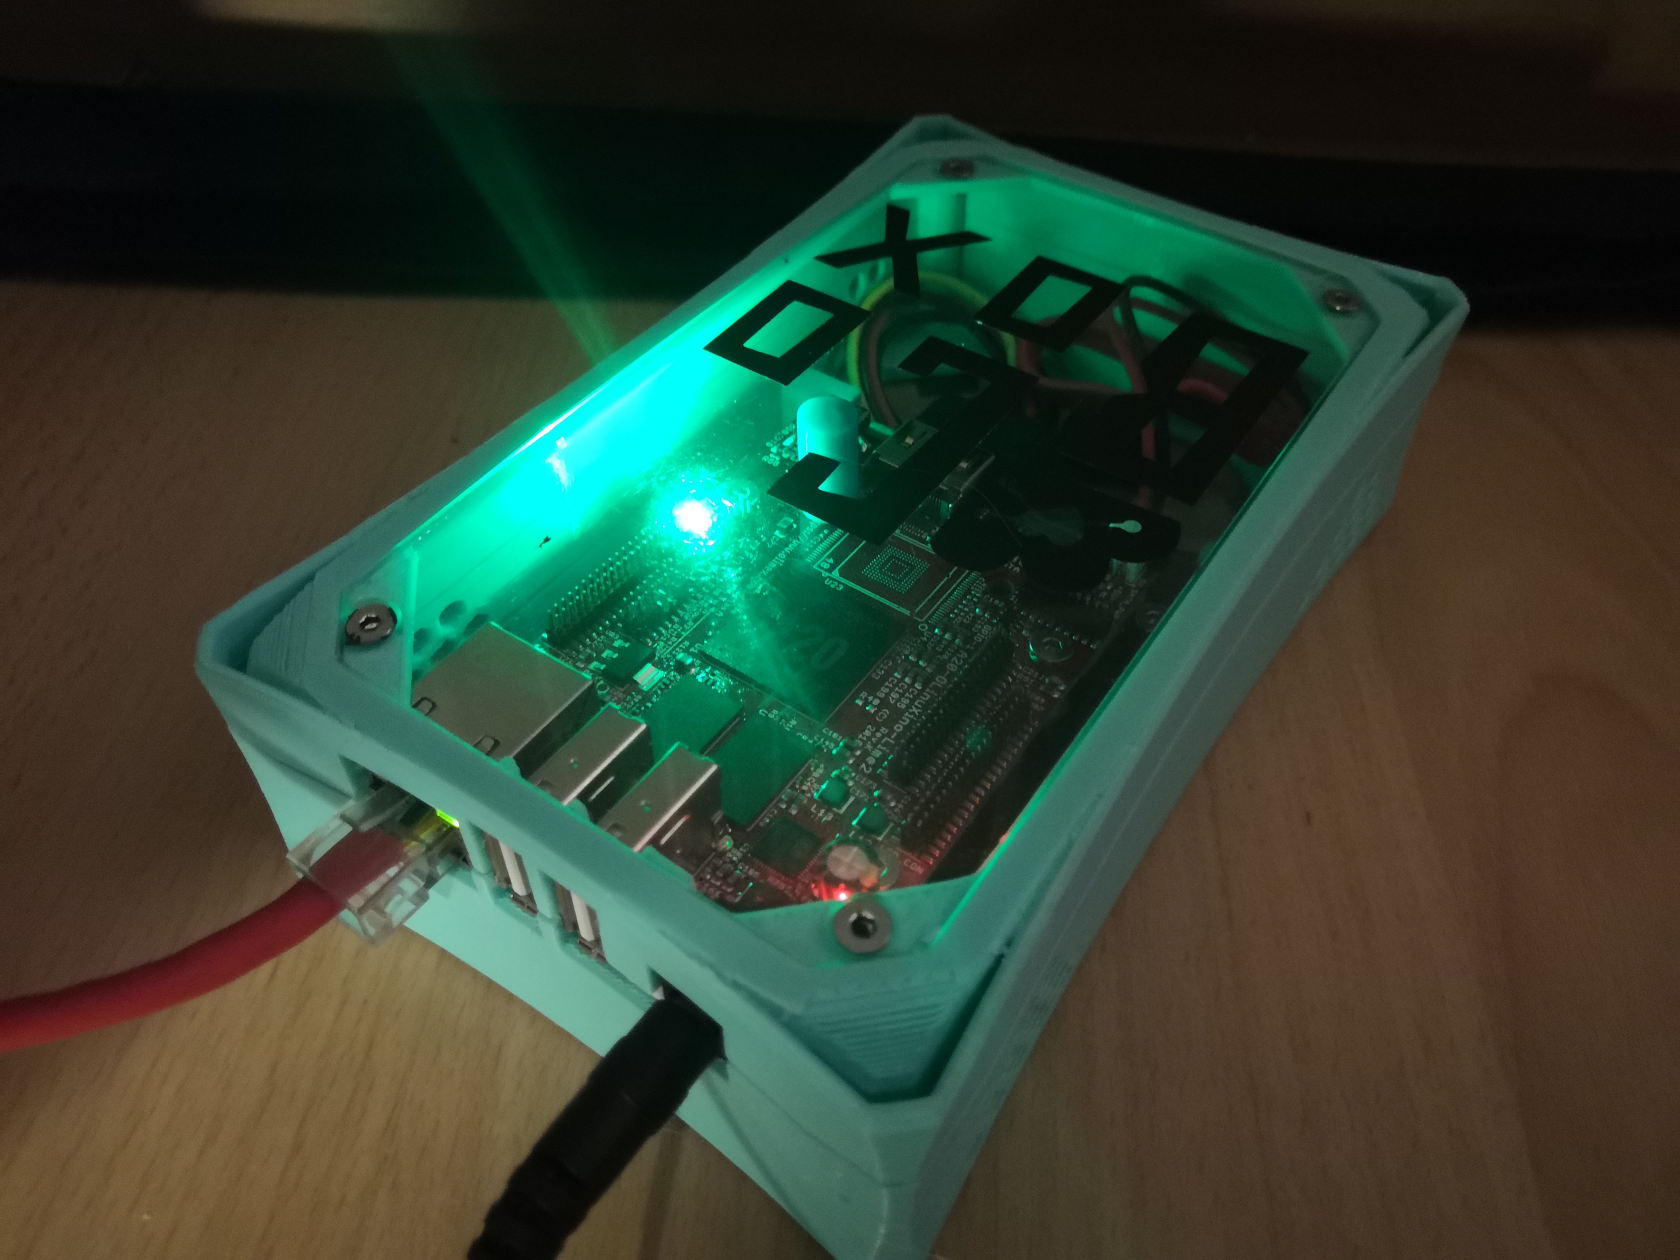
Features:

- well-shaped PETG housing, fitting for A20-OLinuXino-LIME2-UM
- total weight ~ 380g (case + hardware components inside)
- compatible to 7mm and 9mm 2.5" hard disks (just replace the threaded standoffs)

## CoBox cloud server with Olimex - Overview and bill of material (BOM)

<table id="bkmrk-part-required-amount" role="grid" style="width: 99.9734%; height: 3818.95px;"><thead><tr style="height: 38.1167px;"><td style="width: 19.9912%; height: 38.1167px;"></td><td style="width: 19.9912%; height: 38.1167px;">**Part**</td><td style="width: 19.9912%; height: 38.1167px;">**Required amount**</td><td style="width: 19.9912%; height: 38.1167px;">**Price (net) per piece**</td><td style="width: 19.9912%; height: 38.1167px;">**Notes**</td></tr></thead><tbody><tr role="row" style="height: 262.717px;"><td style="width: 19.9912%; height: 262.717px;">[![grafik.png](https://wiki.stadtfabrikanten.org/uploads/images/gallery/2025-10/scaled-1680-/AD41y3pAmEoJSONm-grafik.png)](https://wiki.stadtfabrikanten.org/uploads/images/gallery/2025-10/AD41y3pAmEoJSONm-grafik.png)

</td><td style="width: 19.9912%; height: 262.717px;">[A20-OLinuXino-LIME2-UM](https://www.olimex.com/Products/OLinuXino/A20/A20-OLinuXino-LIME2/open-source-hardware)</td><td style="width: 19.9912%; height: 262.717px;">1 x</td><td style="width: 19.9912%; height: 262.717px;">~ 40 €</td><td style="width: 19.9912%; height: 262.717px;">  
</td></tr><tr role="row" style="height: 200.55px;"><td style="width: 19.9912%; height: 200.55px;">[![grafik.png](https://wiki.stadtfabrikanten.org/uploads/images/gallery/2025-10/scaled-1680-/uJDgvwwiptJJMRAT-grafik.png)](https://wiki.stadtfabrikanten.org/uploads/images/gallery/2025-10/uJDgvwwiptJJMRAT-grafik.png)

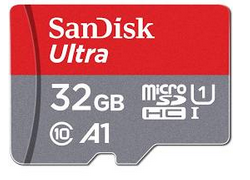
</td><td style="width: 19.9912%; height: 200.55px;">Micro SD Card</td><td style="width: 19.9912%; height: 200.55px;">1 x

</td><td style="width: 19.9912%; height: 200.55px;">~ 10 €</td><td style="width: 19.9912%; height: 200.55px;">  
</td></tr><tr role="row" style="height: 244.75px;"><td style="width: 19.9912%; height: 244.75px;">[![grafik.png](https://wiki.stadtfabrikanten.org/uploads/images/gallery/2025-10/scaled-1680-/FHBAMWlVlyuF6uoG-grafik.png)](https://wiki.stadtfabrikanten.org/uploads/images/gallery/2025-10/FHBAMWlVlyuF6uoG-grafik.png)

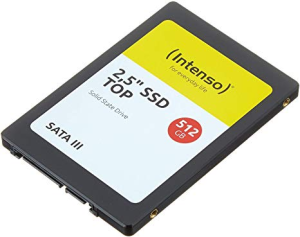
</td><td style="width: 19.9912%; height: 244.75px;">S-ATA Hard Disk

</td><td style="width: 19.9912%; height: 244.75px;">1 x</td><td style="width: 19.9912%; height: 244.75px;">~ 60 €</td><td style="width: 19.9912%; height: 244.75px;">  
</td></tr><tr role="row" style="height: 272.183px;"><td style="width: 19.9912%; height: 272.183px;">[![grafik.png](https://wiki.stadtfabrikanten.org/uploads/images/gallery/2025-10/scaled-1680-/T68mO1qgQ3QaBoPJ-grafik.png)](https://wiki.stadtfabrikanten.org/uploads/images/gallery/2025-10/T68mO1qgQ3QaBoPJ-grafik.png)

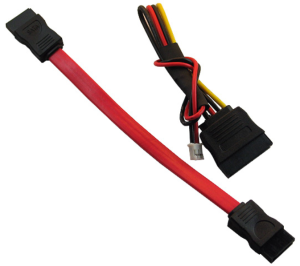
</td><td style="width: 19.9912%; height: 272.183px;">[S-ATA cable set](https://www.olimex.com/Products/Components/Cables/SATA-CABLE-SET/)</td><td style="width: 19.9912%; height: 272.183px;">1 x</td><td style="width: 19.9912%; height: 272.183px;">~ 5 €</td><td style="width: 19.9912%; height: 272.183px;">  
</td></tr><tr role="row" style="height: 222.983px;"><td style="width: 19.9912%; height: 222.983px;">[![grafik.png](https://wiki.stadtfabrikanten.org/uploads/images/gallery/2025-10/scaled-1680-/Njwt59489j2exF12-grafik.png)](https://wiki.stadtfabrikanten.org/uploads/images/gallery/2025-10/Njwt59489j2exF12-grafik.png)

</td><td style="width: 19.9912%; height: 222.983px;">Spacer Olimex to top plate - 8x16 mm - M3 thread</td><td style="width: 19.9912%; height: 222.983px;">1 x</td><td style="width: 19.9912%; height: 222.983px;">  
</td><td style="width: 19.9912%; height: 222.983px;">- needs M3 thread at one side → secured with M3 x 6 screw on Olimex

</td></tr><tr role="row" style="height: 320.55px;"><td style="width: 19.9912%; height: 320.55px;">[![grafik.png](https://wiki.stadtfabrikanten.org/uploads/images/gallery/2025-10/scaled-1680-/e22VDeIRHWuUUFmx-grafik.png)](https://wiki.stadtfabrikanten.org/uploads/images/gallery/2025-10/e22VDeIRHWuUUFmx-grafik.png)

</td><td style="width: 19.9912%; height: 320.55px;">3D printed housing - top</td><td style="width: 19.9912%; height: 320.55px;">1 x</td><td style="width: 19.9912%; height: 320.55px;">  
</td><td style="width: 19.9912%; height: 320.55px;">  
</td></tr><tr role="row" style="height: 320.55px;"><td style="width: 19.9912%; height: 320.55px;">[![grafik.png](https://wiki.stadtfabrikanten.org/uploads/images/gallery/2025-10/scaled-1680-/lrxgaFosKWRPXvng-grafik.png)](https://wiki.stadtfabrikanten.org/uploads/images/gallery/2025-10/lrxgaFosKWRPXvng-grafik.png)

</td><td style="width: 19.9912%; height: 320.55px;">3D printed housing - bottom</td><td style="width: 19.9912%; height: 320.55px;">1 x</td><td style="width: 19.9912%; height: 320.55px;">  
</td><td style="width: 19.9912%; height: 320.55px;">  
</td></tr><tr role="row" style="height: 236.233px;"><td style="width: 19.9912%; height: 236.233px;">[![grafik.png](https://wiki.stadtfabrikanten.org/uploads/images/gallery/2025-10/scaled-1680-/nIAQbEa5trGNHb7r-grafik.png)](https://wiki.stadtfabrikanten.org/uploads/images/gallery/2025-10/nIAQbEa5trGNHb7r-grafik.png)

</td><td style="width: 19.9912%; height: 236.233px;">3D printed base mount</td><td style="width: 19.9912%; height: 236.233px;">1 x   
(variant A)</td><td style="width: 19.9912%; height: 236.233px;">  
</td><td style="width: 19.9912%; height: 236.233px;">joins Olimex with HDD to form one unit</td></tr><tr role="row" style="height: 320.55px;"><td style="width: 19.9912%; height: 320.55px;">[![grafik.png](https://wiki.stadtfabrikanten.org/uploads/images/gallery/2025-10/scaled-1680-/s8vBXDmCCTNZk61O-grafik.png)](https://wiki.stadtfabrikanten.org/uploads/images/gallery/2025-10/s8vBXDmCCTNZk61O-grafik.png)

</td><td style="width: 19.9912%; height: 320.55px;">lasercut base mount</td><td style="width: 19.9912%; height: 320.55px;">1 x   
(variant B)</td><td style="width: 19.9912%; height: 320.55px;">  
</td><td style="width: 19.9912%; height: 320.55px;">joins Olimex with HDD to form one unit</td></tr><tr role="row" style="height: 320.55px;"><td style="width: 19.9912%; height: 320.55px;">[![grafik.png](https://wiki.stadtfabrikanten.org/uploads/images/gallery/2025-10/scaled-1680-/9bEngOVOly2rvlZJ-grafik.png)](https://wiki.stadtfabrikanten.org/uploads/images/gallery/2025-10/9bEngOVOly2rvlZJ-grafik.png)

</td><td style="width: 19.9912%; height: 320.55px;">3-color CoBox sticker 140x80 mm

(Oracal HPC 751 - black)

</td><td style="width: 19.9912%; height: 320.55px;">1 x</td><td style="width: 19.9912%; height: 320.55px;">  
</td><td style="width: 19.9912%; height: 320.55px;">  
</td></tr><tr role="row" style="height: 310.133px;"><td style="width: 19.9912%; height: 310.133px;">[![grafik.png](https://wiki.stadtfabrikanten.org/uploads/images/gallery/2025-10/scaled-1680-/PaDdcT1PAixJix1Y-grafik.png)](https://wiki.stadtfabrikanten.org/uploads/images/gallery/2025-10/PaDdcT1PAixJix1Y-grafik.png)

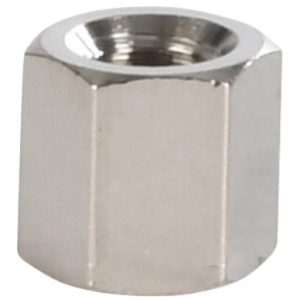
</td><td style="width: 19.9912%; height: 310.133px;">[threaded standoff - M3 x 5 mm](https://www.reichelt.de/distanzhuelsen-metall-6-kant-m3-5mm-vt-di-5mm-p231480.html?&trstct=pos_0&nbc=1)</td><td style="width: 19.9912%; height: 310.133px;">4 x</td><td style="width: 19.9912%; height: 310.133px;">0,08 €</td><td style="width: 19.9912%; height: 310.133px;">you may use longer distance bolts if required (8 mm if thin SSD HDD used which requires to use spacer) → 5 mm bolts for regular HDD or 8 mm bolts for SSD</td></tr><tr role="row" style="height: 190.817px;"><td style="width: 19.9912%; height: 190.817px;">[![grafik.png](https://wiki.stadtfabrikanten.org/uploads/images/gallery/2025-10/scaled-1680-/GfGwFwfTSzRpqwjQ-grafik.png)](https://wiki.stadtfabrikanten.org/uploads/images/gallery/2025-10/GfGwFwfTSzRpqwjQ-grafik.png)

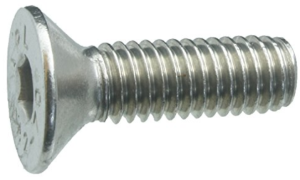
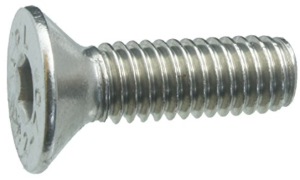
</td><td style="width: 19.9912%; height: 190.817px;">[Hexagon socket countersunk screw ISO 10642 M3 x 4 mm - A2](https://www.ebay.de/itm/Senkkopfschrauben-DIN-7991-M3-M4-M5-M6-M8-EDELSTAHL-A2-Innensechskant/401011184909?hash=item5d5e21150d:m:mmSodSsalhW9van1mJlos7A)</td><td style="width: 19.9912%; height: 190.817px;">8 x</td><td style="width: 19.9912%; height: 190.817px;">0,06 €</td><td style="width: 19.9912%; height: 190.817px;">required for top and bottom plate → you may not use longer screws because you will hit the HDD surface otherwise

- alternatives → [screwsandmore.de](https://www.screwsandmore.de/de/sortiment/schrauben-und-bolzen/innensechskant-schrauben/senkkopf-din-7991/din-7991-edelstahl-a2/din-7991-a2-m3-schwarz/din-7991-a2-m3x5-sb/7357/100-stueck-senkkopfschrauben-din-7991-a2-m3x5-schwarz)

</td></tr><tr role="row" style="height: 190.817px;"><td style="width: 19.9912%; height: 190.817px;">[![grafik.png](https://wiki.stadtfabrikanten.org/uploads/images/gallery/2025-10/scaled-1680-/1HuqRT444KkdH7Gn-grafik.png)](https://wiki.stadtfabrikanten.org/uploads/images/gallery/2025-10/1HuqRT444KkdH7Gn-grafik.png)

</td><td style="width: 19.9912%; height: 190.817px;">[Hexagon socket countersunk screw ISO 10642 M3 x 6 mm - A2](https://www.ebay.de/itm/Senkkopfschrauben-DIN-7991-M3-M4-M5-M6-M8-EDELSTAHL-A2-Innensechskant/401011184909?hash=item5d5e21150d:m:mmSodSsalhW9van1mJlos7A)</td><td style="width: 19.9912%; height: 190.817px;">5 x</td><td style="width: 19.9912%; height: 190.817px;">0,06 €</td><td style="width: 19.9912%; height: 190.817px;">you may nor use longer screws if required because there could happen collisions

- alternatives → [screwsandmore.de](https://www.screwsandmore.de/de/sortiment/schrauben-und-bolzen/innensechskant-schrauben/senkkopf-din-7991/din-7991-edelstahl-a2/din-7991-a2-m3-schwarz/din-7991-a2-m3x5-sb/7357/100-stueck-senkkopfschrauben-din-7991-a2-m3x5-schwarz)

</td></tr><tr role="row" style="height: 195.55px;"><td style="width: 19.9912%; height: 195.55px;">[![grafik.png](https://wiki.stadtfabrikanten.org/uploads/images/gallery/2025-10/scaled-1680-/iIs9NlBgZS1TJbQJ-grafik.png)](https://wiki.stadtfabrikanten.org/uploads/images/gallery/2025-10/iIs9NlBgZS1TJbQJ-grafik.png)

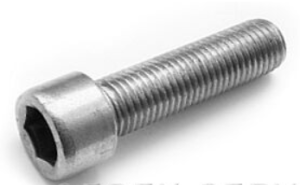
</td><td style="width: 19.9912%; height: 195.55px;">[Hexagon socket screw ISO 4762 M3 x 16 mm - A2](https://www.ebay.de/itm/Zylinderschrauben-DIN-912-M1-6-M8-Innensechskant-EDELSTAHL-A2-VA-V2A-ISO-4762/121468645907?hash=item1c48187213:m:m8uLnX3beL2QXYG7I_ms7DQ)</td><td style="width: 19.9912%; height: 195.55px;">4 x</td><td style="width: 19.9912%; height: 195.55px;">0,06 €</td><td style="width: 19.9912%; height: 195.55px;">  
</td></tr><tr role="row" style="height: 171.9px;"><td style="width: 19.9912%; height: 171.9px;">[![grafik.png](https://wiki.stadtfabrikanten.org/uploads/images/gallery/2025-10/scaled-1680-/xl9tBMt1bbHdapHQ-grafik.png)](https://wiki.stadtfabrikanten.org/uploads/images/gallery/2025-10/xl9tBMt1bbHdapHQ-grafik.png)

</td><td style="width: 19.9912%; height: 171.9px;">[rubber feet Ø8 mm](https://www.reichelt.de/stossfaenger-selbstklebend-6-4-mm-klar-rnd-455-00487-p211667.html?&trstct=pol_2&nbc=1)</td><td style="width: 19.9912%; height: 171.9px;">4 x</td><td style="width: 19.9912%; height: 171.9px;">0,02 €</td><td style="width: 19.9912%; height: 171.9px;">max. Ø8,5 mm round or 9,5 x 9,5 mm square</td></tr></tbody></table>

## 3D model previews and downloads

Downloadable files for 3d printing / laser cutting can be found at [https://manyfold.stadtfabrikanten.org/models/kn5508z8npfn](https://gitea.fablabchemnitz.de/vmario/cobox-housing)

## Possible feature enhancements

- self-printed bolt spacer could be replaced by a distance bolt M3x16 mm

## Production steps

1. print parts (base, top, cylinder)
2. lasercut parts (with protection foil) → top and back plate, base plate
3. make thread into cylinder
4. smooth edges at printed parts (using cutter knife or sanding paper)
5. remove support material on printed parts
6. create coutersunk shapes in lasercut parts
7. remove protections foils
8. screw together printed top base with lasercut plate sing 4x M3x4 screws
9. create sticker with Plotter
10. put sticker on top plate (must be screwed together before!) → sticker will hide screw heads
11. add missing parts: screws, bolts, rubber feet

# CoBox Cloud Software

After assembling the hardware we can go ahead to begin with software installation

[![grafik.png](https://wiki.stadtfabrikanten.org/uploads/images/gallery/2025-10/scaled-1680-/jWdu8phJKBML0W9x-grafik.png)](https://wiki.stadtfabrikanten.org/uploads/images/gallery/2025-10/jWdu8phJKBML0W9x-grafik.png)

[ CoBoxLedgerZine.pdf](https://wiki.stadtfabrikanten.org/attachments/106)

## CoBox Setup on Linux (Armbian Focal)

### Download Image of Armbian Focal

- [https://www.armbian.com/olimex-lime-2](https://www.armbian.com/olimex-lime-2/)
- [https://uk.mirrors.fossho.st/armbian/dl/lime2/archive](https://uk.mirrors.fossho.st/armbian/dl/lime2/archive)

```bash
wget https://uk.mirrors.fossho.st/armbian/dl/lime2/archive/Armbian_20.08.2_Lime2_focal_current_5.8.6.img.xz
unxz Armbian_20.08.2_Lime2_focal_current_5.8.6.img.xz
```

### Flash image

Use balena etcher to flash on SD Card

### Prepare to run

Attach LAN cable + Monitor + Keyboard to CoBox. Plug in power cable and let boot up. Then configure default username + password

<p class="callout info">sshd is already enabled. After configuring user and password you are able to connect by ssh directly</p>

[![grafik.png](https://wiki.stadtfabrikanten.org/uploads/images/gallery/2025-10/scaled-1680-/pXKOm3SUiNJxIBQe-grafik.png)](https://wiki.stadtfabrikanten.org/uploads/images/gallery/2025-10/pXKOm3SUiNJxIBQe-grafik.png)

### Configure the system

```bash
sudo apt update
sudo apt upgrade
sudo apt install libtool
```

### Install the Seeder Service

All communication with the seeder happens via the [hyperswarm](https://github.com/hyperswarm/dht) [DHT](https://en.wikipedia.org/wiki/Distributed_hash_table), which has some NAT hole-punching stuff built in.

Instructions for installing the seeder are here: [https://docs.cobox.cloud/seeder\_install.html](https://docs.cobox.cloud/seeder_install.html). The install script only works for x64 architecture and wont run on the lime2. So we need to compile for ourselves. See [https://gitlab.com/coboxcoop/seeder](https://gitlab.com/coboxcoop/seeder)

```bash
We can install npm using Node Version Manager (nvm) or by regular repository installer (apt install npm)
curl -o- https://raw.githubusercontent.com/nvm-sh/nvm/v0.36.0/install.sh | bash #we use nvm
 
#log off and on again to make available nvm command to recent user
nvm ls-remote #list nodejs version
 
nvm install v12.16.3 #we install version 12.16.3 which is recommended to use for recent Cobox version. (see https://www.npmjs.com/package/@coboxcoop/seeder). It will be used (enabled) automatically
nvm use v12.16.3
 
#install some requirements for the seeder (globally using -g switch)
npm install -g pm2
npm install -g sodium-native
 
npm install -g @coboxcoop/seeder #this takes a while for the crypto library 'libsodium' to compile. Do not use newer npm version like 14.13.0. cobox will compile but not run because it's there's a sodium-native imcompability. We run 'nvm uninstall 14.13.0' to throw away that version. If you switched the npm version without reboot you might get strange non-working installation results
```

### Run the seeder server application

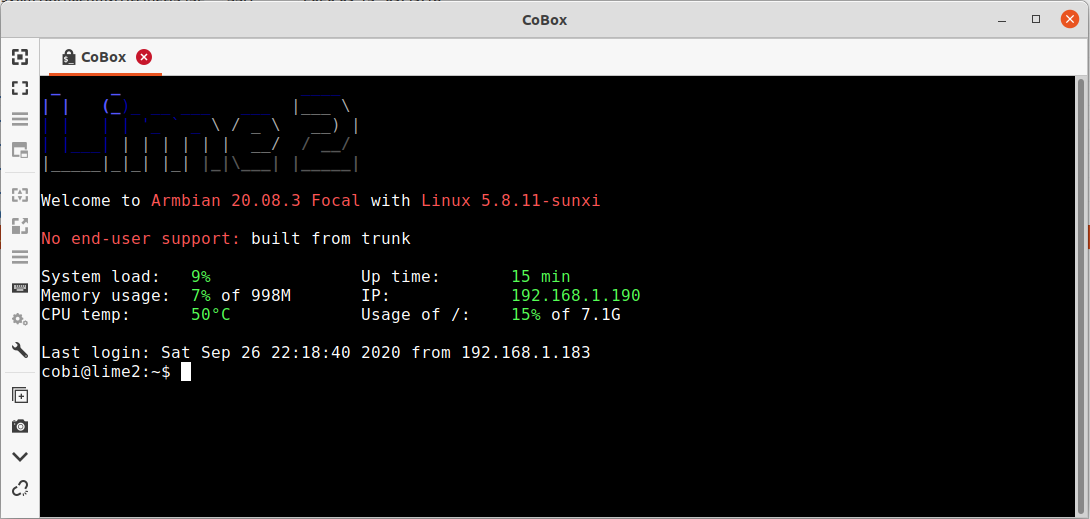
This is a manual execution for configuration. First bootup will ask you for a seeder name. Just enter your desired name.

```bash
cobox-seeder start #if the cobox-seeder command is not available the installation might have failed or you need to re-renter your current user-session
 
#if "usr/bin/env: node: No such file or directory"  occures then call "nvm use v12.16.3" again
```

[![grafik.png](https://wiki.stadtfabrikanten.org/uploads/images/gallery/2025-10/scaled-1680-/6iD9su33RrSVUH9w-grafik.png)](https://wiki.stadtfabrikanten.org/uploads/images/gallery/2025-10/6iD9su33RrSVUH9w-grafik.png)
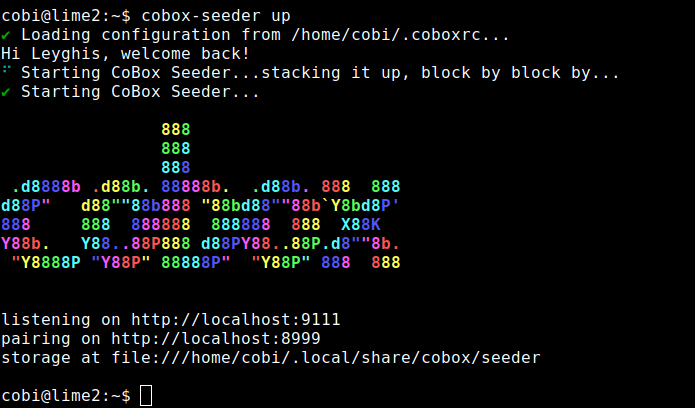
The config file is stored at `/home/cobi/.coboxrc`

### Validate service is running

```bash
curl http://localhost:9111 #check if it is really running #after startup it might take 5-10 seconds until it appears!
 
#check the logs
cat /home/cobi/.local/share/cobox/seeder/logs/seeder/error.log
```

### Export Seeder Keys

```bash
cobox-seeder keys export
```

### Remaining ToDos

<div class="rwui_item_content" id="bkmrk-integrate-hard-drive">- integrate hard drive as main storage and make use of it
- reduce power sucking of Olimex by disabling unrequired features
- general hardening
- convenience stuff

</div>## CoBox Setup on Windows Subsystem for Linux

This is not tested yet. Happy to get some info about how that will behave.

```bash
#run an admin shell
curl -sL https://deb.nodesource.com/setup_11.x | sudo -E bash -
#to be documented
```

## Install a CoBox client

this is done on your laptop or desktop computer → [https://docs.cobox.cloud/app\_install.html](https://docs.cobox.cloud/app_install.html)

### CoBox Desktop Client

Test bench on a Linux Ubuntu 20 LTS computer

[https://docs.cobox.cloud/app\_install.html](https://docs.cobox.cloud/app_install.html)

```bash
curl -o- https://cobox.cloud/releases/cobox-v1.0.0-alpha.1/download.sh | bash
CoBox 1.0.0-alpha.1 has been downloaded successfully. Execute it with this command:
 
/home/tomate/.config/cobox/releases/cobox-v1.0.0-alpha.1-linux-x64/cobox
 
Add it to your PATH with this command (add this to .bash_profile / .bashrc / .zshrc):
 
export PATH="$PATH:/home/tomate/.config/cobox/releases/cobox-v1.0.0-alpha.1-linux-x64"
tomate@tomator:~$ vim .bashrc
tomate@tomator:~$ source .bashrc
```

```bash
tomate@tomator:~$ cobox start
✖ No configuration found. Lets make one!
✔ Where will cobox be accessible? … /home/tomate/cobox
✔ Saving configuration to /home/tomate/.coboxrc
stacking it up, block by block by...
 
888
888
888
.d8888b .d88b. 88888b. .d88b. 888 888
d88P" d88""88b888 "88bd88""88b`Y8bd8P'
888 888 888888 888888 888 X88K
Y88b. Y88..88P888 d88PY88..88P.d8""8b.
"Y8888P "Y88P" 88888P" "Y88P" 888 888
 
 
listening on http://localhost:9112
pairing on http://localhost:8999
mounting at file:///home/tomate/cobox
storage at file:///home/tomate/.config/cobox
```

[![grafik.png](https://wiki.stadtfabrikanten.org/uploads/images/gallery/2025-10/scaled-1680-/UcotpZEMmqR3IsJl-grafik.png)](https://wiki.stadtfabrikanten.org/uploads/images/gallery/2025-10/UcotpZEMmqR3IsJl-grafik.png) [![grafik.png](https://wiki.stadtfabrikanten.org/uploads/images/gallery/2025-10/scaled-1680-/5m68m7MolQM2iLiK-grafik.png)](https://wiki.stadtfabrikanten.org/uploads/images/gallery/2025-10/5m68m7MolQM2iLiK-grafik.png) [![grafik.png](https://wiki.stadtfabrikanten.org/uploads/images/gallery/2025-10/scaled-1680-/0OatoRtifKLZQDGg-grafik.png)](https://wiki.stadtfabrikanten.org/uploads/images/gallery/2025-10/0OatoRtifKLZQDGg-grafik.png) [![grafik.png](https://wiki.stadtfabrikanten.org/uploads/images/gallery/2025-10/scaled-1680-/J82MInHrA8Lebavn-grafik.png)](https://wiki.stadtfabrikanten.org/uploads/images/gallery/2025-10/J82MInHrA8Lebavn-grafik.png)

# Eingangsampel - Hereinspaziert!

[![grafik.png](https://wiki.stadtfabrikanten.org/uploads/images/gallery/2025-02/scaled-1680-/khr20yz1SrbEQiLu-grafik.png)](https://wiki.stadtfabrikanten.org/uploads/images/gallery/2025-02/khr20yz1SrbEQiLu-grafik.png)

Entstanden im Jahr 2017 ist dieses kleine Ampelreaktivierungsprojekt. Eine ausgediente Fußgängerampel schmückte den Eingang zur Philippstraße und konnte von innen manuell an- und ausgeschalten werden. Für besondere Verwirrungseffekte können wir beide Phasen gleichzeitig zuschalten.

Aktuell hängt sie noch nicht wieder am neuen Standort. Das soll sich jedoch ändern.

Es gibt noch Ideen dazu, wie

- aktuellen Ampelstatus auslesen und mit Monitoring zu verknüpfen
- Remote-Zuschaltung per GPIO über Raspberry Pi, ESP32 o.ä, integrieren

# Gehäuse für Prusa 3D Drucker

von: Knut Jähnig, 14.12.2019

- Vorlagen und Projektidee von:  
    [<u>https://blog.prusaprinters.org/cheap-simple-3d-printer-enclosure/</u>](https://blog.prusaprinters.org/cheap-simple-3d-printer-enclosure/)  
    [<u>https://www.thingiverse.com/thing:2864118</u>](https://www.thingiverse.com/thing:2864118)

Veröffentlicht unter:

- [<u>https://www.thingiverse.com/thing:4084686</u>](https://www.thingiverse.com/thing:4084686)
- [<u>https://www.thingiverse.com/thing:4084737</u>](https://www.thingiverse.com/thing:4084737)
- [<u>https://www.thingiverse.com/thing:4098719</u>](https://www.thingiverse.com/thing:4098719)

## Einleitung

Mein 3D Drucker musste in den Keller umziehen und soll dabei jedoch nicht Staub ansetzen. Daher habe ich mich entschieden ein Gehäuse zu bauen. Mit der Anleitung des Prusa–Blogs und ist das recht einfach und eine verhältnismäßig günstige Methode.

### Kostenübersicht

<table id="bkmrk-anzahl-name-einzelpr" role="grid"><thead aria-label="Verwenden Sie die Schaltflächen der Spaltenüberschriften zum Sortieren."><tr role="row"><td>**Anzahl**</td><td>**Name**</td><td>**Einzelpreise**</td><td>**Summe**</td></tr></thead><colgroup><col></col><col></col><col></col><col></col></colgroup><tbody><tr role="row"><td>3

</td><td>Ikea Lack Tische

</td><td>6,00 €

</td><td>18,00 €

</td></tr><tr role="row"><td>6

</td><td>Plexiglasscheiben (Baumarkt Zuschnitt 440mm x 440mm x 3mm)- Preis: 37,95€ / m²

</td><td>7,35 €

</td><td>44,10 €

</td></tr><tr role="row"><td>4

</td><td>Plexiglasscheiben (Baumarkt Zuschnitt 220mm x 440mm x 3mm)

</td><td>3.67 €

</td><td>14,68 €

</td></tr><tr role="row"><td>8

</td><td>Senkkopfschrauben 6 x 20..**40**

</td><td>als Pack günst.

</td><td>4,00 €

</td></tr><tr role="row"><td>8

</td><td>Senkkopfschrauben 6 x 50..**60**

</td><td>als Pack günst.

</td><td>9,00 €

</td></tr><tr role="row"><td>16

</td><td>Senkkopfschrauben 4x20

</td><td>vorhanden

</td><td>ca. 3,00 €

</td></tr><tr role="row"><td>ca. 30

</td><td>Senkkopfschrauben 3x16 für LED Streifen- / Kabelklammern

</td><td>vorhanden

</td><td>ca. 5,00 €

</td></tr><tr role="row"><td>1

</td><td>LED-Streifen

</td><td>vorhanden

</td><td>ca. 15,00 €

</td></tr><tr role="row"><td>2

</td><td>PLA-weiß ca. 1kg (Verbatin)

</td><td>29,99 €

</td><td>60,00 €

</td></tr><tr role="row"><td>4

</td><td>Magnete zylindrisch D5 x 5mm, z.B. S-05-05-N

</td><td>20 x 0,31 €

</td><td>6,20 €

</td></tr><tr role="row"><td>4

</td><td>Sechskantmuttern M4 flach DIN439 B

</td><td>vorhanden

</td><td>ca. 0,50 €

</td></tr><tr role="row"><td>1

</td><td>Rauchmelder

</td><td>Vorhanden

</td><td>ca. 16,00 €

</td></tr><tr><td></td><td></td><td></td><td>**Gesamt: 200,48 €**

</td></tr></tbody></table>

## Aufbau

Der Aufbau verlief ohne Probleme. Werden mehrere Tische zusammengebaut, so sollte man aufpassen, dass die Schrauben von oben und unten sich nicht treffen, was bei mir der Fall war. Gegebenenfalls sollten kürze Schrauben verwendet werden. Die Plexiglasscheiben haben bei mir aufgrund grober Toleranzen ca. 1-2mm Luft zur Seite. Die Scheiben könnte man etwas größer (Achtung nicht in der Höhe!) zuschneiden lassen. Am besten alle ohne Scheiben aufbauen, genau messen und dann erst zuschneiden lassen. In wieweit die „Belüftung“ gewollt ist kann ich nicht sagen. Bei mir stellt sich eine Temperatur von ca. 30° im Laufe des Druckvorgangs ein.

## Änderungen

Die Türgriffe und die magnetische Türzuhaltung habe ich umkonstruiert. Die im Projekt vorhanden Griffe ragen beim mir (aufgrund geringen Platzes) zu weit heraus.

[![grafik.png](https://wiki.stadtfabrikanten.org/uploads/images/gallery/2025-08/scaled-1680-/Nxh488zRygXO5ynv-grafik.png)](https://wiki.stadtfabrikanten.org/uploads/images/gallery/2025-08/Nxh488zRygXO5ynv-grafik.png) [![grafik.png](https://wiki.stadtfabrikanten.org/uploads/images/gallery/2025-08/scaled-1680-/yOsWXgzUuNjJt0R6-grafik.png)](https://wiki.stadtfabrikanten.org/uploads/images/gallery/2025-08/yOsWXgzUuNjJt0R6-grafik.png)

*Geänderter Türgriffe unten*

Da ich auch die Magnete nicht hatte, habe ich mit vorhanden Magneten eine neue Halterung konstruiert. Dabei wird der Magnet in ein gedrucktes Gehäuse gelegt und diese angeschraubt. Auf der Scheibe sitzt eine kleine Kappe, die eine Sechskantmutter (DIN 439 B) M4 (2,2mm dick) aufnimmt. Diese wird vom Magneten angezogen und hält die Tür zu. Die Kappe habe ich in zwei Ausführungen konstruiert. Entweder wird die Kappe direkt auf die Ecke gesteckt, wenn die Türen einen Spalt in der Mitte haben. Sollten die Türen gut schließen, dann gibt es eine Varianten, bei der die Kappe nur oben auf die Plexiglasscheibe gesteckt werden. Ich habe die Kappen mit Sekundenkleber fixiert.

[![grafik.png](https://wiki.stadtfabrikanten.org/uploads/images/gallery/2025-08/scaled-1680-/ikLWWYgERapecwZn-grafik.png)](https://wiki.stadtfabrikanten.org/uploads/images/gallery/2025-08/ikLWWYgERapecwZn-grafik.png) [![grafik.png](https://wiki.stadtfabrikanten.org/uploads/images/gallery/2025-08/scaled-1680-/x1no6Y2wqQlVWyzq-grafik.png)](https://wiki.stadtfabrikanten.org/uploads/images/gallery/2025-08/x1no6Y2wqQlVWyzq-grafik.png)

*Magnethalterung, oben*

Für die LED - Steifen habe ich eine Halterung entworfen. Damit habe ich die Streifen an der Decke befestigt.

[![grafik.png](https://wiki.stadtfabrikanten.org/uploads/images/gallery/2025-08/scaled-1680-/VdVmYA2Ts1WAtbLA-grafik.png)](https://wiki.stadtfabrikanten.org/uploads/images/gallery/2025-08/VdVmYA2Ts1WAtbLA-grafik.png) [![grafik.png](https://wiki.stadtfabrikanten.org/uploads/images/gallery/2025-08/scaled-1680-/oMOeoA9FhdIjCMPt-grafik.png)](https://wiki.stadtfabrikanten.org/uploads/images/gallery/2025-08/oMOeoA9FhdIjCMPt-grafik.png)

*LED-Streifenhalter*

## Ergebnis

 Ich bin mit dem Ergebnis sehr zufrieden. Für eine gutes Preis / Leistungsverhältnis bekommt man ein schönes Gehäuse.

[![grafik.png](https://wiki.stadtfabrikanten.org/uploads/images/gallery/2025-08/scaled-1680-/489ID1CeYHhQ6oZp-grafik.png)](https://wiki.stadtfabrikanten.org/uploads/images/gallery/2025-08/489ID1CeYHhQ6oZp-grafik.png) [![grafik.png](https://wiki.stadtfabrikanten.org/uploads/images/gallery/2025-08/scaled-1680-/6c56JlMdNIZqt7qz-grafik.png)](https://wiki.stadtfabrikanten.org/uploads/images/gallery/2025-08/6c56JlMdNIZqt7qz-grafik.png) [![grafik.png](https://wiki.stadtfabrikanten.org/uploads/images/gallery/2025-08/scaled-1680-/pnOk3T5jBXWbC1V1-grafik.png)](https://wiki.stadtfabrikanten.org/uploads/images/gallery/2025-08/pnOk3T5jBXWbC1V1-grafik.png) [![grafik.png](https://wiki.stadtfabrikanten.org/uploads/images/gallery/2025-08/scaled-1680-/lMKIKZPmfMHHwAKW-grafik.png)](https://wiki.stadtfabrikanten.org/uploads/images/gallery/2025-08/lMKIKZPmfMHHwAKW-grafik.png) [![grafik.png](https://wiki.stadtfabrikanten.org/uploads/images/gallery/2025-08/scaled-1680-/sY453ZhpPNclpj1L-grafik.png)](https://wiki.stadtfabrikanten.org/uploads/images/gallery/2025-08/sY453ZhpPNclpj1L-grafik.png) [![grafik.png](https://wiki.stadtfabrikanten.org/uploads/images/gallery/2025-08/scaled-1680-/EUpRPqk5p2uHNs2j-grafik.png)](https://wiki.stadtfabrikanten.org/uploads/images/gallery/2025-08/EUpRPqk5p2uHNs2j-grafik.png) [![grafik.png](https://wiki.stadtfabrikanten.org/uploads/images/gallery/2025-08/scaled-1680-/DkFaz8EVoVr6CgIk-grafik.png)](https://wiki.stadtfabrikanten.org/uploads/images/gallery/2025-08/DkFaz8EVoVr6CgIk-grafik.png) [![grafik.png](https://wiki.stadtfabrikanten.org/uploads/images/gallery/2025-08/scaled-1680-/4CrwHKVvX9Zrb4rm-grafik.png)](https://wiki.stadtfabrikanten.org/uploads/images/gallery/2025-08/4CrwHKVvX9Zrb4rm-grafik.png) [![grafik.png](https://wiki.stadtfabrikanten.org/uploads/images/gallery/2025-08/scaled-1680-/7jL0tCZ4u256uyUO-grafik.png)](https://wiki.stadtfabrikanten.org/uploads/images/gallery/2025-08/7jL0tCZ4u256uyUO-grafik.png) [![grafik.png](https://wiki.stadtfabrikanten.org/uploads/images/gallery/2025-08/scaled-1680-/3PRkyoz3bWDPI5NP-grafik.png)](https://wiki.stadtfabrikanten.org/uploads/images/gallery/2025-08/3PRkyoz3bWDPI5NP-grafik.png) [![grafik.png](https://wiki.stadtfabrikanten.org/uploads/images/gallery/2025-08/scaled-1680-/F51XUOZ4NfGvuDFL-grafik.png)](https://wiki.stadtfabrikanten.org/uploads/images/gallery/2025-08/F51XUOZ4NfGvuDFL-grafik.png) [![grafik.png](https://wiki.stadtfabrikanten.org/uploads/images/gallery/2025-08/scaled-1680-/pEoeX9t87p9zr2gl-grafik.png)](https://wiki.stadtfabrikanten.org/uploads/images/gallery/2025-08/pEoeX9t87p9zr2gl-grafik.png)

# LED Mesh Lauflicht

Unser treuer Wegbegleiter auf vielen Veranstaltungen und immer ein Hingucker.

Seit 2025 ist im Mesh ein neuer Controller verbaut. Dieser nutzt die Open Source Software WLED. Siehe [https://kno.wled.ge](https://kno.wled.ge)

[![grafik.png](https://wiki.stadtfabrikanten.org/uploads/images/gallery/2025-05/scaled-1680-/vOWK6eG3UbkNPXYd-grafik.png)](https://wiki.stadtfabrikanten.org/uploads/images/gallery/2025-05/vOWK6eG3UbkNPXYd-grafik.png) [![grafik.png](https://wiki.stadtfabrikanten.org/uploads/images/gallery/2025-05/scaled-1680-/UUnuTVXMl1kjjyPK-grafik.png)](https://wiki.stadtfabrikanten.org/uploads/images/gallery/2025-05/UUnuTVXMl1kjjyPK-grafik.png)

<iframe allowfullscreen="allowfullscreen" frameborder="0" height="315" sandbox="allow-same-origin allow-scripts allow-popups" src="https://videos.stadtfabrikanten.org/videos/embed/47d49678-59f7-4dc6-843a-fa01283f501e" width="560"></iframe>

 <iframe allowfullscreen="allowfullscreen" frameborder="0" height="315" sandbox="allow-same-origin allow-scripts allow-popups" src="https://videos.stadtfabrikanten.org/videos/embed/afed8cf8-8b26-4ffe-b09b-b35ad2e2464e" width="560"></iframe>

<iframe allowfullscreen="allowfullscreen" frameborder="0" height="315" sandbox="allow-same-origin allow-scripts allow-popups" src="https://videos.stadtfabrikanten.org/videos/embed/d23cc3ad-eb4b-488c-ae63-0b09520bffd7" width="560"></iframe>

<details id="bkmrk-die-alte-dokumentati"><summary>Die alte Dokumentation</summary>

- RGB-Farben
- Matrix-Geflecht „strucwire“ von Kieselstein GmbH
- Schweiß und Blut in: 3D-Modellierung, 3D-Druck, Laserschneiden, Löten, Programmieren und Testen
- LED-Matrix: 5 x 18
- Controller: Arduino Nano
- Kennwerte: 5 V, 3 A (ca. 4,5 Watt Verbrauch bei voller Ausleuchtung)

<p class="callout warning">Das LED Mesh buggt rum, wenn zu viele effect lines eingetragen sind. Einzelne leds sind dann immer an! Erfolgreich getestet wurde es bisher mit max. 18 ungefähr gleich langen Zeilen</p>

## Neue Laufschrift-Infos flashen

#### 1. Arduino IDE installieren (im Beispiel Version 1.8.8)

<div class="rwui_item_content" id="bkmrk-https%3A%2F%2Fwww.arduino.">- [https://www.arduino.cc/en/Main/Software](https://www.arduino.cc/en/Main/Software)
- [https://www.arduino.cc/download\_handler.php?f=/arduino-1.8.8-windows.exe](https://www.arduino.cc/download_handler.php?f=/arduino-1.8.8-windows.exe)

</div>### 2. Boardverwalter → Arduino AVR Boards hinzufügen

1. Der Boardverwalter ist zu finden unter Werkzeuge → Board → Boardverwalter
2. ATmega382P Support aktivieren

[![grafik.png](https://wiki.stadtfabrikanten.org/uploads/images/gallery/2025-05/scaled-1680-/MqjO6fxpv0TA7zJP-grafik.png)](https://wiki.stadtfabrikanten.org/uploads/images/gallery/2025-05/MqjO6fxpv0TA7zJP-grafik.png)

### 3. Arduino .ino Projekt pullen und bearbeiten

<div class="rwui_step conf-macro output-block" data-hasbody="true" data-macro-name="ui-step" id="bkmrk-git-projekt-%28code-re"><div class="rwui_item_content">- Git Projekt (Code Repository) → [https://gitea.fablabchemnitz.de/vmario/LED-Mesh](https://gitea.fablabchemnitz.de/vmario/LED-Mesh)
- Libraries aus dem Projekt nach `C:\Program Files (x86)\Arduino\libraries` kopieren. Die verwendeten Bibliotheken sind: 
    - [https://github.com/AaronLiddiment/LEDMatrix](https://github.com/AaronLiddiment/LEDMatrix)
    - [https://github.com/AaronLiddiment/LEDText](https://github.com/AaronLiddiment/LEDText)
    - [https://github.com/FastLED/FastLED](https://github.com/FastLED/FastLED)
- Quelltext bearbeiten

</div></div>### 4. Flashing vorbereiten

<div class="rwui_step conf-macro output-block" data-hasbody="true" data-macro-name="ui-step" id="bkmrk-board%3A-arduino-nano-"><div class="rwui_item_number">- Board: Arduino Nano
- Bootloader/Prozessor: `ATmega328P (Old Bootlader)`  
    [![grafik.png](https://wiki.stadtfabrikanten.org/uploads/images/gallery/2025-05/scaled-1680-/p8LNy7CJRzLydxlE-grafik.png)](https://wiki.stadtfabrikanten.org/uploads/images/gallery/2025-05/p8LNy7CJRzLydxlE-grafik.png)
- passenden COM-Port auswählen!

</div></div>### 5. Verkabelung anpassen (WICHTIG!)

<p class="callout danger">Bei jedem Flash-Vorgang muss sichergestellt sein, dass das <span style="color: rgb(255,102,0);">orangefarbene </span>Kabel "V IN" abgezogen wird, um Beschädigungen zu vermeiden! Das Pin-Mapping:  
  
D5 = schwarz | GND = silber | VIN = orange</p>


[![grafik.png](https://wiki.stadtfabrikanten.org/uploads/images/gallery/2025-05/scaled-1680-/VQJolX5F0ydZyCWl-grafik.png)](https://wiki.stadtfabrikanten.org/uploads/images/gallery/2025-05/VQJolX5F0ydZyCWl-grafik.png)

### 6. Kompilat hochladen

[![grafik.png](https://wiki.stadtfabrikanten.org/uploads/images/gallery/2025-05/scaled-1680-/NeuiNgm8GGGKtUjv-grafik.png)](https://wiki.stadtfabrikanten.org/uploads/images/gallery/2025-05/NeuiNgm8GGGKtUjv-grafik.png)
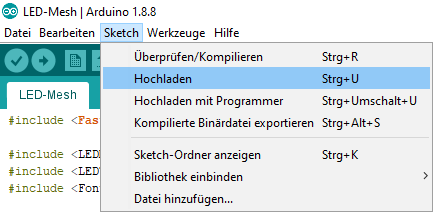
### 7. Verkabelung zurücksetzen

<div class="rwui_item_content" id="bkmrk-usb-kabel-abziehen-o">1. USB-Kabel abziehen
2. orangefarbenes Kabel ran

</div>### 8. Testen + Fertig

## Textbeispiele

MakerFaire Hannover 2019

```ini
EFFECT_FRAME_RATE "\x04"
EFFECT_HSV_AH "\x00\xff\xff\xff\xff\xff"  "FABLAB CHEMNITZ WELCOMES YOU TO MAKERFAIRE HANNOVER 2019 <3    "
EFFECT_HSV "\x20\xff\xff"                 "DER STADTFABRIKANTEN E.V. WUENSCHT EUCH EINE FROHE MESSE!    "
EFFECT_HSV "\xc0\xff\xff"                 "DIE OFFENE MITMACHWERKSTATT IN CHEMNITZ    "
EFFECT_HSV_AV "\x00\xff\xff\x40\xff\xff"  "ALREADY FOUND THE BALANCE BETWEEN WORKAROUND AND LIFECYCLE?    "
 
#langsam: EFFECT_FRAME_RATE "\x07"
#schnell: EFFECT_FRAME_RATE "\x03"
```

MakerFaire Sachsen 2021

```ini
DON'T GET MAD, GET MAKER.
DAS FABLAB CHEMNITZ - DIE OFFENE MITMACHWERKSTATT IN CHEMNITZ.
THERE'S A MAKER IN ALL OF US.
HALLO VOM STADTFABRIKANTEN EV.
VÍTEJTE NA MAKER FAIRE V SASKU.
WELCOME TO THE MAKER FAIRE SAXONY.
MAKE FAIR, NOT WAR.
SOMETHING SPECIAL IN THE MAKING.
HAVE A BREAK, HAVE A FAB LAB.
FAB LAB, THE PROBLEM SOLVER.
DIE UNORDINÄRE, FAIRE SCHAFFENSSPHÄRE.
WISSEN IST MACHBAR.
THE BALANCE BETWEEN WORK AROUND AND LIFE CYCLE.
OUR MATTER: DO IT TOGETHER. BECAUSE TOGETHER IS BETTER.
ACHTUNG: HIER MACHE ICH.
ACROSS THE BORDERS OF MIND.
PŘES HRANICE MYSLI.
```

</details>

# LED Pfeil (mit Strucwire mesh)

Ein toller strucwire-Pfeil als eines der neueren Drahtprojekt. Enstand irgendwann in der alten Werkstatt (Philippstraße. Zu Vorführzwecken läuft er aber schon und macht eine gute Figur.

[![grafik.png](https://wiki.stadtfabrikanten.org/uploads/images/gallery/2025-05/scaled-1680-/z1W5CBGeEtVRmUVn-grafik.png)](https://wiki.stadtfabrikanten.org/uploads/images/gallery/2025-05/z1W5CBGeEtVRmUVn-grafik.png) [![grafik.png](https://wiki.stadtfabrikanten.org/uploads/images/gallery/2025-05/scaled-1680-/8QCPQFqtAKXRUiUQ-grafik.png)](https://wiki.stadtfabrikanten.org/uploads/images/gallery/2025-05/8QCPQFqtAKXRUiUQ-grafik.png)

## Beispielvideos

<iframe allowfullscreen="allowfullscreen" frameborder="0" height="315" sandbox="allow-same-origin allow-scripts allow-popups" src="https://videos.stadtfabrikanten.org/videos/embed/3b6f9011-dca8-4a43-911c-a26fabd56b71" width="560"></iframe>

<iframe allowfullscreen="allowfullscreen" frameborder="0" height="315" sandbox="allow-same-origin allow-scripts allow-popups" src="https://videos.stadtfabrikanten.org/videos/embed/3d4891a0-6dc1-4446-94a7-2f7508e7d562" width="560"></iframe>

<iframe allowfullscreen="allowfullscreen" frameborder="0" height="315" sandbox="allow-same-origin allow-scripts allow-popups" src="https://videos.stadtfabrikanten.org/videos/embed/011c9608-b14d-4332-aca6-dee0eecf8089" width="560"></iframe>

<iframe allowfullscreen="allowfullscreen" frameborder="0" height="315" sandbox="allow-same-origin allow-scripts allow-popups" src="https://videos.stadtfabrikanten.org/videos/embed/20a33282-7340-4752-ab49-2db9b665c96a" width="560"></iframe>

<iframe allowfullscreen="allowfullscreen" frameborder="0" height="315" sandbox="allow-same-origin allow-scripts allow-popups" src="https://videos.stadtfabrikanten.org/videos/embed/252baa46-f7f5-4b87-bb9c-c240781a861f" width="560"></iframe>

## Wertschöpfungskette

Epoxidharz wird beim Vergießen ziemlich warm! Unsere PLA-Gussform hat sich während des Aushärtevorgangs verzogen und ist sehr weich geworden. Wir schätzen, dass wir über 70°C locker drüber gekommen sind.

## Pfeil flashen

### 1. Arduino IDE installieren (im Beispiel Version 1.8.8)

- [https://www.arduino.cc/en/Main/Software](https://www.arduino.cc/en/Main/Software)
- [https://www.arduino.cc/download\_handler.php?f=/arduino-1.8.8-windows.exe](https://www.arduino.cc/download_handler.php?f=/arduino-1.8.8-windows.exe)

### 2. Boardverwalter → Arduino AVR Boards hinzufügen

ATmega382P Support aktivieren

[![grafik.png](https://wiki.stadtfabrikanten.org/uploads/images/gallery/2025-05/scaled-1680-/Co4ay4ZIJj3A2Nf9-grafik.png)](https://wiki.stadtfabrikanten.org/uploads/images/gallery/2025-05/Co4ay4ZIJj3A2Nf9-grafik.png)

### 3. Arduino .ino Projekt pullen und bearbeiten

<p class="callout danger">Diese Passage wurde vom [Lauflicht](https://wiki.stadtfabrikanten.org/books/projekte-und-anleitungen-IW2/page/led-mesh-lauflicht "LED Mesh Lauflicht") kopiert. Es existiert aktuell kein eigenständiges Repository für den Code.</p>

- Git Projekt (Code Repository) → [https://gitea.fablabchemnitz.de/vmario/LED-Mesh](https://gitea.fablabchemnitz.de/vmario/LED-Mesh)
- Libraries aus dem Projekt nach "C:\\Program Files (x86)\\Arduino\\libraries" kopieren
- Die verwendeten Bibliotheken sind: 
    - [https://github.com/AaronLiddiment/LEDMatrix](https://github.com/AaronLiddiment/LEDMatrix)
    - [https://github.com/AaronLiddiment/LEDText](https://github.com/AaronLiddiment/LEDText)
    - [https://github.com/FastLED/FastLED](https://github.com/FastLED/FastLED)

### 4. Flashing vorbereiten

<div class="rwui_item_content" id="bkmrk-board%3A-arduino-nano-">- Board: Arduino Nano
- Bootloade/Prozessor: "ATmega328P (Old Bootlader)"  
    [![grafik.png](https://wiki.stadtfabrikanten.org/uploads/images/gallery/2025-05/scaled-1680-/YuPcUThygcdso6ij-grafik.png)](https://wiki.stadtfabrikanten.org/uploads/images/gallery/2025-05/YuPcUThygcdso6ij-grafik.png)
- passenden COM-Port auswählen!

</div>### 5. Verkabelung anpassen (WICHTIG!)

<p class="callout danger">Bei jedem Flash-Vorgang muss sichergestellt sein, dass das <span style="color: rgb(255,102,0);">orangefarbene </span>Kabel "V IN" abgezogen wird, um Beschädigungen zu vermeiden! Das Pin-Mapping:  
  
D5 = schwarz | GND = silber | VIN = orange</p>

[![grafik.png](https://wiki.stadtfabrikanten.org/uploads/images/gallery/2025-05/scaled-1680-/fzXC2cduyANYwdVv-grafik.png)](https://wiki.stadtfabrikanten.org/uploads/images/gallery/2025-05/fzXC2cduyANYwdVv-grafik.png) [![grafik.png](https://wiki.stadtfabrikanten.org/uploads/images/gallery/2025-05/scaled-1680-/P5ZaotKIh8zpNQzm-grafik.png)](https://wiki.stadtfabrikanten.org/uploads/images/gallery/2025-05/P5ZaotKIh8zpNQzm-grafik.png) [![grafik.png](https://wiki.stadtfabrikanten.org/uploads/images/gallery/2025-05/scaled-1680-/s6Y97WfGmPLlNPho-grafik.png)](https://wiki.stadtfabrikanten.org/uploads/images/gallery/2025-05/s6Y97WfGmPLlNPho-grafik.png)
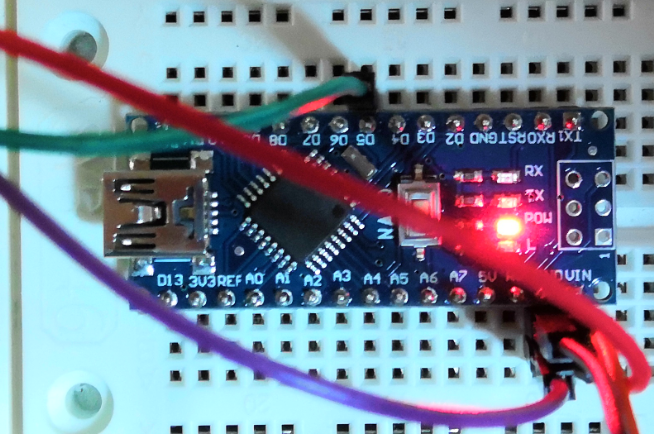
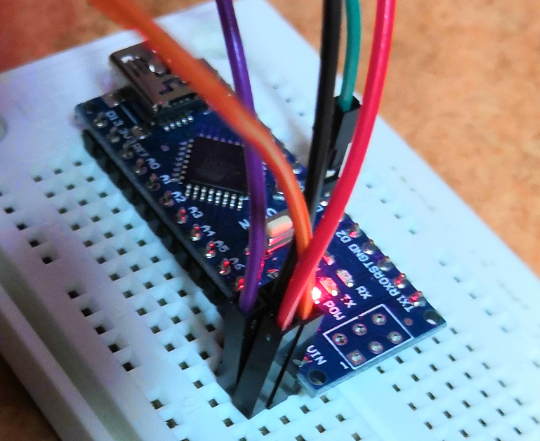
### 6. Flashen

[![grafik.png](https://wiki.stadtfabrikanten.org/uploads/images/gallery/2025-05/scaled-1680-/ZB7VMIqrRPuZdilF-grafik.png)](https://wiki.stadtfabrikanten.org/uploads/images/gallery/2025-05/ZB7VMIqrRPuZdilF-grafik.png)
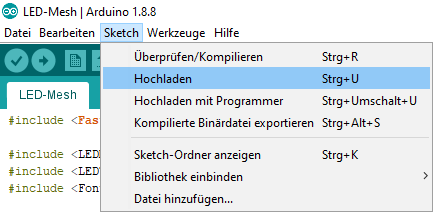
### 7. Verkabelung zurücksetzen

<div class="rwui_step conf-macro output-block" data-hasbody="true" data-macro-name="ui-step" id="bkmrk-usb-kabel-abziehen-o"><div class="rwui_item_content">1. USB-Kabel abziehen
2. orangefarbenes Kabel ran

</div></div>### 8. Testen + Fertig

# MidiFlower - Musik mit Pflanzen

<span>Wir haben im Juli 2025 ein Kit für eine MidiFlower erhalten. Basierend auf der französischen </span>[Originaldokumentation](https://wikifab.org/wiki/Capteur_BioData_pour_ESP32_-_PCB_MidiFlower#Werkzeuge%20und%20Material)<span> hier eine eingedeutschte Kopie.</span>

# Arduino IDE und ESP32 flashen

<p class="callout info">Deutsche Dokumentation der Originalquelle: [http://wikifab.org/wiki/Capteur\_BioData\_pour\_ESP32](http://wikifab.org/wiki/Capteur_BioData_pour_ESP32)</p>

[![IMG_20250806_172027.jpg](https://wiki.stadtfabrikanten.org/uploads/images/gallery/2025-08/scaled-1680-/ZdybZNtHuqSRvlsk-img-20250806-172027.jpg)](https://wiki.stadtfabrikanten.org/uploads/images/gallery/2025-08/ZdybZNtHuqSRvlsk-img-20250806-172027.jpg)

## Arduino IDE

Wir arbeiten mit der IDE Version 2.3.6.. Siehe [https://www.arduino.cc/en/software](https://www.arduino.cc/en/software). Wir installieren außerdem `python3-serial`, um die USB-Verbindung über die IDE zuzulassen:

```
sudo apt install python3-serial
wget https://downloads.arduino.cc/arduino-ide/arduino-ide_2.3.6_Linux_64bit.AppImage
chmod +x arduino-ide_2.3.6_Linux_64bit.AppImage
mv arduino-ide_2.3.6_Linux_64bit.AppImage /opt/
```

## ESP32 Boards

Fügen Sie den ESP32 zur Arduino-IDE hinzu, indem Sie die Zeile [https://raw.githubusercontent.com/espressif/arduino-esp32/gh-pages/package\_esp32\_index.json](https://raw.githubusercontent.com/espressif/arduino-esp32/gh-pages/package_esp32_index.json) hinzufügen:

[![grafik.png](https://wiki.stadtfabrikanten.org/uploads/images/gallery/2025-08/scaled-1680-/67kmBkCAbTmPC8Zh-grafik.png)](https://wiki.stadtfabrikanten.org/uploads/images/gallery/2025-08/67kmBkCAbTmPC8Zh-grafik.png)
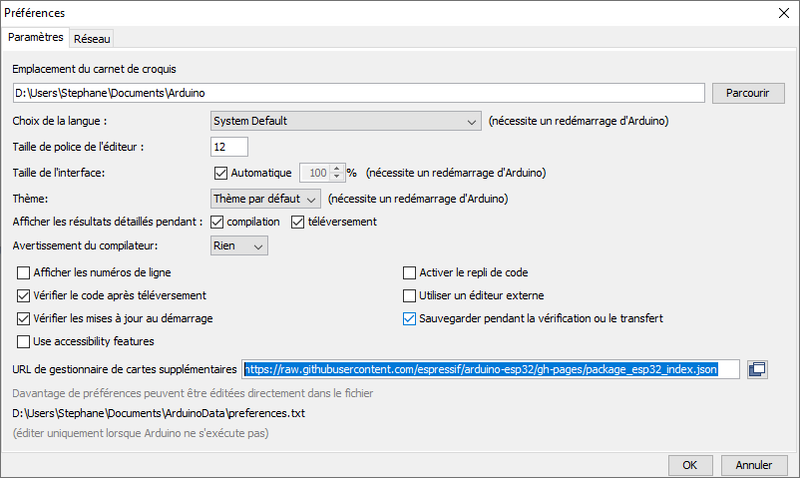
Laden Sie die ESP32-Erweiterung mit dem Board-Manager herunter:

[![grafik.png](https://wiki.stadtfabrikanten.org/uploads/images/gallery/2025-08/scaled-1680-/tHxuUqq7yPiHBTUR-grafik.png)](https://wiki.stadtfabrikanten.org/uploads/images/gallery/2025-08/tHxuUqq7yPiHBTUR-grafik.png)
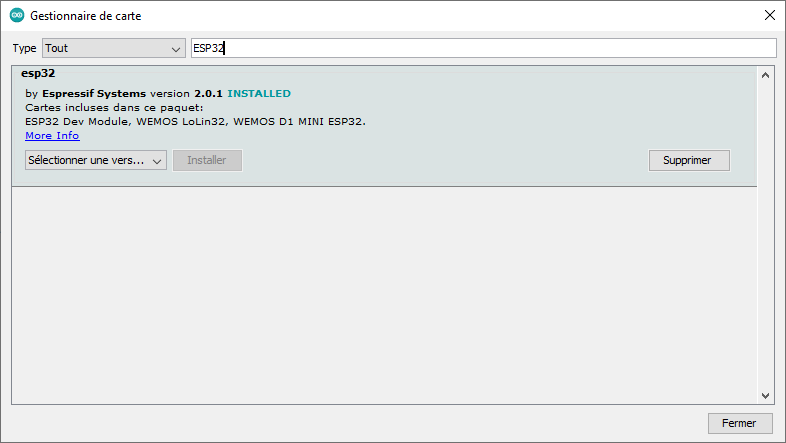
## Bibliotheken installieren

Notwendige Bibliotheken und Versionen:

- NimBLE-Arduino 1.4.3
- ESP32-BLE-MIDI 0.3.2
- BLE-MIDI 2.2
- ArduinoBLE 1.4.1
- MIDI Library 5.0.2

[![grafik.png](https://wiki.stadtfabrikanten.org/uploads/images/gallery/2025-08/scaled-1680-/ifjRuv8FaO8T73ne-grafik.png)](https://wiki.stadtfabrikanten.org/uploads/images/gallery/2025-08/ifjRuv8FaO8T73ne-grafik.png) [![grafik.png](https://wiki.stadtfabrikanten.org/uploads/images/gallery/2025-08/scaled-1680-/JjYMBJjudl29Y275-grafik.png)](https://wiki.stadtfabrikanten.org/uploads/images/gallery/2025-08/JjYMBJjudl29Y275-grafik.png)
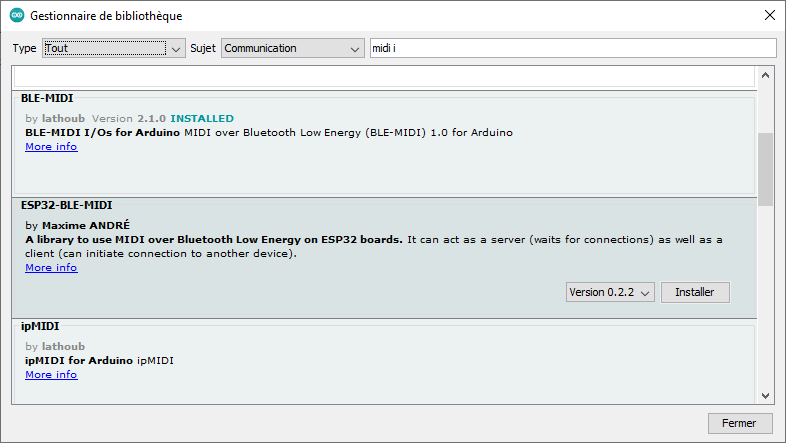
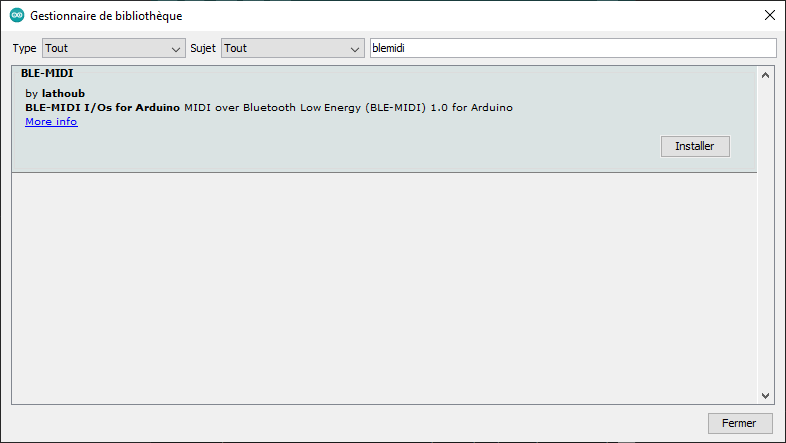
[![grafik.png](https://wiki.stadtfabrikanten.org/uploads/images/gallery/2025-08/scaled-1680-/zcm8beJsoypzdLim-grafik.png)](https://wiki.stadtfabrikanten.org/uploads/images/gallery/2025-08/zcm8beJsoypzdLim-grafik.png)
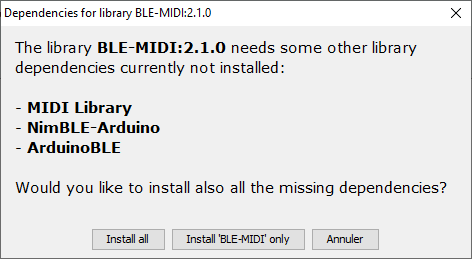
## Kompilieren und Hochladen

Außerdem manuell das Projekt in deinen Library-Ordner (z.B. `~/Arduino/libraries/MidiFlower-0.2.0/`) entpacken

- die Originalversion des Hackathons: [https://github.com/crocsg/MidiFlower/releases/download/v0.1/midiflower.zip](https://github.com/crocsg/MidiFlower/releases/download/v0.1/midiflower.zip)
- **<span style="color: rgb(22, 145, 121);">Die überarbeitete Version: [https://github.com/crocsg/MidiFlower/archive/refs/tags/v0.2.0.zip](https://github.com/crocsg/MidiFlower/archive/refs/tags/v0.2.0.zip)</span>**

**<span style="color: rgb(22, 145, 121);">Kompilieren Sie den Sketch für einen ESP32 und laden Sie ihn auf den ESP32 hoch. (Möglicherweise müssen Sie die Taste „Boot” drücken, um den Upload durchzuführen. Siehe Dokumentation des ESP32). Der Sketch ist hier verfügbar:</span>**

### USB-Anschluss

Falls auf über USB nicht auf den Controller zugegriffen werden kann, fehlen u.U. die passenden Berechtigungen. Dies lässt sich wie folgt beheben:

```
sudo usermod -a -G dialout $(whoami)
```

Falls dies nicht ausreicht:

```
sudo vim /etc/udev/rules.d/99-usb-serial.rules
```

```
KERNEL=="ttyACM[0-9]*", SYMLINK+="ttyUSB%n", GROUP="dialout", MODE="0660"
```

```
sudo udevadm control --reload-rules
sudo udevadm trigger
```

Falls dies immer noch nicht ausreicht ein dreckiger Trick:

```
sudo chmod 666 /dev/ttyUSB0
```

### Modul-Auswahl, Partitionierung, Hochladen

[Unser Modul](https://www.az-delivery.de/products/esp-32-dev-kit-c-unverlotet-nodemcu-module-wlan-mit-usb-c-anschluss-wifi-development-board-mit-cp2102-nachfolgermodell-zum-esp8266-kompatibel-mit-arduino) hat folgende Specs:

- Stromversorgungsspannung (USB): 5 V
- Logiklevel: 3.3 V
- Benötigter Betriebsstrom: min. 500 mA
- SoC: ESP32 WOOM 32
- Taktfrequenzbereich: bis240 MHz
- RAM: 512 kB
- SPIFFS: 4 MB
- I/O Pins: 34
- Schnittstellen: SPI, I2C, I2S, CAN, UART
- Wi-Fi Protokolle: 802.11 b/g/n (802.11n bis zu 150 Mbps)
- Wi-Fi Frequenz: 2.4 GHz - 2.5 GHz
- Bluetooth: V4.2 - BLE und Classic Bluetooth
- Drahtlose Antenne: PCB
- Abmessungen: 56 x 28 x 13 mm

<s>Folgendes Partitionierungsschema ist für's Flashen wichtig: `No OTA (2MB App / 2MB SPIFFS)`  
</s>Folgendes Partitionierungsschema ist für's Flashen wichtig: `Default 4MB with spiffs (1.2MB APP/1.5MB SPIFFS)`

[![grafik.png](https://wiki.stadtfabrikanten.org/uploads/images/gallery/2025-08/scaled-1680-/QmvRMO3U9ZkyhTsz-grafik.png)](https://wiki.stadtfabrikanten.org/uploads/images/gallery/2025-08/QmvRMO3U9ZkyhTsz-grafik.png)

Wir selbst nutzen für unseren Flashing Vorgang ein `ESP32 Dev Kit C` von AZ-Delivery. Dies entspricht in Arduino IDE dem Entwicklerboard `ESP32 Wrover Module` oder `ESP32-WROOM-DA`. Wir flashen bei einer Baudrate von 115200.

[![Bildschirmfoto_20250806_192704.png](https://wiki.stadtfabrikanten.org/uploads/images/gallery/2025-08/scaled-1680-/d6jQPCRZAyAjzG7u-bildschirmfoto-20250806-192704.png)](https://wiki.stadtfabrikanten.org/uploads/images/gallery/2025-08/d6jQPCRZAyAjzG7u-bildschirmfoto-20250806-192704.png)

## Flashing überprüfen

Über den Serial Monitor unter Tools können wir bei angeschlossenen USB-Port überprüfen, was die Ausgabe des Controllers ist. Mit Baudrate 115200 erhalten wir u.U. folgenden Output:

```
st:0x1 (POWERON_RESET),boot:0x13 (SPI_FAST_FLASH_BOOT)
configsip: 0, SPIWP:0xee
clk_drv:0x00,q_drv:0x00,d_drv:0x00,cs0_drv:0x00,hd_drv:0x00,wp_drv:0x00
mode:DIO, clock div:1
load:0x3fff0030,len:4980
load:0x40078000,len:16612
load:0x40080400,len:3480
entry 0x400805b4
E (229) esp_core_f�[}���͡� Incorrect size of core dump image: 1
```

u.U. stimmt hier das Partitionierungsschema nicht. Überpüfen und neu kompilieren!

## Hinweise und Referenzen

Dieses Tutorial wurde dank der Arbeit von Sam Cusumano electricityforprogress [https://github.com/electricityforprogress/MIDIsprout](https://github.com/electricityforprogress/MIDIsprout) erstellt. Die Originalarbeit von Sam unterliegt der Open-Source-Lizenz „MIT Licence”.

# BioData-Sensor für ESP32 - DIY ohne Fertigplatine

<p class="callout info">Deutsche Dokumentation der Originalquelle: [http://wikifab.org/wiki/Capteur\_BioData\_pour\_ESP32](http://wikifab.org/wiki/Capteur_BioData_pour_ESP32)</p>

[![grafik.png](https://wiki.stadtfabrikanten.org/uploads/images/gallery/2025-08/scaled-1680-/Y9Oow3i660byCS5b-grafik.png)](https://wiki.stadtfabrikanten.org/uploads/images/gallery/2025-08/Y9Oow3i660byCS5b-grafik.png)

## Einführung

Das Ziel dieses Tutorials ist der Bau des Biodata-Sensors von Sam Cusumano ([https://github.com/electricityforprogress/MIDIsprout](https://github.com/electricityforprogress/MIDIsprout)) für die Verwendung mit einem ESP32.Der ESP32 ermöglicht es dann, die an der Pflanze vorgenommenen Messungen zu interpretieren und sie in Bluetooth-Midi-Frames an einen Synthesizer zu übertragen.

## Schritt 1 – Benötigtes Material

- 1x Breadboard
- Verbindungskabel
- Verbindungskabel für Breadboard
- 1x ESP32 (in unserem Fall Velleman)
- 1x 555 IC
- 1x Elektrolytkondensator 47 µf
- 1x Keramikkondensator 1 µf
- 1x Keramikkondensator 0,0047 µf
- 1x LED
- 1x Widerstand von 100 kOhm
- 1x Widerstand von 1 kOhm

## Schritt 2 – Einbau des IC 555

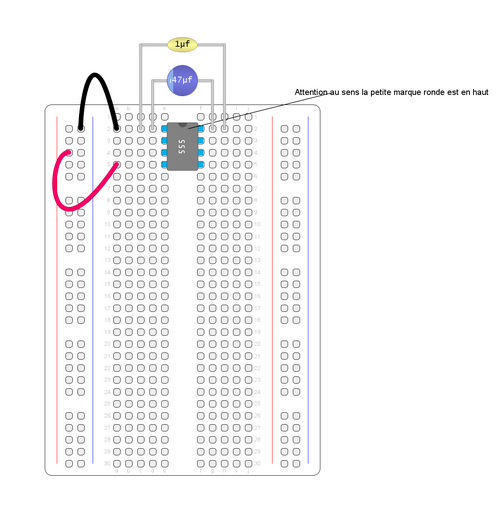
Beachten Sie zunächst, dass die Anschlüsse der Testplatine mit Zahlen und Buchstaben gekennzeichnet sind. Die Spalten an der Seite sind ebenfalls mit + und - gekennzeichnet. Positionieren Sie dann die Komponente 555 auf der Testplatine und achten Sie dabei auf die Position der 555 auf der Testplatine. Achten Sie auf die Ausrichtung des 555, die kleine runde Markierung auf dem Bauteil muss nach oben zeigen.

[![grafik.png](https://wiki.stadtfabrikanten.org/uploads/images/gallery/2025-08/scaled-1680-/11AGUJMDPWWG9nZp-grafik.png)](https://wiki.stadtfabrikanten.org/uploads/images/gallery/2025-08/11AGUJMDPWWG9nZp-grafik.png)
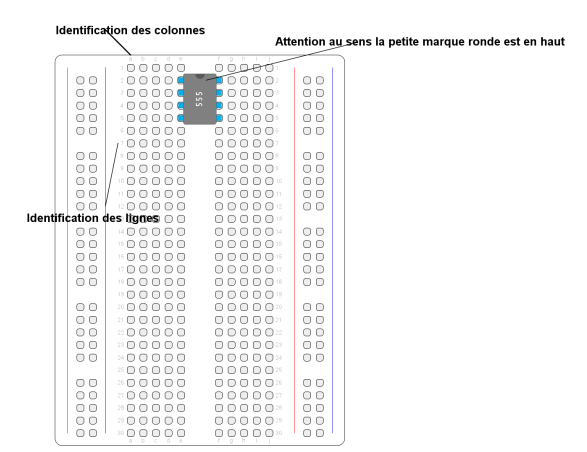
## Schritt 3 – Stromversorgung des 555 hinzufügen

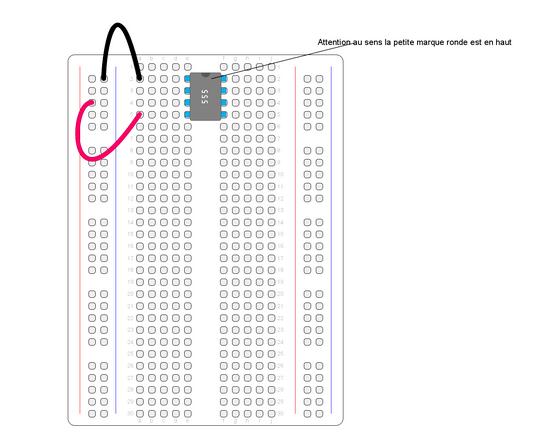
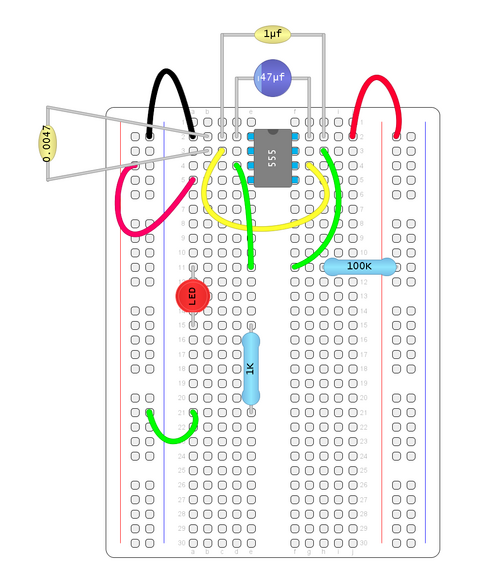
Ein schwarzer Draht zwischen **a2** und der Masseleitung. Ein roter Draht zwischen **a5** und der +5V-Leitung.

[![grafik.png](https://wiki.stadtfabrikanten.org/uploads/images/gallery/2025-08/scaled-1680-/GO71stvq8XuoABhQ-grafik.png)](https://wiki.stadtfabrikanten.org/uploads/images/gallery/2025-08/GO71stvq8XuoABhQ-grafik.png)
## Schritt 4 – Versorgungskondensatoren

Positionieren Sie die Kondensatoren 1μf und 47μf.

<p class="callout warning">**Achtung:** Der Kondensator 47μf hat eine bestimmte Ausrichtung, der längere Anschluss (+) muss nach rechts zeigen.</p>

[![grafik.png](https://wiki.stadtfabrikanten.org/uploads/images/gallery/2025-08/scaled-1680-/BHBay70Toa0bW24M-grafik.png)](https://wiki.stadtfabrikanten.org/uploads/images/gallery/2025-08/BHBay70Toa0bW24M-grafik.png)

## Schritt 5 – Zeitkondensatoren

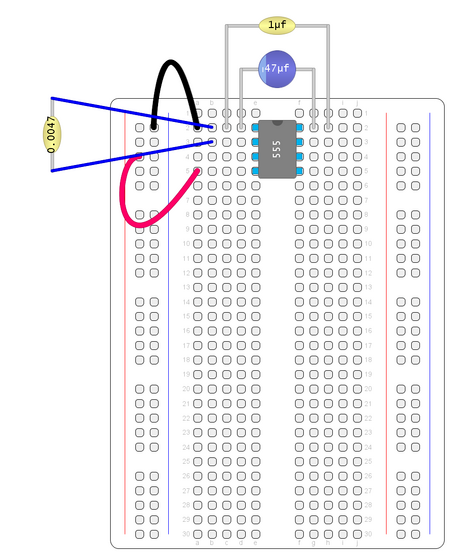
Setzen Sie den Kondensator 0,0047μf zwischen **b2** und **b3** ein.

[![grafik.png](https://wiki.stadtfabrikanten.org/uploads/images/gallery/2025-08/scaled-1680-/izqHNa8iLreN1E8C-grafik.png)](https://wiki.stadtfabrikanten.org/uploads/images/gallery/2025-08/izqHNa8iLreN1E8C-grafik.png)
## Schritt 6 – Verkabelung

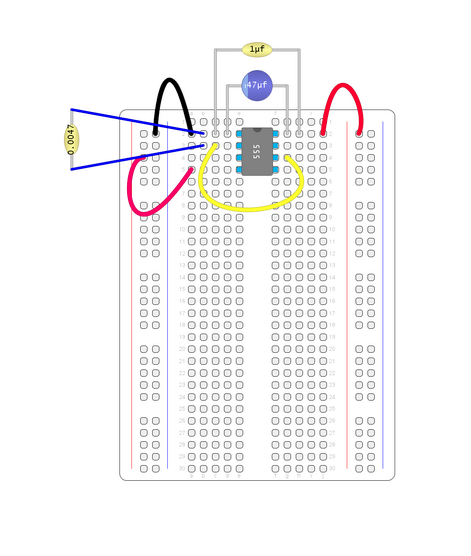
- Verlegen Sie ein Kabel zwischen **c3** und **g4**.
- Verlegen Sie ein rotes Kabel zwischen **j2** und der Stromversorgungsleitung + auf der rechten Seite.

[![grafik.png](https://wiki.stadtfabrikanten.org/uploads/images/gallery/2025-08/scaled-1680-/lrUvblMG0eaOU5MA-grafik.png)](https://wiki.stadtfabrikanten.org/uploads/images/gallery/2025-08/lrUvblMG0eaOU5MA-grafik.png)
## Schritt 7 – Widerstand

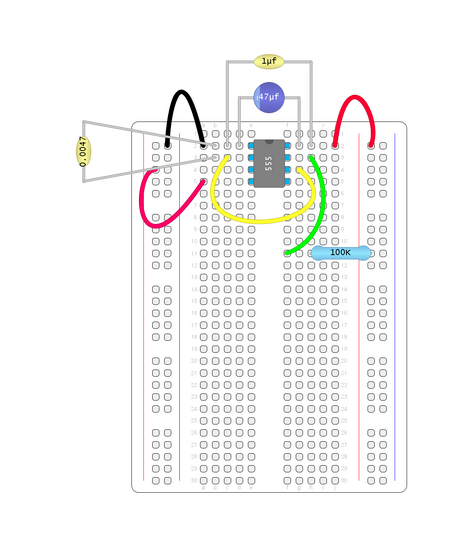
Positionieren Sie einen Draht zwischen **h3** und **f11**. Positionieren Sie den 100k-Widerstand zwischen der Leitung + und **h11**.

[![grafik.png](https://wiki.stadtfabrikanten.org/uploads/images/gallery/2025-08/scaled-1680-/GH3Y5ePWqYCKqXT0-grafik.png)](https://wiki.stadtfabrikanten.org/uploads/images/gallery/2025-08/GH3Y5ePWqYCKqXT0-grafik.png)
## Schritt 8 – Ausgang des 555

- Verbinden Sie **d4** und **e11** mit einem Draht.
- Verbinden Sie **a11** und **a15** mit einer LED. Achtung: Der längere Anschluss der LED (+) wird an **a11** angeschlossen.
- Verbinden Sie **e15** und **e21** mit einem 1k-Widerstand.
- Verbinden Sie **a21** mit der Leitung -.

[![grafik.png](https://wiki.stadtfabrikanten.org/uploads/images/gallery/2025-08/scaled-1680-/dzB1KhB679FqiD8A-grafik.png)](https://wiki.stadtfabrikanten.org/uploads/images/gallery/2025-08/dzB1KhB679FqiD8A-grafik.png)
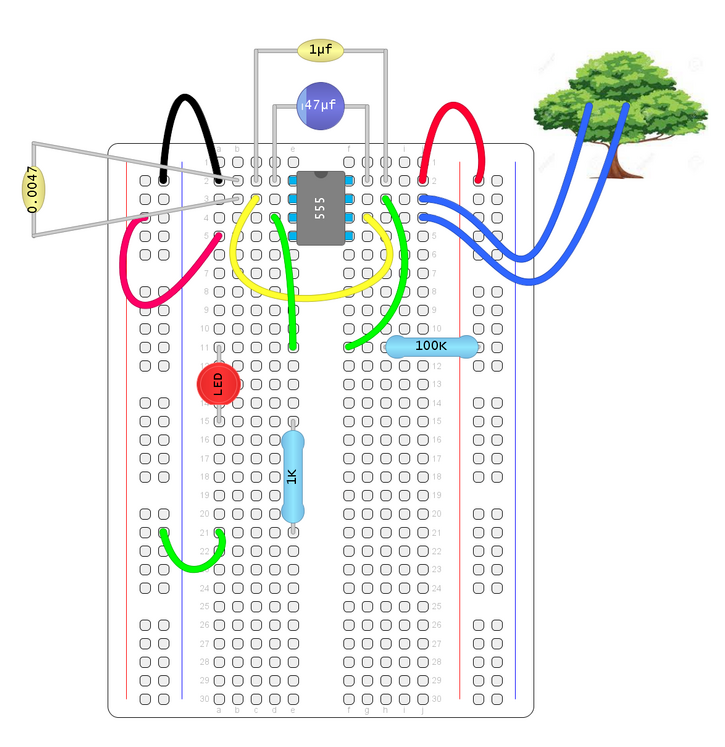
## Schritt 9 – Anschluss des Sensors an die Pflanze

Schließen Sie die Pflanze an **j3** und **j4** an. Die Elektroden an der Pflanze können einfach 5cm abisolierte Elektrokabel sein. Wickeln Sie das abisolierte Kabel um einen Stab.

[![grafik.png](https://wiki.stadtfabrikanten.org/uploads/images/gallery/2025-08/scaled-1680-/5aqF0g7OrgDsS4T2-grafik.png)](https://wiki.stadtfabrikanten.org/uploads/images/gallery/2025-08/5aqF0g7OrgDsS4T2-grafik.png)
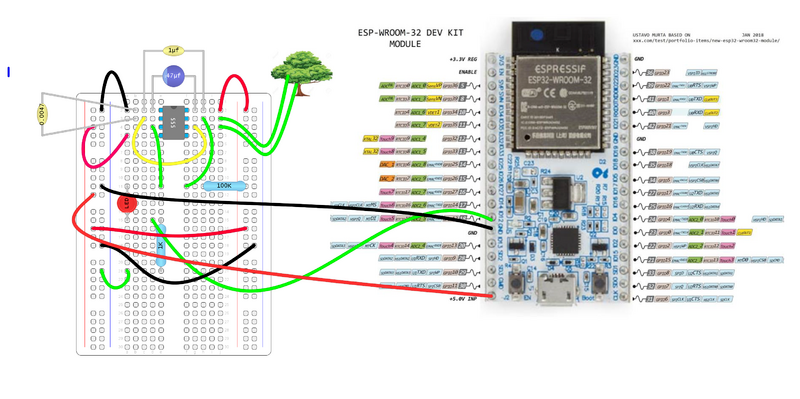
## Schritt 10 – ESP32 anschließen

- Verbinden Sie die Leitungen – auf jeder Seite der Testplatine mit einem schwarzen Draht.
- Verbinden Sie die Leitungen + auf jeder Seite der Testplatine mit einem roten Draht.
- Verbinden Sie die Leitung + mit dem Pin +5 des ESP32.
- Verbinden Sie die Leitung - mit dem Pin GND des ESP32.
- Verbinden Sie den Anschluss **d15** der Steckplatine mit dem Pin **gpio12** und dem ESP32.

[![grafik.png](https://wiki.stadtfabrikanten.org/uploads/images/gallery/2025-08/scaled-1680-/42VW8K6olReEvW9R-grafik.png)](https://wiki.stadtfabrikanten.org/uploads/images/gallery/2025-08/42VW8K6olReEvW9R-grafik.png)
# BioData-Sensor für ESP32 – PCB MidiFlower

<p class="callout info">Quelle der Originaldokumentation: [https://wikifab.org/wiki/Capteur\_BioData\_pour\_ESP32\_-\_PCB\_MidiFlower](https://wikifab.org/wiki/Capteur_BioData_pour_ESP32_-_PCB_MidiFlower)</p>

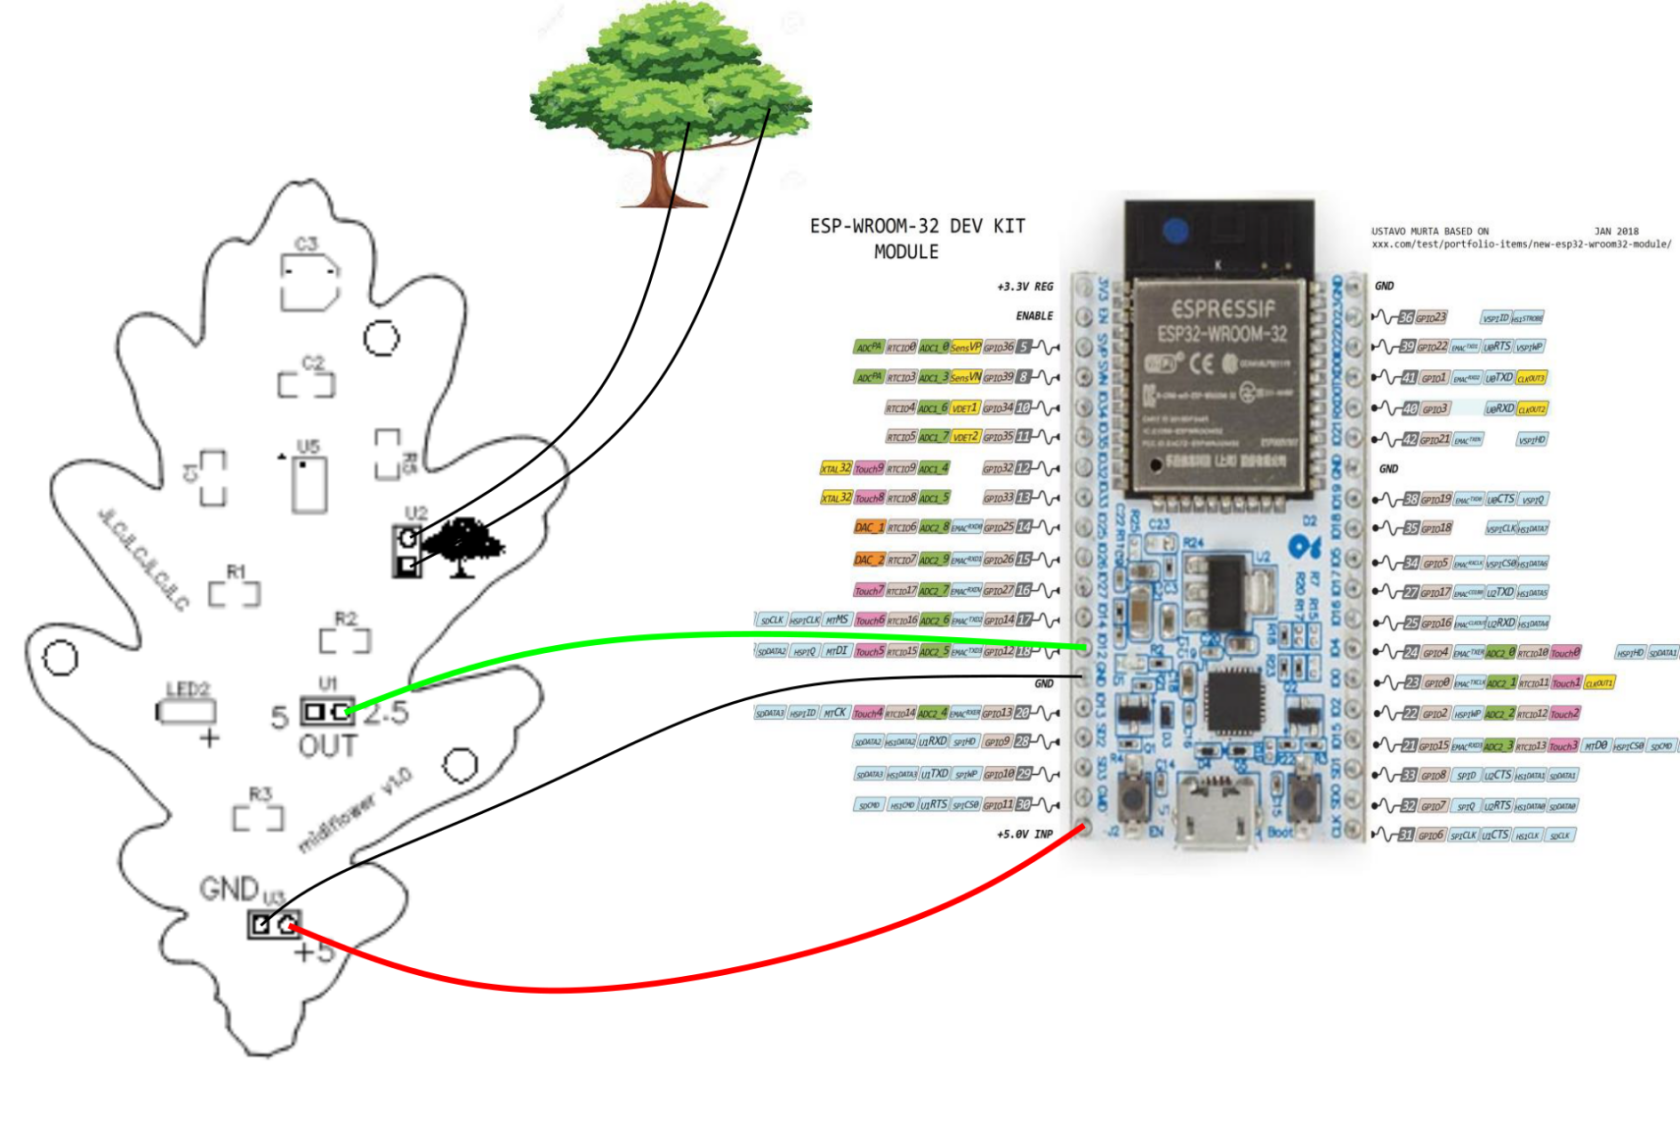
[![1.png](https://wiki.stadtfabrikanten.org/uploads/images/gallery/2026-01/scaled-1680-/w6MixUeN3rtJBkTm-1.png)](https://wiki.stadtfabrikanten.org/uploads/images/gallery/2026-01/w6MixUeN3rtJBkTm-1.png)

## Schritt 1 - Anschließen des ESP32 an den Sensor

- Verbinden von GND vom Sensor mit einem GND-Pin des ESP32
- Verbinden von 5V des Sensors mit einem 5V-Pin des ESP32
- Verbinden von 3,3V- oder 2,5V-Pin des Sensors (je nach Boardrevision) mit dem Pin Nr. 18 (GPIO12) des ESP32 - siehe Pin Layout in der Grafik
- Verbinden der Pflanze mit dem Anschluss des Sensors, der einen Baum darstellt

## Schritt 2 - Programmierung des ESP32

Sie können das vorherige Tutorial fortsetzen, in dem angegeben ist, wie Sie das Programm in den ESP32 hochladen können

- [BioData-Sensor für ESP32](https://wiki.stadtfabrikanten.org/books/projekte-und-anleitungen-IW2/page/biodata-sensor-fur-esp32-diy-ohne-fertigplatine "BioData-Sensor für ESP32")

2 verschiedene Programme für ESP32 finden sich hier:

- [https://github.com/crocsg/MidiFlower](https://github.com/crocsg/MidiFlower)
- [https://github.com/crocsg/MidiFlower\_wifi](https://github.com/crocsg/MidiFlower_wifi)

Eine Verwendung mit dem neuen Raspberry PI PICO findet sich hier:

- [https://github.com/crocsg/usb\_midiflower](https://github.com/crocsg/usb_midiflower)

Weitere Projekte, die die Verwendung des Sensors veranschaulichen, finden sich ebenfalls hier:

- [MUTED – Biodata-Gehäuse für analoges Synthesizer-Modul](https://wiki.stadtfabrikanten.org/books/projekte-und-anleitungen-IW2/page/muted-biodata-gehause-fur-analoges-synthesizer-modul "MUTED – Biodata-Gehäuse für analoges Synthesizer-Modul")

# Bluetooth BLE Midi - Anwendungen (Apps)

## Ubuntu

### [FluidSynth Midi Synthesizer](https://github.com/FluidSynth/fluidsynth)

```
sudo apt install fluidsynth fluid-soundfont-gs alsa-utils qsynth
```

## Apple iOS

### [GarageBand](https://apps.apple.com/de/app/garageband/id408709785)

## Android

### Anwendungen, um per Bluetooth einen Midi-Port bereit zu stellen

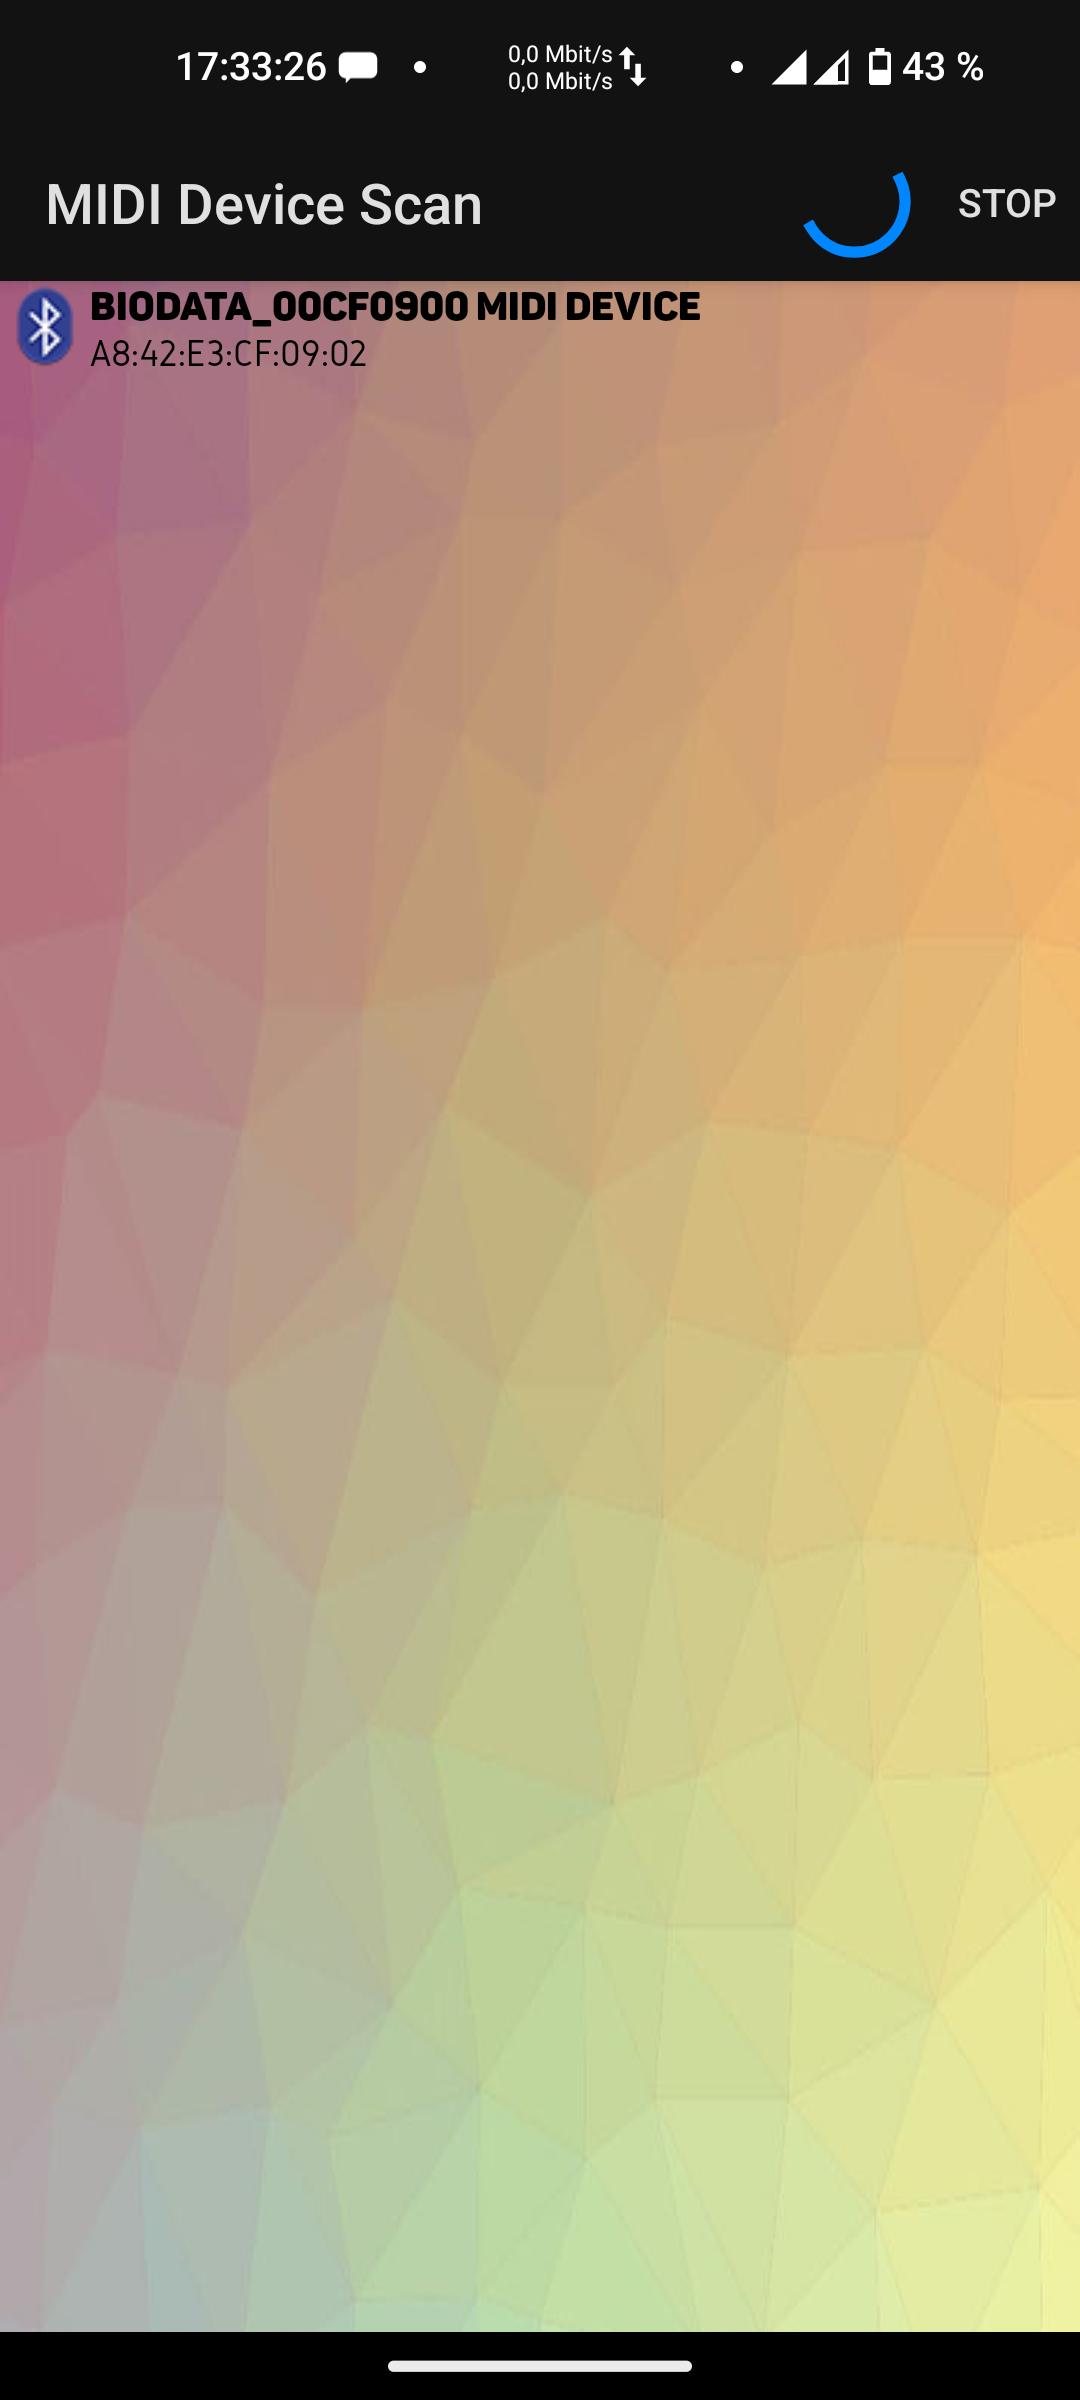
Wir benötigen ein Programm zum Mappen von Midi-Ports aus Bluetooth-Geräten. Hierfür eignet sich zum Beispiel: [Bluetooth MIDI Connect](https://play.google.com/store/apps/details?id=bluetooth.midi.connect "Bluetooth MIDI Connect")

[![Screenshot_20250811-173326_bluetooth.midi.connect.png](https://wiki.stadtfabrikanten.org/uploads/images/gallery/2025-08/scaled-1680-/GMvOvgaMH3CNnmY0-screenshot-20250811-173326-bluetooth-midi-connect.png)](https://wiki.stadtfabrikanten.org/uploads/images/gallery/2025-08/GMvOvgaMH3CNnmY0-screenshot-20250811-173326-bluetooth-midi-connect.png)
### Anwedungen, um Instrumente auf verfügbare Midi-Ports zu legen

Neben einem verfügbaren Midi-Port benötigen wir eine App zum Abspielen der Tonfolgen, die über das Interface geschickt werden. Hierfür empfiehlt sich [FluidSynth MIDI Synthesizer](https://play.google.com/store/apps/details?id=net.volcanomobile.fluidsynthmidi&hl=de "FluidSynth MIDI Synthesizer") oder [Piano MIDI BLE USB](https://play.google.com/store/apps/details?id=dcm.pianomidibleusb&hl=de).

#### [Piano MIDI BLE USB](https://play.google.com/store/apps/details?id=dcm.pianomidibleusb&hl=de)

[![Screenshot_20250806-201517_Piano MIDI BLE USB.png](https://wiki.stadtfabrikanten.org/uploads/images/gallery/2025-08/scaled-1680-/OLNfnrxxVXwuJs9l-screenshot-20250806-201517-piano-midi-ble-usb.png)](https://wiki.stadtfabrikanten.org/uploads/images/gallery/2025-08/OLNfnrxxVXwuJs9l-screenshot-20250806-201517-piano-midi-ble-usb.png) [![Screenshot_20250806-201603_Piano MIDI BLE USB.png](https://wiki.stadtfabrikanten.org/uploads/images/gallery/2025-08/scaled-1680-/ttnh3BKS9UmAOnCC-screenshot-20250806-201603-piano-midi-ble-usb.png)](https://wiki.stadtfabrikanten.org/uploads/images/gallery/2025-08/ttnh3BKS9UmAOnCC-screenshot-20250806-201603-piano-midi-ble-usb.png)
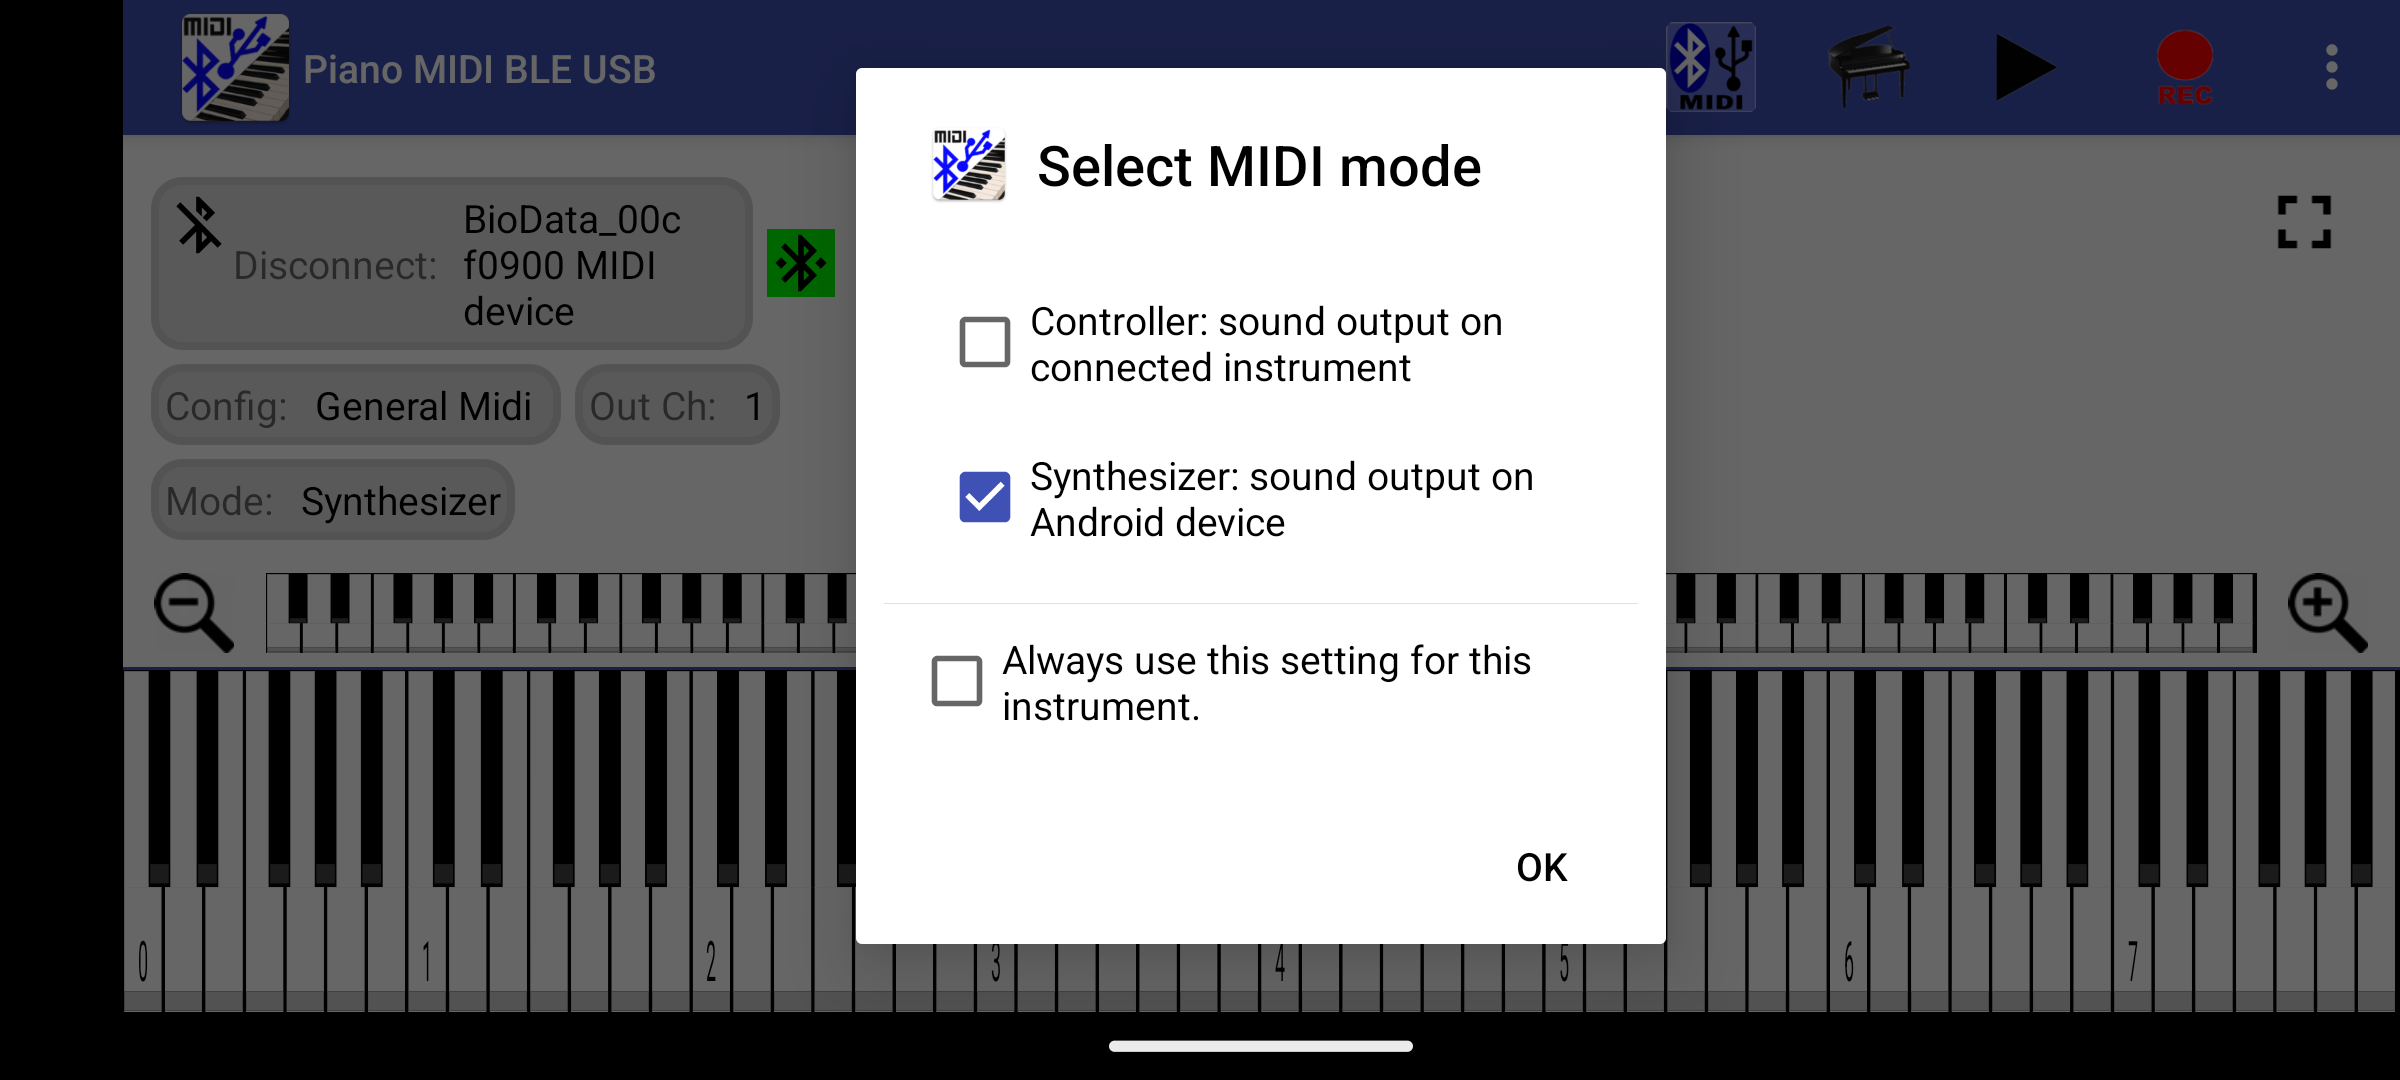
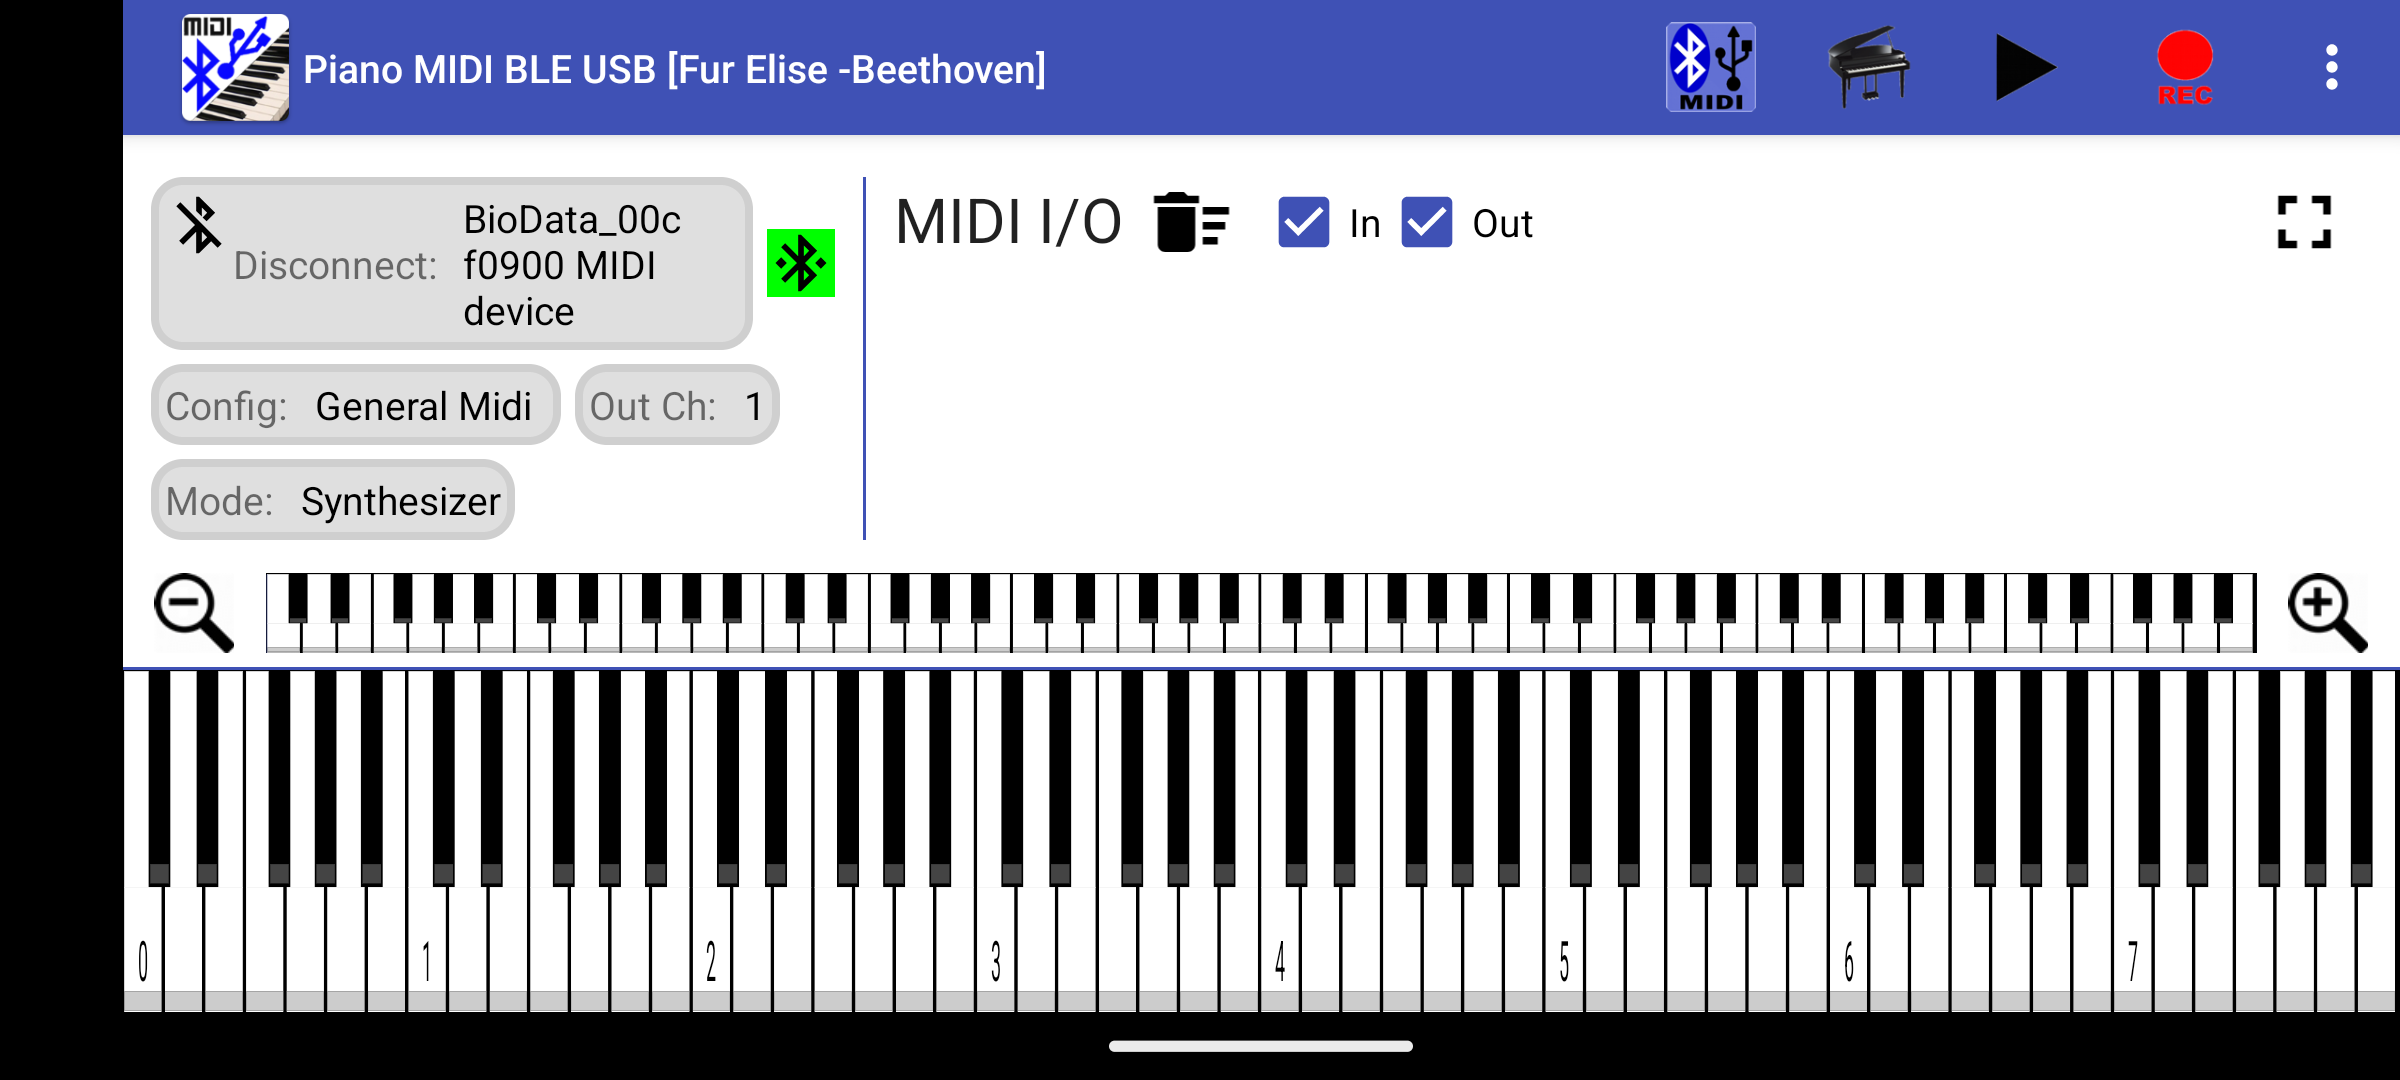
#### [FluidSynth MIDI Synthesizer](https://play.google.com/store/apps/details?id=net.volcanomobile.fluidsynthmidi&hl=de "FluidSynth MIDI Synthesizer")

Auch auf Github verfügbar: [https://github.com/FluidSynth/fluidsynth](https://github.com/FluidSynth/fluidsynth)

[![grafik.png](https://wiki.stadtfabrikanten.org/uploads/images/gallery/2025-08/scaled-1680-/yze8Eq5VUlMs0Xgr-grafik.png)](https://wiki.stadtfabrikanten.org/uploads/images/gallery/2025-08/yze8Eq5VUlMs0Xgr-grafik.png) [![Screenshot_20250806-192901_FluidSynth MIDI.png](https://wiki.stadtfabrikanten.org/uploads/images/gallery/2025-08/scaled-1680-/zBalsHr7ljj0vuKT-screenshot-20250806-192901-fluidsynth-midi.png)](https://wiki.stadtfabrikanten.org/uploads/images/gallery/2025-08/zBalsHr7ljj0vuKT-screenshot-20250806-192901-fluidsynth-midi.png)
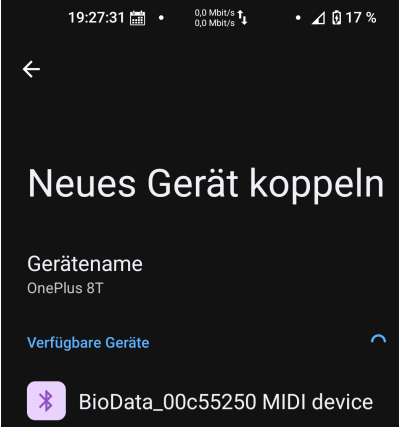
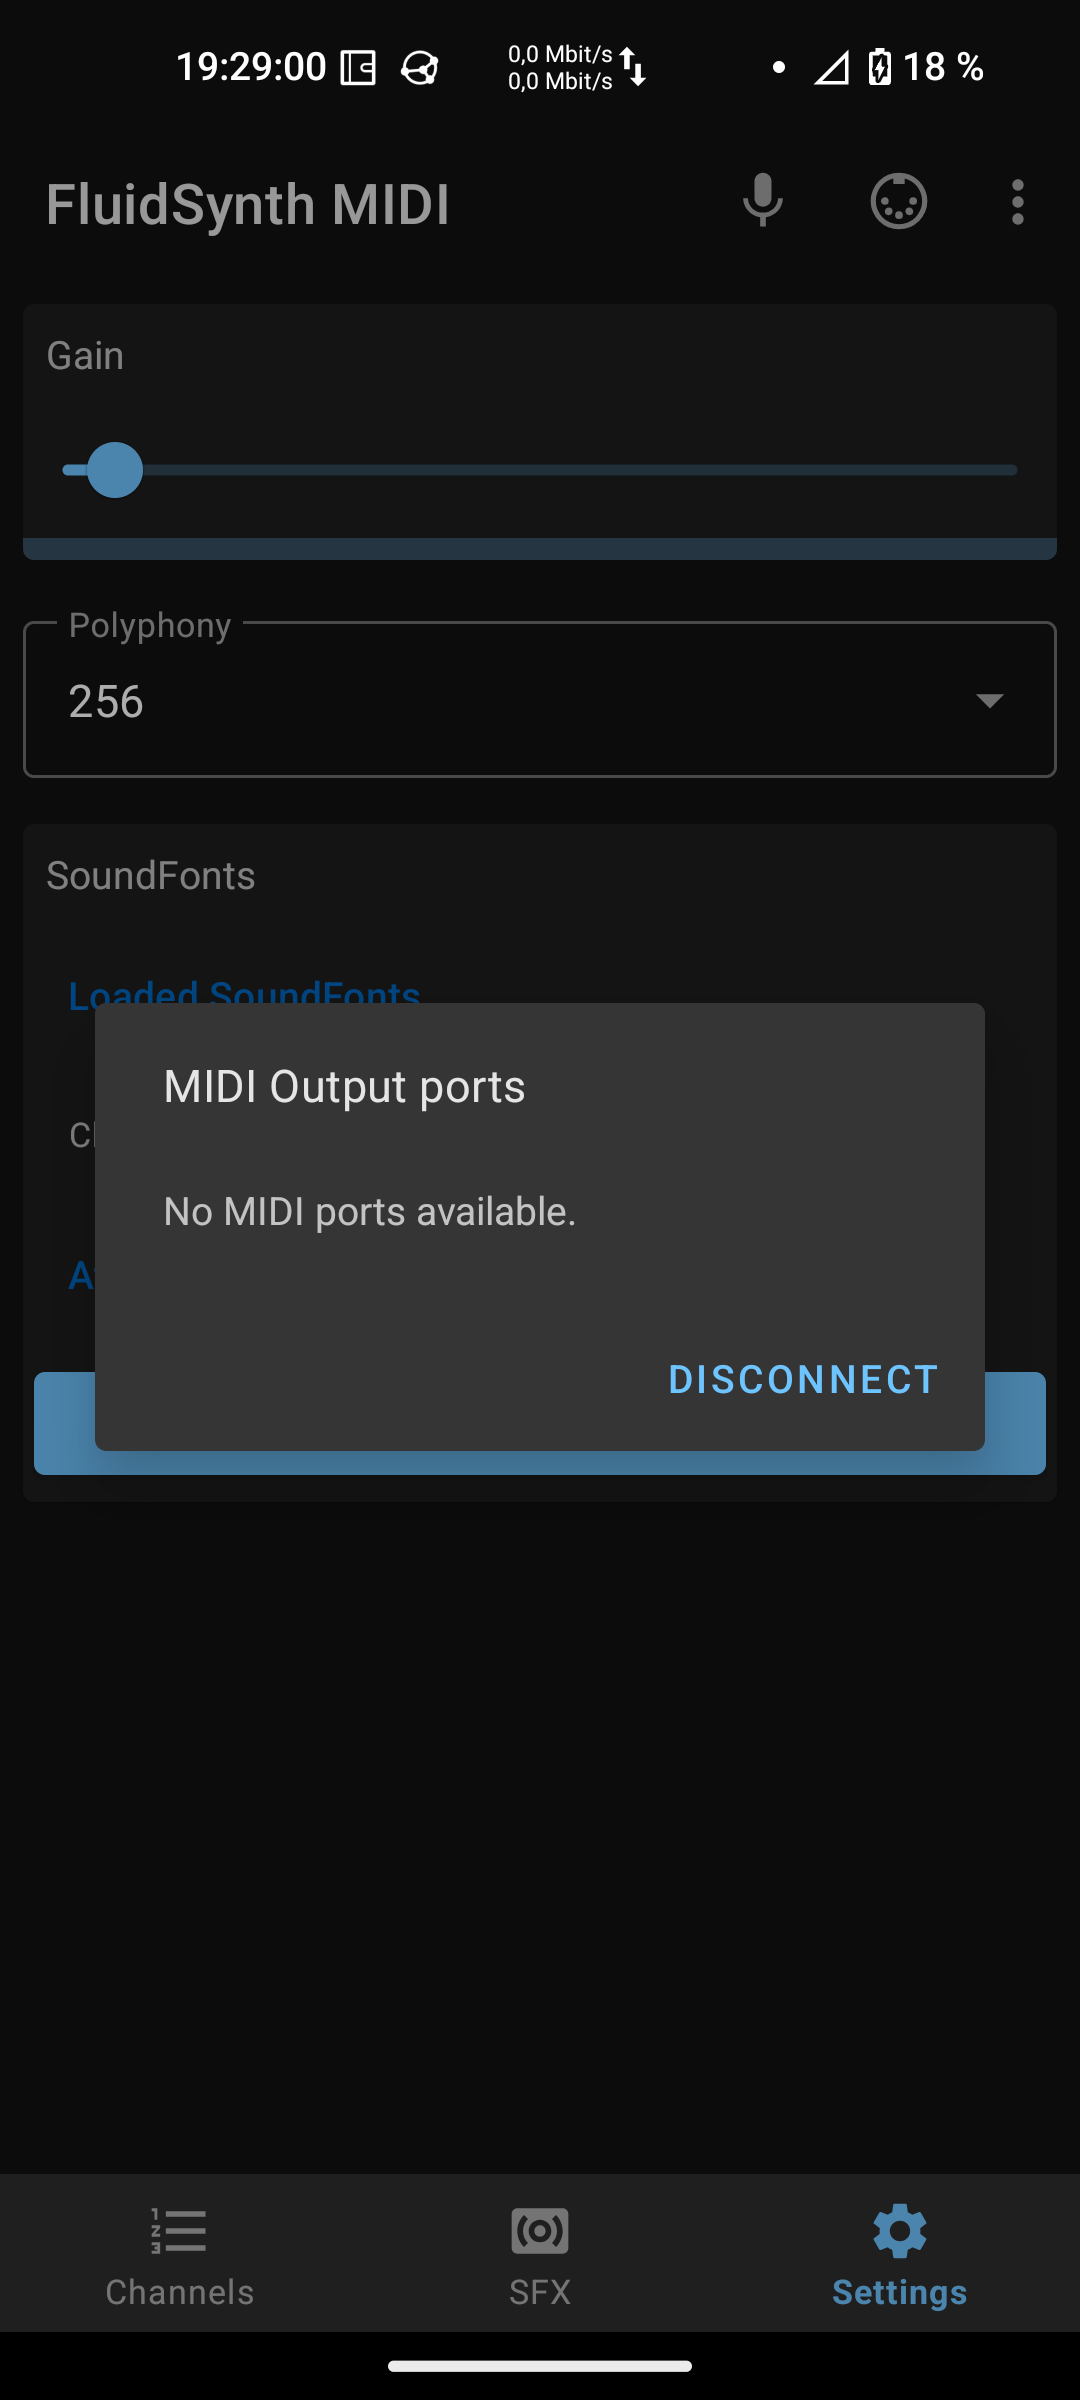
# Far-Feuille-Eu –  Schall- und Lichtwellen durch elektrische Aktivität von Pflanzen

<p class="callout info">Quelle: [Far-Feuille-Eu - Son et lumière généré par l'activité électrique d'une plante](https://wikifab.org/wiki/Far-Feuille-Eu_-_Son_et_lumi%C3%A8re_g%C3%A9n%C3%A9r%C3%A9_par_l%27activit%C3%A9_%C3%A9lectrique_d%27une_plante "Far-Feuille-Eu - Son et lumière généré par l'activité électrique d'une plante")</p>

[![grafik.png](https://wiki.stadtfabrikanten.org/uploads/images/gallery/2025-08/scaled-1680-/kX2yuZrsPjOGyDgn-grafik.png)](https://wiki.stadtfabrikanten.org/uploads/images/gallery/2025-08/kX2yuZrsPjOGyDgn-grafik.png)

## Einleitungsvideo

<iframe allowfullscreen="allowfullscreen" height="314" src="https://www.youtube.com/embed/O4S34NO_LiY" width="560"></iframe>

## Schritt 1 – Biodata-Sensor bauen

[![grafik.png](https://wiki.stadtfabrikanten.org/uploads/images/gallery/2025-08/scaled-1680-/eaQ7SL4RvGHZN2fw-grafik.png)](https://wiki.stadtfabrikanten.org/uploads/images/gallery/2025-08/eaQ7SL4RvGHZN2fw-grafik.png)

Je nach Ihrer Erfahrung benötigen Sie zwischen einer Stunde und einem halben Tag, um den Biodatensensor zusammenzubauen, zu testen und in Betrieb zu nehmen, mit dem jede Bluetooth-Synthesizer-Anwendung mit einer Pflanze verbunden werden kann. [Beginnen Sie mit der Anleitung von Stéphane Godin und bauen Sie diesen Sensor.](https://wiki.stadtfabrikanten.org/books/projekte-und-anleitungen-IW2/page/biodata-sensor-fur-esp32-diy-ohne-fertigplatine "BioData-Sensor für ESP32")

## Schritt 2 – Starten Sie den 3D-Druck

Mesurez votre pot de fleur et les dimensions nécessaires pour pouvoir intégrer votre plante, puis allez chercher [le fichier pour le socle](https://web.archive.org/web/20250520155247/https://drive.google.com/file/d/1WeacEAcX-e_NLnPgxIgujOgtNV_j1QRc/view?usp=sharing), et [le fichier pour le dôme.](https://web.archive.org/web/20250520155247/https://drive.google.com/file/d/114RNaMXRkyomxuzjUO1NQfzcZhYAg7Bp/view?usp=sharing)

Messen Sie Ihren Blumentopf und die erforderlichen Abmessungen, um Ihre Pflanze unterbringen zu können, und suchen Sie dann die Datei für den Sockel und die Datei für die Kuppel:

- [tazon-tissue-Ender3.stl](https://wiki.stadtfabrikanten.org/attachments/94)
- [Plant\_pot\_cover7.stl](https://wiki.stadtfabrikanten.org/attachments/93)

Passen Sie die Abmessungen und die Ausrichtung an, um zwei Ausdrucke vorzubereiten. Der Sockel kann im Vergleich zu den anderen Abmessungen X und Y um 50 % in der Z-Achse verkleinert werden, um das Modell zu „verdichten”. Der Druckvorgang kann sehr lange dauern. Die Volumen sind relativ dünn, sodass Sie eine hohe Füllrate (&gt;50 %) festlegen können. Starten oder planen Sie Ihre 3D-Drucke und fahren Sie mit dem Rest dieses Tutorials fort.

[![grafik.png](https://wiki.stadtfabrikanten.org/uploads/images/gallery/2025-08/scaled-1680-/kqgekZUuGPSyUM4o-grafik.png)](https://wiki.stadtfabrikanten.org/uploads/images/gallery/2025-08/kqgekZUuGPSyUM4o-grafik.png) [![grafik.png](https://wiki.stadtfabrikanten.org/uploads/images/gallery/2025-08/scaled-1680-/ClSwwdTQCcsHimag-grafik.png)](https://wiki.stadtfabrikanten.org/uploads/images/gallery/2025-08/ClSwwdTQCcsHimag-grafik.png)[![grafik.png](https://wiki.stadtfabrikanten.org/uploads/images/gallery/2025-08/scaled-1680-/TFOV1fHNz5kPHtiS-grafik.png)](https://wiki.stadtfabrikanten.org/uploads/images/gallery/2025-08/TFOV1fHNz5kPHtiS-grafik.png)
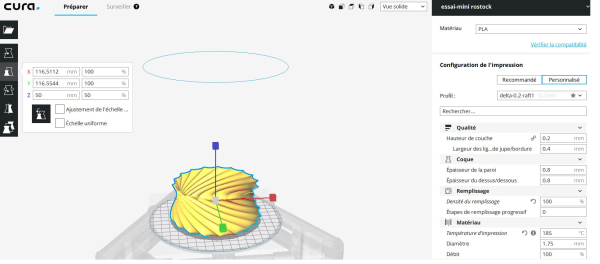
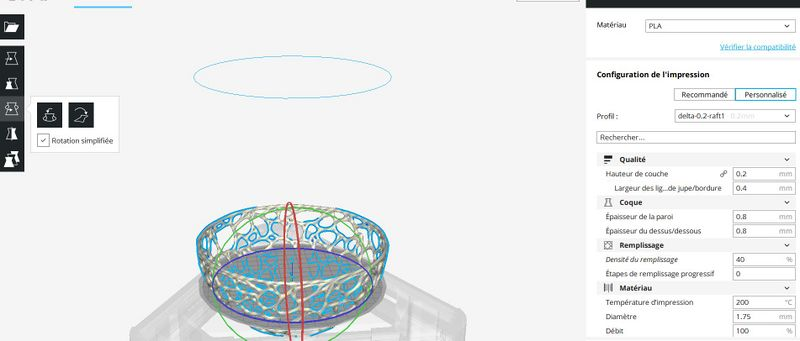
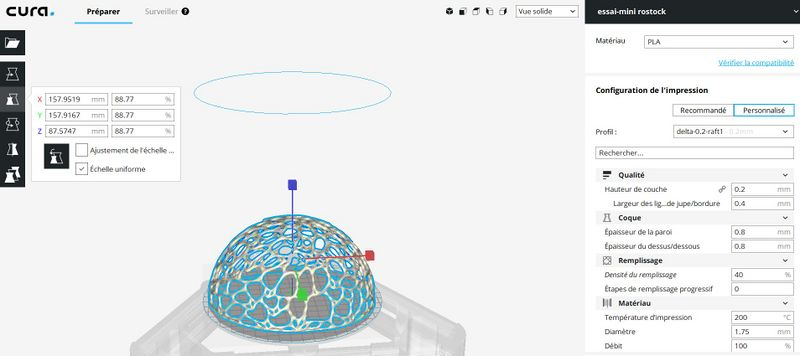
## Schritt 3 – Fertigen Sie die Reflektoren an

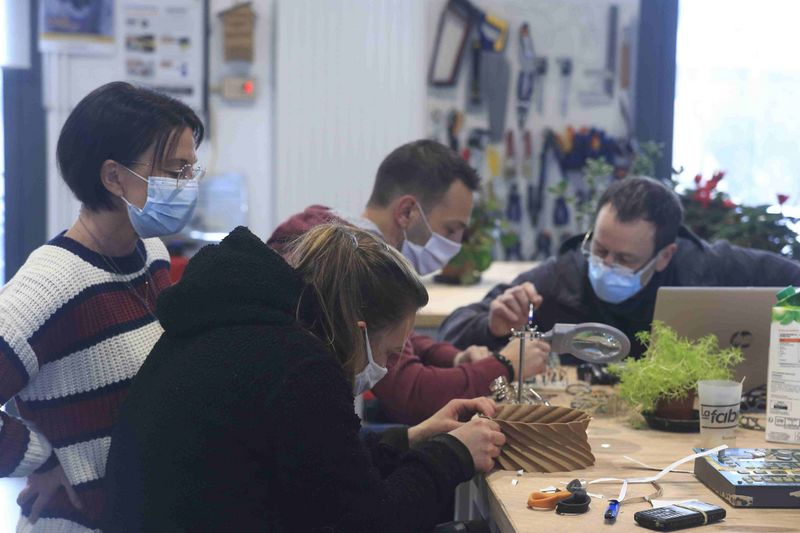
Sie benötigen eine Schere, Klebestift und Aluminiumfolie. Schneiden Sie kleine Streifen aus, die den Mustern des Sockels folgen.bHier hat das Team von Far-Feuille-Eu auch einen Rand am unteren Rand der Kuppel angebracht, ähnlich einem reflektierenden „Saturnring”. Kartonbasis und Aluminiumfolie. Kleben Sie Ihre Reflektoren sorgfältig in die Rillen des Sockels. Sie können auch versuchen, einen reflektierenden Ring am unteren Rand der Kuppel anzubringen.

[![grafik.png](https://wiki.stadtfabrikanten.org/uploads/images/gallery/2025-08/scaled-1680-/Xex0l9Rkm64imc7z-grafik.png)](https://wiki.stadtfabrikanten.org/uploads/images/gallery/2025-08/Xex0l9Rkm64imc7z-grafik.png) [![grafik.png](https://wiki.stadtfabrikanten.org/uploads/images/gallery/2025-08/scaled-1680-/fwFt7XjnsQs0yhnI-grafik.png)](https://wiki.stadtfabrikanten.org/uploads/images/gallery/2025-08/fwFt7XjnsQs0yhnI-grafik.png)
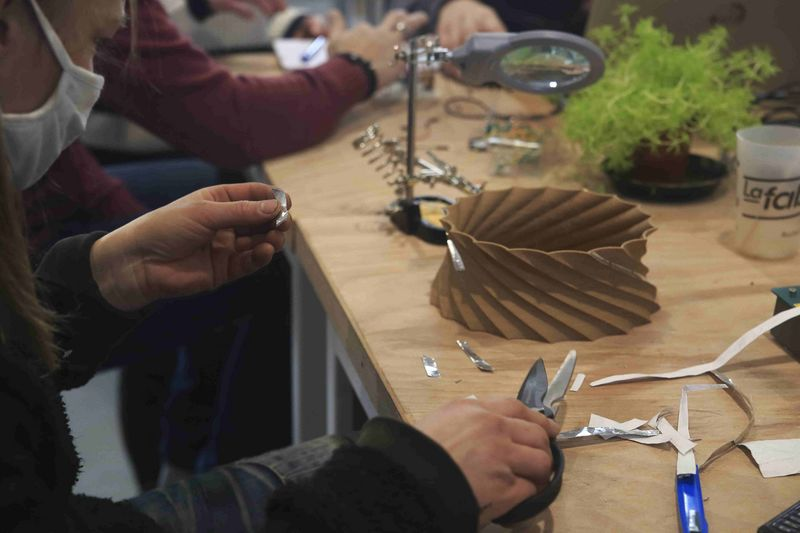
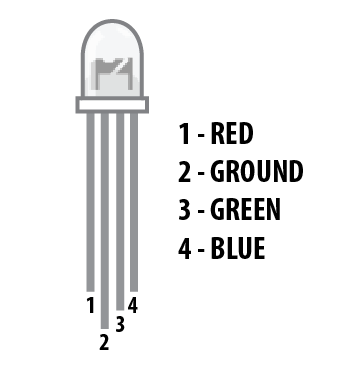
## Schritt 4 – Löten und verbinden Sie die RGB-LEDs

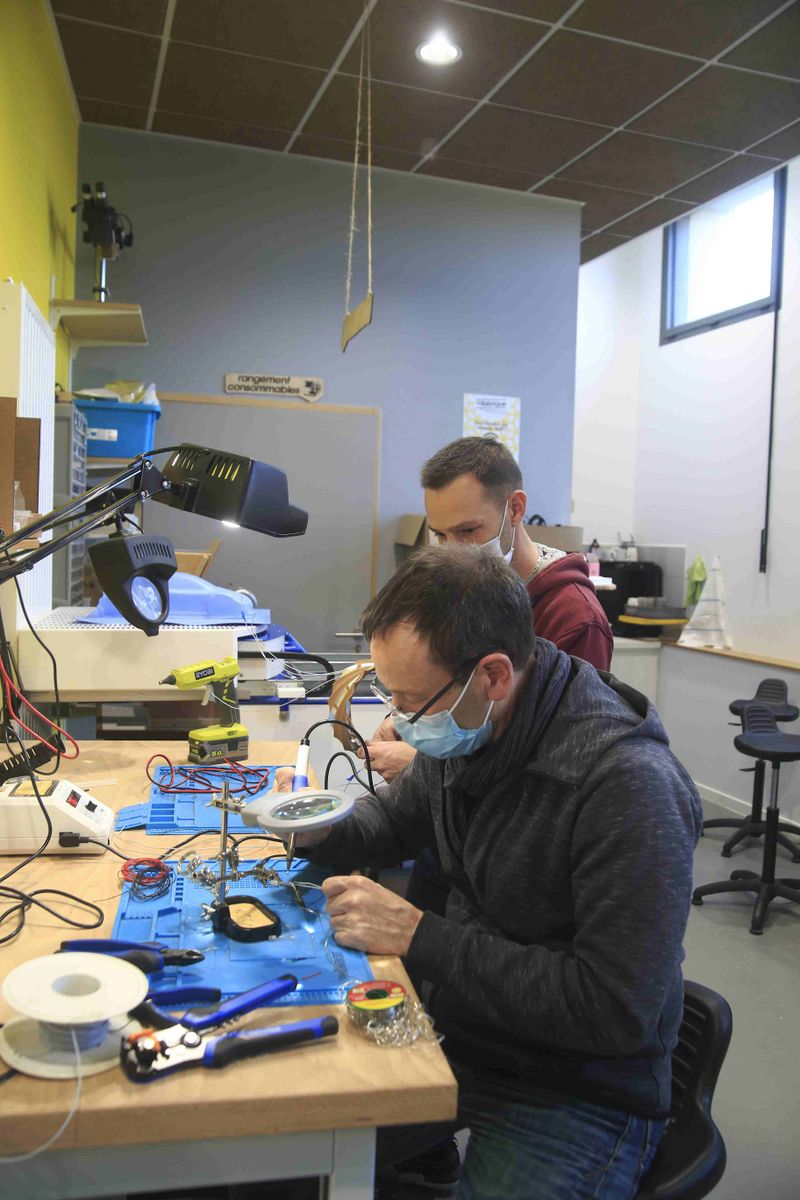
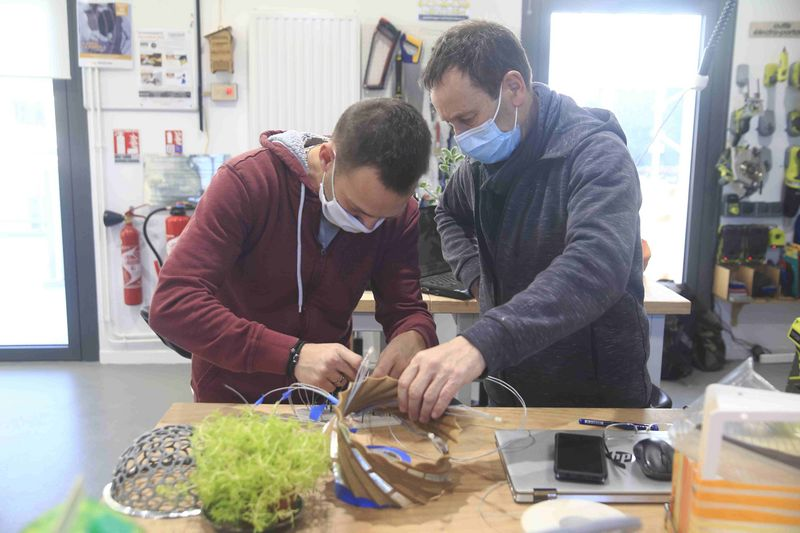
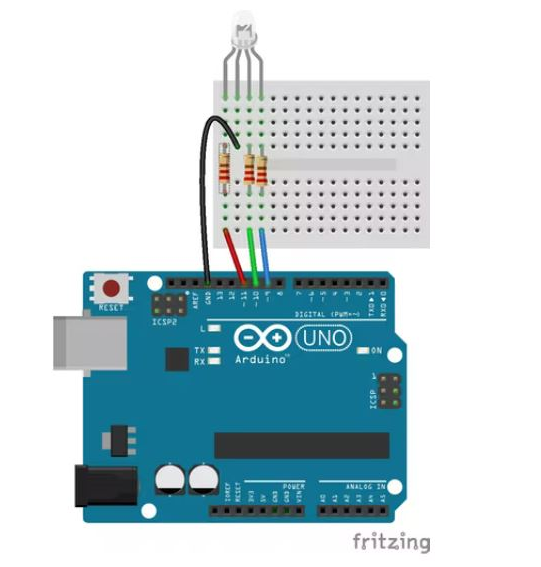
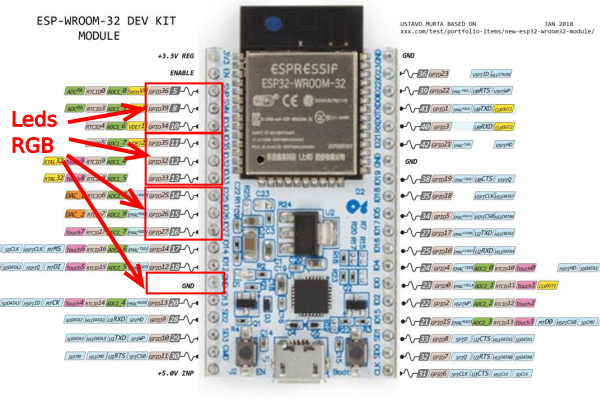
Wie im Quellcode von Schritt 5 zu sehen ist, müssen die RGB-LEDs an die nummerierten Pins des ESP32 Controllers angeschlossen werden. Es müssen jedoch auch drei mit drei RGB-LEDs verlötete Bänder hergestellt werden, die an die ESP32-Karte angeschlossen werden. Dies kann anhand der Prototyping-Platine erfolgen, die zur Herstellung des Biodatensensors verwendet wird.

Auf dem Prototyping-Board muss ein Widerstand von 220 K pro Farbstift auf RGB-LEDs vorgesehen werden. Die Masse der LEDs ist mit GND des ESP32 verbunden. [Diese Anleitung kann Ihnen helfen, wenn Sie noch nie eine RGB-LED an einen Arduino angeschlossen haben.](https://web.archive.org/web/20250520155247/https://create.arduino.cc/projecthub/muhammad-aqib/arduino-rgb-led-tutorial-fc003e)

Die drei LEDs dieses Prototyps sind wie folgt verdrahtet:

```c
#define PIN1_RED 25 // GIOP25
#define PIN1_GREEN 26 // GIOP26
#define PIN1_BLUE 27 // GIOP27
#define PIN2_RED 35 // GIOP35
#define PIN2_GREEN 32 // GIOP32
#define PIN2_BLUE 33 // GIOP33
#define PIN3_RED 36 // GIOP36
#define PIN3_GREEN 39 // GIOP39
#define PIN3_BLUE 34 // GIOP34
```

Wenn Sie die Anleitung zur Herstellung des Sensors von Stéphane Godin befolgt haben, verwenden Sie dasselbe ESP32-wroom-Modul. Das letzte Bild zeigt Ihnen, wo Sie Ihre LEDs anschließen müssen. Sie können alle Massen der LEDs mit der Masse (GND) der ESP32-Karte verbinden. Anschließend können Sie Tests durchführen, müssen aber noch Ihre LED-Bänder in die Kuppelstruktur integrieren, beispielsweise mit Klebeband.

Wenn Ihnen das gelingt, haben Sie die Kuppel der Far-Feuille-Eu gebaut!

[![grafik.png](https://wiki.stadtfabrikanten.org/uploads/images/gallery/2025-08/scaled-1680-/JFPuasdbNyazjaBN-grafik.png)](https://wiki.stadtfabrikanten.org/uploads/images/gallery/2025-08/JFPuasdbNyazjaBN-grafik.png) [![grafik.png](https://wiki.stadtfabrikanten.org/uploads/images/gallery/2025-08/scaled-1680-/oZawxthWgDc90wzc-grafik.png)](https://wiki.stadtfabrikanten.org/uploads/images/gallery/2025-08/oZawxthWgDc90wzc-grafik.png) [![grafik.png](https://wiki.stadtfabrikanten.org/uploads/images/gallery/2025-08/scaled-1680-/go3n6zyvVkP314go-grafik.png)](https://wiki.stadtfabrikanten.org/uploads/images/gallery/2025-08/go3n6zyvVkP314go-grafik.png) [![grafik.png](https://wiki.stadtfabrikanten.org/uploads/images/gallery/2025-08/scaled-1680-/20JRTCeNSePFMntp-grafik.png)](https://wiki.stadtfabrikanten.org/uploads/images/gallery/2025-08/20JRTCeNSePFMntp-grafik.png) [![grafik.png](https://wiki.stadtfabrikanten.org/uploads/images/gallery/2025-08/scaled-1680-/bgNxhWMJ7vGyark8-grafik.png)](https://wiki.stadtfabrikanten.org/uploads/images/gallery/2025-08/bgNxhWMJ7vGyark8-grafik.png)
## Schritt 5 – Arduino Quellcode integrieren und ESP32-Modul flashen

Nachfolgend finden Sie den von Jacques während des Hackathons entwickelten Quellcode.

Sie können diese .ino-Datei auch herunterladen und mit der Arduino-Software öffnen, wobei Sie dieselben Einstellungen wie in der Anleitung von Stéphane Godin verwenden, und sie dann an den ESP32 zu laden.

```c#
#define PIN1_RED 25 // GIOP25
#define PIN1_GREEN 26 // GIOP26
#define PIN1_BLUE 27 // GIOP27
#define PIN2_RED 35 // GIOP35
#define PIN2_GREEN 32 // GIOP32
#define PIN2_BLUE 33 // GIOP33
#define PIN3_RED 36 // GIOP36
#define PIN3_GREEN 39 // GIOP39
#define PIN3_BLUE 34 // GIOP34

#define R_channel 0
#define G_channel 1
#define B_channel 2

#define pwm_frequency 5000 // frequence pwm
#define pwm_resolution 8 // 8 bit resolution

//##############################
void setup()
{
  pinMode(PIN1_RED,   OUTPUT);
  pinMode(PIN1_GREEN, OUTPUT);
  pinMode(PIN1_BLUE,  OUTPUT);

  pinMode(PIN2_RED,   OUTPUT);
  pinMode(PIN2_GREEN, OUTPUT);
  pinMode(PIN2_BLUE,  OUTPUT);

  pinMode(PIN3_RED,   OUTPUT);
  pinMode(PIN3_GREEN, OUTPUT);
  pinMode(PIN3_BLUE,  OUTPUT);


  ledcAttachPin (PIN1_RED, R_channel);
  ledcAttachPin (PIN1_GREEN, G_channel);
  ledcAttachPin (PIN1_BLUE, B_channel);

  ledcAttachPin (PIN2_RED, R_channel);
  ledcAttachPin (PIN2_GREEN, G_channel);
  ledcAttachPin (PIN2_BLUE, B_channel);
  
  ledcAttachPin (PIN3_RED, R_channel);
  ledcAttachPin (PIN3_GREEN, G_channel);
  ledcAttachPin (PIN3_BLUE, B_channel);
  
  ledcSetup(R_channel, pwm_frequency,pwm_resolution);
  ledcSetup(G_channel, pwm_frequency,pwm_resolution);
  ledcSetup(B_channel, pwm_frequency,pwm_resolution);

}

void loop()
{
          //Correspondance des frequences des notes en hertz (octave à 0) et la couleurs
          Serial.println (note.value); 
          if (note.value == 36) //Do
          {
          setColor(237, 0, 0); // RGB_Ecarlate
          }
          else if (note.value == 37) //Do# 
          {
          setColor(255, 0, 0); //RGB rouge
          }
          else if (note.value == 38) //Ré_Orange
          {
          setColor(255, 165, 0); //RGB_Ornage
          }
          else if (note.value == 39) //Ré#_Jaune
          {
          setColor(255, 255, 0); //RGB_Jaune
          }
          else if (note.value == 40) //Mi_Citron 
          {
          setColor(0, 255, 0); //RGB_Citron
          }
          else if (note.value == 41) //Fa_Vert
          {
          setColor(0, 128, 0); //RGB_Vert
          }
          else if (note.value == 42) //Fa#_Turquoise
          {
          setColor(0, 206, 209); //RGB_Turquoise
          }
          else if (note.value == 43) //Sol
          {
          setColor(0, 255, 255); //RGB_Cyan
          }
          else if (note.value == 44) //Sol#_Indigo 
          {
          setColor(75, 0, 130); //RGB_Indigo
          }
          else if (note.value == 45) //La_Bleu
          {
          setColor(0, 0, 255); //RGB_Bleu
          }
          else if (note.value == 46) //La#_Pourpre 
          {
          setColor(176, 224, 230); //RGB_Pourpre
          }
          else if (note.value == 47) //Si
          {
          setColor(255, 0, 255); //RGB_Mangenta
          }
 }

void setColor(int R, int G, int B) 
{
ledcWrite(R_channel,R);
ledcWrite(G_channel,G);
ledcWrite(B_channel,B);

}
```

## Schritt 6 – Ton- und Lichttests

1. Sie müssen auf einem Mobiltelefon mit Bluetooth eine kostenlose Synthesizer-App installieren. Siehe [Bluetooth BLE Midi](https://wiki.stadtfabrikanten.org/books/projekte-und-anleitungen-IW2/page/bluetooth-ble-midi-anwendungen-apps "Bluetooth BLE Midi").
2. Aktivieren Sie dann Bluetooth in den Einstellungen Ihres Smartphones.
3. Starten Sie schließlich die Synthesizer-App und aktivieren Sie die Auswahl einer Bluetooth-Midi-Quelle.
4. Wählen Sie „far-feuille-eu”. Sie sollten nun mit der MIDI-Quelle verbunden sein und den Klang der Pflanze hören können.
5. Durch die Einstellung der Klänge, die den MIDI-Kanälen 1 bis 3 zugewiesen sind, mit dem Synthesizer können Sie die Atmosphäre stark beeinflussen. Die Noten und der Rhythmus werden durch den Arduino-Quellcode definiert.

# MUTED – Biodata-Gehäuse für analoges Synthesizer-Modul

<p class="callout info">Originalquelle: [https://wikifab.org/wiki/MUTED\_-\_boitier\_biodata\_vers\_module\_de\_synth%C3%A9tiseur\_analogique](https://wikifab.org/wiki/MUTED_-_boitier_biodata_vers_module_de_synth%C3%A9tiseur_analogique)</p>

[![grafik.png](https://wiki.stadtfabrikanten.org/uploads/images/gallery/2025-08/scaled-1680-/3zVNWf9TsjNf2pBz-grafik.png)](https://wiki.stadtfabrikanten.org/uploads/images/gallery/2025-08/3zVNWf9TsjNf2pBz-grafik.png)

Gehäuse zum Anschluss einer Pflanze an einen analogen Synthesizer. Prototyp, der vom MUTED-Team während eines Hackathons zur Umwandlung von Biodaten in Musik entwickelt wurde, der Ende 2021 vom Climate Change Lab in Janzé in der Nähe von Rennes organisiert wurde.

## <span class="mw-headline" id="bkmrk-einf%C3%BChrung-1">Einführung</span>

Dieser Prototyp wurde innerhalb von zwei Tagen in Janzé in der Nähe von Rennes vom MUTED-Team während eines Hackathons entwickelt, dessen Ziel es war, die in einer Pflanze festgestellte biologische Aktivität in eine musikalische Installation umzuwandeln. Um ihn nachzubauen, muss zunächst der im erforderlichen Tutorial beschriebene Sensor hergestellt werden.

Dann eine 3,5-mm-Klinkenbuchse zum Löten (oder aus einem alten Kopfhörerkabel) und eine Box zum Einbau des Geräts.

Achtung: Es funktioniert mit jedem Gerät, das eine Steuerspannung zwischen 0 und 3,3 V akzeptiert (insbesondere alle analogen Synthesizer).

## <span class="mw-headline" id="bkmrk-einleitungsvideo-1">Einleitungsvideo</span>

<span class="mw-headline"><iframe allowfullscreen="allowfullscreen" height="314" src="https://www.youtube.com/embed/IRmjFJB9KYg?embeds_referring_euri=https" width="560"></iframe>

</span>

## Schritt 1 – Führen Sie zunächst das Tutorial [Biodata-Sensor mit ESP32](https://wiki.stadtfabrikanten.org/books/projekte-und-anleitungen-IW2/page/biodata-sensor-fur-esp32-diy-ohne-fertigplatine "BioData-Sensor für ESP32") durch.

[![grafik.png](https://wiki.stadtfabrikanten.org/uploads/images/gallery/2025-08/scaled-1680-/zUMOCTFuJafo6MRS-grafik.png)](https://wiki.stadtfabrikanten.org/uploads/images/gallery/2025-08/zUMOCTFuJafo6MRS-grafik.png)
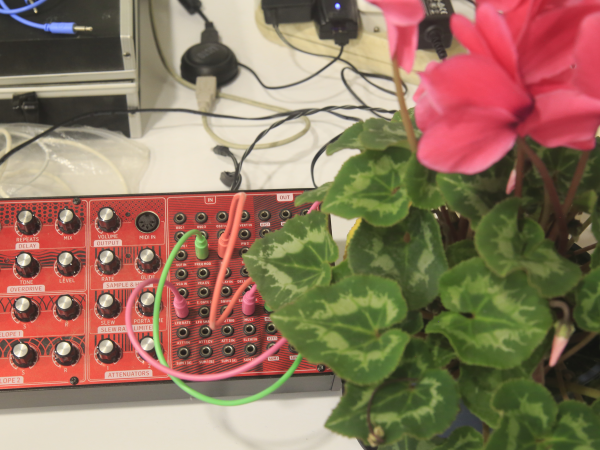
Achtung: Sie müssen zunächst in der Lage sein, eine Pflanze an eine elektronische Karte anzuschließen, um winzige elektrische Schwankungen zu erfassen und umzuwandeln. Dies dauert zwischen zwei Stunden und einem halben Tag, wenn Sie dem Tutorial von Stéphane Godin folgen.

## Schritt 2 – Arduino-Quellcode integrieren

[![grafik.png](https://wiki.stadtfabrikanten.org/uploads/images/gallery/2025-08/scaled-1680-/5j9CIJE5i0LgHVjE-grafik.png)](https://wiki.stadtfabrikanten.org/uploads/images/gallery/2025-08/5j9CIJE5i0LgHVjE-grafik.png)
Der kompatible Quellcode für den Betrieb des Sensors wird hier aufgerufen. Er muss kompiliert und mit dem Arduino-Tool an das ESP32-Modul gesendet werden.

```c#
/*
 MIT License

Copyright (c) 2016 electricityforprogress

Permission is hereby granted, free of charge, to any person obtaining a copy
of this software and associated documentation files (the "Software"), to deal
in the Software without restriction, including without limitation the rights
to use, copy, modify, merge, publish, distribute, sublicense, and/or sell
copies of the Software, and to permit persons to whom the Software is
furnished to do so, subject to the following conditions:

The above copyright notice and this permission notice shall be included in all
copies or substantial portions of the Software.

THE SOFTWARE IS PROVIDED "AS IS", WITHOUT WARRANTY OF ANY KIND, EXPRESS OR
IMPLIED, INCLUDING BUT NOT LIMITED TO THE WARRANTIES OF MERCHANTABILITY,
FITNESS FOR A PARTICULAR PURPOSE AND NONINFRINGEMENT. IN NO EVENT SHALL THE
AUTHORS OR COPYRIGHT HOLDERS BE LIABLE FOR ANY CLAIM, DAMAGES OR OTHER
LIABILITY, WHETHER IN AN ACTION OF CONTRACT, TORT OR OTHERWISE, ARISING FROM,
OUT OF OR IN CONNECTION WITH THE SOFTWARE OR THE USE OR OTHER DEALINGS IN THE
SOFTWARE.


This project is based on https://github.com/electricityforprogress/MIDIsprout great work about biodata sonification
*/

#include <Arduino.h>

#define SAMPLESIZE  32
#define LED 5
#define DAC1 25

#define DESIRED_EVENT 6
#define ARRAYLEN(a) ((sizeof(a))/(sizeof(a[0])))

//manage LEDs without delay() jgillick/arduino-LEDFader https://github.com/jgillick/arduino-LEDFader.git
void sample();
float mapfloat(float x, float in_min, float in_max, float out_min, float out_max);
void analyzeSample();


//******************************
static byte state;
//*******************************

const byte interruptPin = 12; //galvanometer input

byte samplesize = SAMPLESIZE / 2; //set sample array size
//const byte analysize = SAMPLESIZE - 1;  //trim for analysis array


int CVmod = 0;


volatile unsigned long microseconds; //sampling timer
volatile byte sindex = 0;
volatile unsigned long samples[SAMPLESIZE];

float threshold = 1;  //change threshold multiplier


unsigned long previousMillis = 0;
unsigned long currentMillis = 1;
unsigned long batteryCheck = 0; //battery check delay timer

uint32_t threshold_last_millis = 0;
unsigned int  threshold_evt = 0;


//std::vector<CSequence*> psequences;

uint32_t sequence_time = 0;
uint16_t sequence_index = 0;
uint32_t chipId = 0;

char bleserverid[64] = "";
void setup()
{

  for(int i=0; i<17; i=i+8) {
    chipId |= ((ESP.getEfuseMac() >> (40 - i)) & 0xff) << i;
  }


  pinMode (LED, OUTPUT);    // initilize led output
  digitalWrite(LED, HIGH);   // set led ON

  sprintf (bleserverid, "BioData_%08lx MIDI device", chipId);
 // BLEMidiServer.begin(bleserverid); // initialize bluetooth midi
  Serial.begin(115200);                       //initialize Serial for debug


  attachInterrupt(interruptPin, sample, RISING);  //begin sampling data from interrupt

}

void loop()
{
  currentMillis = millis();   //manage time

  if(sindex >= samplesize)  { analyzeSample(); }  //if samples array full, also checked in analyzeSample(), call sample analysis
 

  if (currentMillis - threshold_last_millis > 15000)
  {

      if (threshold_evt < DESIRED_EVENT)
      {
        if (threshold > 0.001)
          threshold /= 1.4;
      }
      else
      {
        if (threshold < 10)
          threshold *= 1.4;
      }
      threshold_last_millis = currentMillis;
      threshold_evt = 0;
      //Serial.println(threshold);
  }


}


//interrupt timing sample array
void sample()
{
  if(sindex < samplesize) {
    samples[sindex] = micros() - microseconds;
    microseconds = samples[sindex] + microseconds; //rebuild micros() value w/o recalling
    //micros() is very slow
    //try a higher precision counter
    //samples[sindex] = ((timer0_overflow_count << 8) + TCNT0) - microseconds;
    sindex += 1;
  }
  digitalWrite(LED, ((state) & 0x01) == 0 ? HIGH : LOW);
  state++;


}


void analyzeSample()
{

  //eating up memory, one long at a time!
  unsigned long averg = 0;
  unsigned long maxim = 0;
  unsigned long minim = 10000000;
  float stdevi = 0;
  unsigned long delta = 0;
  byte change = 0;

   digitalWrite(LED, ((state) & 0x01) == 0 ? HIGH : LOW);
  state++;
  if (sindex >= samplesize) { //array is full
    unsigned long sampanalysis[SAMPLESIZE];
    for (byte i=0; i < samplesize; i++){
      //skip first element in the array
      sampanalysis[i] = samples[i];  //load analysis table (due to volitle)
      //manual calculation
      if(sampanalysis[i] > maxim) { maxim = sampanalysis[i]; }
      if(sampanalysis[i] < minim) { minim = sampanalysis[i]; }
      averg += sampanalysis[i];

    }
    averg = averg / (samplesize);
    for (byte i = 0; i < samplesize; i++)
    {
      stdevi += (sampanalysis[i] - averg) * (sampanalysis[i] - averg) ;  //prep stdevi
    }

    //manual calculation

    stdevi = stdevi / (samplesize);
    if (stdevi < 1) { stdevi = 1.0; } //min stdevi of 1

    stdevi = sqrt(stdevi); //calculate stdevu

    delta = maxim - minim;


    //Serial.printf("%ld %ld %ld %ld %f %f\r\n", minim, maxim, averg, delta, stdevi, stdevi * threshold);
    Serial.printf("%ld", delta);
    //Serial.print(averg);
    Serial.println(",");
    CVmod = map(delta, 0, 20000, 0, 255);
    Serial.println(CVmod);
    
    int data2 = delta % 255;
    Serial.println(data2);
    dacWrite(DAC1, data2);

    sindex = 0;

  }
}
```

## Schritt 3 – Anschlüsse überprüfen

[![grafik.png](https://wiki.stadtfabrikanten.org/uploads/images/gallery/2025-08/scaled-1680-/ANXbjfxzH8Y1bybc-grafik.png)](https://wiki.stadtfabrikanten.org/uploads/images/gallery/2025-08/ANXbjfxzH8Y1bybc-grafik.png)

Die Masse Ihres Audiokabels muss an den GND-Pin des ESP32 angeschlossen werden.

Der andere Draht muss an den GPIO-Pin 25 angeschlossen werden. Das Modul verfügt nämlich über zwei Pins, die automatisch die Umwandlung „Digital Analogic Converter” vornehmen, die Pins GPIO 25 und 26. Dies geschieht in einem Bereich zwischen 0 und 3,3 V.

Um die Funktion zu testen, können Sie ein Multimeter nehmen und es an zwei Abschnitten des Klinkensteckers anlegen. Normalerweise messen Sie eine variable Spannung zwischen 0 und 3,3 V.

## Schritt 4 – Das Modul an einen Synthesizer anschließen

[![grafik.png](https://wiki.stadtfabrikanten.org/uploads/images/gallery/2025-08/scaled-1680-/hYQGvQtlW1P9UFSo-grafik.png)](https://wiki.stadtfabrikanten.org/uploads/images/gallery/2025-08/hYQGvQtlW1P9UFSo-grafik.png)

Jetzt müssen Sie nur noch das an eine Pflanze angeschlossene Gehäuse mit Strom versorgen (zwei abisolierte Kabel an zwei Stäben) und den Stecker einstecken, um ein lebendes Modul in Ihren Synthesizer zu integrieren.

Ein großes Dankeschön an Simon Lamy für die bereitgestellten Informationen und die Medienelemente dieses Tutorials!

## Notizen und Referenzen

- Biodata/Sound/Beispiele: [https://electricityforprogress.com/biodata-sonification](https://electricityforprogress.com/biodata-sonification)
- Mehrere Ressourcen Labomedia: [https://ressources.labomedia.org/capteurs\_environnementaux\_biofeedback](https://ressources.labomedia.org/capteurs_environnementaux_biofeedback)
- Midi + Arduino: [http://www.planetarduino.org/?cat=5499](http://www.planetarduino.org/?cat=5499)
- MIDI/Noten: [https://newt.phys.unsw.edu.au/jw/notes.html](https://newt.phys.unsw.edu.au/jw/notes.html)
- Midi-Paket-Logger: [http://www.midiox.com](http://www.midiox.com)

# Projektbeschreibung Hartensteiner Stern 3D-Druck

- von: Knut Jähnig, FabLab Chemnitz
- Veröffentlicht unter: [<u>https://www.thingiverse.com/thing:3897502</u>](https://www.thingiverse.com/thing:3897502)
- Datum: 08.12.2018

[![grafik.png](https://wiki.stadtfabrikanten.org/uploads/images/gallery/2025-10/scaled-1680-/datOCvih8bG5GIT2-grafik.png)](https://wiki.stadtfabrikanten.org/uploads/images/gallery/2025-10/datOCvih8bG5GIT2-grafik.png)

*Abbildung 1: neuwertiger Hartensteiner Adventsstern (Quelle: [https://www.erzgebirge-palast.de](https://www.erzgebirge-palast.de/Adventssterne-und-Weihnachtssterne/Hartensteiner-Weihachtssterne/Hartensteiner-Weihnachtsstern-fuer-Innen-weiss-weinrot-mit-gold-68-cm::13319.html?utm_campaign=shopping&utm_source=merchantcenter&utm_medium=googleshopping&utm_content=google-de&gclid=EAIaIQobChMI0vWMwYv55QIVAuR3Ch2EOALCEAQYASABEgKDPfD_BwE#gid=null&pid=1))*

## Einleitung

Mein älterer Hartensteiner Weihnachtsstern ging langsam kaputt. Besonders das Innenleben leimte auseinander und war nicht mehr stabil genug den Stern zu halten. Ich entschloss mich, das Gerüst des Sterns neu zu drucken.

## Aufbau des Sterns

Der Stern besteht aus 12 fünfeckigen Spitzen und einem Gerüst aus Pappe, welches schon mehrfach verstärkt wurde.

## Neukonstruktion

[![grafik.png](https://wiki.stadtfabrikanten.org/uploads/images/gallery/2025-10/scaled-1680-/3kdzXN36BehQ2r8D-grafik.png)](https://wiki.stadtfabrikanten.org/uploads/images/gallery/2025-10/3kdzXN36BehQ2r8D-grafik.png)

 Abbildung 2: alter Grundkörper

Um dieses Gerüst zu ersetzen habe ich den Grundkörper neu konstruiert. Aufgrund der Größe habe ich mich entschieden das Gerüst aus 12 Einzelteilen zusammen zu setzen. Dies lassen sich leichter drucken und es sind keine aufwendigen Abstützungen beim Drucken nötig. Für die Konstruktion verwende ich FreeCAD.

[![grafik.png](https://wiki.stadtfabrikanten.org/uploads/images/gallery/2025-10/scaled-1680-/Kw9FnLYniocoGzog-grafik.png)](https://wiki.stadtfabrikanten.org/uploads/images/gallery/2025-10/Kw9FnLYniocoGzog-grafik.png)

Abbildung 3: Konstruktion Teilkörper

## Berechnung der Winkel

Damit die Teile aneinander passen muss der Winkel der Kanten untereinander berechnet werden. Die Summe aller Winkel um diesen Mittelpunkt ist der Vollkreis mit 360°. Daher beträgt der Winkel zum Mittelpunkt in jedem Dreieck $72° = \\frac{360°}{5}$. Die beiden anderen Winkel sind gleich groß, daher ergeben sich die andern Dreieckwinkel aus der Innenwinkelsumme $\\frac{180° - 72°}{2} = 54°$. Die Innenwinkel im Fünfeck bestehen aus zwei Dreieckswinkel und daher einen Wert von $2 \\cdot 54° = 108°$

[![grafik.png](https://wiki.stadtfabrikanten.org/uploads/images/gallery/2025-10/scaled-1680-/sRJ3Ij0Acx7YCQ1v-grafik.png)](https://wiki.stadtfabrikanten.org/uploads/images/gallery/2025-10/sRJ3Ij0Acx7YCQ1v-grafik.png)

*Abbildung 4: Berechnung Innenwinkel Fünfeck*

***![](https://old.stadtfabrikanten.org/download/attachments/55019687/Grafik14.png?version=1&modificationDate=1573687155013&api=v2 "Additive Fertigung (3D-Druck) > Projektbeschreibung Hartensteiner Stern 3D-Druck > Grafik14.png")***

*Abbildung 5: Zusammenfügen der Teilstücke*

Für die Konstruktion ist noch entscheidend, unter welchem Winkel sich die drei Fünfecke aneinanderfügen. Es wird daher der Winkel berechnet, der benötigt wird, wenn man eines von zwei benachbarten, flachen Fünfecken hochklappt, bis diese zusammenpassen. Dazu müssen die zwei grünen Linien senkrecht übereinander stehen.

**![](https://old.stadtfabrikanten.org/download/attachments/55019687/image2019-11-14_0-24-11.png?version=1&modificationDate=1573687451660&api=v2 "Additive Fertigung (3D-Druck) > Projektbeschreibung Hartensteiner Stern 3D-Druck > image2019-11-14_0-24-11.png")**

*Abbildung 6: Berechnung Kippwinkel Teil*

Der Winkel von der senkrechten Linie (Winkel 90°) zur grünen Knickkante beträgt $18° = 108° - 90°$. Der Winkel von der senkrechten Linie zur zweiten grünen Linien beträgt auch $18° = 180° - 108° - 54°$. Der Winkel zur zweiten grünen Linie beträgt $36° = 18° + 18°$.

**![](https://old.stadtfabrikanten.org/download/attachments/55019687/Grafik12.png?version=1&modificationDate=1573687148897&api=v2 "Additive Fertigung (3D-Druck) > Projektbeschreibung Hartensteiner Stern 3D-Druck > Grafik12.png")**

*Abbildung 7: Berechnung Kippwinkel Teil 2*

Die lange grüne Gerade habe die Länge l. Der Abstand zur kurzen grünen Gerade beträgt $a = tan(18°) \\cdot l$.

Durch das Hochklappen des rechten Fünfecks muss der Eckpunkt an der kurzen grünen Gerade bis zur anderen Ecke der kurzen grünen Gerade geschwenkt werden. Dabei wird immer senkrecht von oben geschaut und der Anteil, der aus der Bildebene heraus kommt, erst einmal vernachlässigt.

**Erklärung**:   
Damit sich drei Fünfecken in einer Ecke berühren, müssen diese aus Symmetriegründen auf der Verlängerung vom Mittelpunkt eines Fünfecks durch eine seiner Eckpunkte liegen. Genau diese ist die weiße Linie, die durch die Endpunkt der beiden grünen Linie verläuft und im Mittelpunkt des linken Fünfeck startet. Die kurze grüne Gerade habe die Länge m. Die Länge n soll dabei die Länge des eine Teil der langen grünen Gerade sein. Es ergibt sich $n = l - m$. Der Abstand der grünen Geraden ergibt sich jedoch auch mit dem andern Winkel als $a = tan(36°) \\cdot n = tan(18°)\\cdot l4$. Definiert man x zu $x=\\frac{n}{l}$ so erhält man $\\frac{tan(36°)}{l} = \\frac{tan(18°)}{X}$.

$x = \\frac{tan(18°)}{tan(36°)}$

Wird das rechte Fünfecke um den Winkel α nach oben geklappt, so bleibt der Eckpunkt von oben betrachtet auf der kleinen grünen Gerade, wenn man von oben drauf schaut. Die lange grüne gerade verkürzt sich um$x = \\frac{n}{l}=cos(\\alpha)$.

$x = \\frac{tan(18°)}{tan(36°)}=cos(\\alpha)$

$\\alpha = arccos(\\frac{tan(18°)}{tan(36°)})=63,43°$

Der Innenwinkel des Gerüsts beträgt folglich $180° - 63,43° = 116,57°$.

Für die Konstruktion muss der Winkel noch halbiert werden, da er auf beiden Seiten wirksam wird. Der verwendete Winkel beträgt $58,28° = \\frac{116,57°}{2}$.

## Konstruktion des Grundkörperteils

[![grafik.png](https://wiki.stadtfabrikanten.org/uploads/images/gallery/2025-10/scaled-1680-/2pujZMMVYR5r0ik3-grafik.png)](https://wiki.stadtfabrikanten.org/uploads/images/gallery/2025-10/2pujZMMVYR5r0ik3-grafik.png)

*Abbildung 8: Konstruktion Grundkörperteil im Schnitt*

[![grafik.png](https://wiki.stadtfabrikanten.org/uploads/images/gallery/2025-10/scaled-1680-/sTmtFHOIbYCeFgaj-grafik.png)](https://wiki.stadtfabrikanten.org/uploads/images/gallery/2025-10/sTmtFHOIbYCeFgaj-grafik.png)

*Abbildung 9: Alter Stern in neuem Schein*

[![grafik.png](https://wiki.stadtfabrikanten.org/uploads/images/gallery/2025-10/scaled-1680-/5U4FoJn80mQo7RTX-grafik.png)](https://wiki.stadtfabrikanten.org/uploads/images/gallery/2025-10/5U4FoJn80mQo7RTX-grafik.png)

*Abbildung 10: das gedruckte Innenleben des Sterns*

[![grafik.png](https://wiki.stadtfabrikanten.org/uploads/images/gallery/2025-10/scaled-1680-/94Wd2XIBNJKDvZ9G-grafik.png)](https://wiki.stadtfabrikanten.org/uploads/images/gallery/2025-10/94Wd2XIBNJKDvZ9G-grafik.png)

*Abbildung 11: Einzelnes Pentagonsegment*

# Herstell- und Fügetechniken am Beispiel eines Pentagondodekaeder

[![grafik.png](https://wiki.stadtfabrikanten.org/uploads/images/gallery/2025-11/scaled-1680-/UwRKP288VxwVFa0G-grafik.png)](https://wiki.stadtfabrikanten.org/uploads/images/gallery/2025-11/UwRKP288VxwVFa0G-grafik.png) [![grafik.png](https://wiki.stadtfabrikanten.org/uploads/images/gallery/2025-11/scaled-1680-/ev7rhqw37UGF9J2M-grafik.png)](https://wiki.stadtfabrikanten.org/uploads/images/gallery/2025-11/ev7rhqw37UGF9J2M-grafik.png) [![grafik.png](https://wiki.stadtfabrikanten.org/uploads/images/gallery/2025-11/scaled-1680-/nerNGI44QIa81wCR-grafik.png)](https://wiki.stadtfabrikanten.org/uploads/images/gallery/2025-11/nerNGI44QIa81wCR-grafik.png) [![grafik.png](https://wiki.stadtfabrikanten.org/uploads/images/gallery/2025-11/scaled-1680-/eI8bQmpnE9cWfmFG-grafik.png)](https://wiki.stadtfabrikanten.org/uploads/images/gallery/2025-11/eI8bQmpnE9cWfmFG-grafik.png) [![grafik.png](https://wiki.stadtfabrikanten.org/uploads/images/gallery/2025-11/scaled-1680-/lpcdzoujQqDyMv1k-grafik.png)](https://wiki.stadtfabrikanten.org/uploads/images/gallery/2025-11/lpcdzoujQqDyMv1k-grafik.png)

[![grafik.png](https://wiki.stadtfabrikanten.org/uploads/images/gallery/2025-11/scaled-1680-/XFNN7QrL1GaOsbLS-grafik.png)](https://wiki.stadtfabrikanten.org/uploads/images/gallery/2025-11/XFNN7QrL1GaOsbLS-grafik.png) [![grafik.png](https://wiki.stadtfabrikanten.org/uploads/images/gallery/2025-11/scaled-1680-/5vJSaPuUJUBm2ESv-grafik.png)](https://wiki.stadtfabrikanten.org/uploads/images/gallery/2025-11/5vJSaPuUJUBm2ESv-grafik.png) [![grafik.png](https://wiki.stadtfabrikanten.org/uploads/images/gallery/2025-11/scaled-1680-/5FXLzUt2YLoBGpfN-grafik.png)](https://wiki.stadtfabrikanten.org/uploads/images/gallery/2025-11/5FXLzUt2YLoBGpfN-grafik.png) [![grafik.png](https://wiki.stadtfabrikanten.org/uploads/images/gallery/2025-11/scaled-1680-/3VeugDOuNisBc2QK-grafik.png)](https://wiki.stadtfabrikanten.org/uploads/images/gallery/2025-11/3VeugDOuNisBc2QK-grafik.png) [![grafik.png](https://wiki.stadtfabrikanten.org/uploads/images/gallery/2025-11/scaled-1680-/z8x72hVCHHFvBonv-grafik.png)](https://wiki.stadtfabrikanten.org/uploads/images/gallery/2025-11/z8x72hVCHHFvBonv-grafik.png) [![grafik.png](https://wiki.stadtfabrikanten.org/uploads/images/gallery/2025-11/scaled-1680-/XRBVGEi8173wvDKr-grafik.png)](https://wiki.stadtfabrikanten.org/uploads/images/gallery/2025-11/XRBVGEi8173wvDKr-grafik.png) [![grafik.png](https://wiki.stadtfabrikanten.org/uploads/images/gallery/2025-11/scaled-1680-/WkpUpOf1nZLxAEYT-grafik.png)](https://wiki.stadtfabrikanten.org/uploads/images/gallery/2025-11/WkpUpOf1nZLxAEYT-grafik.png) [![grafik.png](https://wiki.stadtfabrikanten.org/uploads/images/gallery/2025-11/scaled-1680-/2jfSiQea6VIMeSuP-grafik.png)](https://wiki.stadtfabrikanten.org/uploads/images/gallery/2025-11/2jfSiQea6VIMeSuP-grafik.png) [![grafik.png](https://wiki.stadtfabrikanten.org/uploads/images/gallery/2025-11/scaled-1680-/zjTaOkfvyjwAFePu-grafik.png)](https://wiki.stadtfabrikanten.org/uploads/images/gallery/2025-11/zjTaOkfvyjwAFePu-grafik.png) [![grafik.png](https://wiki.stadtfabrikanten.org/uploads/images/gallery/2025-11/scaled-1680-/oLs3D1ad1qIsOJOd-grafik.png)](https://wiki.stadtfabrikanten.org/uploads/images/gallery/2025-11/oLs3D1ad1qIsOJOd-grafik.png) [![grafik.png](https://wiki.stadtfabrikanten.org/uploads/images/gallery/2025-11/scaled-1680-/Ivl7weQUGxaVleHR-grafik.png)](https://wiki.stadtfabrikanten.org/uploads/images/gallery/2025-11/Ivl7weQUGxaVleHR-grafik.png) [![grafik.png](https://wiki.stadtfabrikanten.org/uploads/images/gallery/2025-11/scaled-1680-/08vxJTnozsiH2h7c-grafik.png)](https://wiki.stadtfabrikanten.org/uploads/images/gallery/2025-11/08vxJTnozsiH2h7c-grafik.png) [![grafik.png](https://wiki.stadtfabrikanten.org/uploads/images/gallery/2025-11/scaled-1680-/wO9FgwF6hRDCeFH0-grafik.png)](https://wiki.stadtfabrikanten.org/uploads/images/gallery/2025-11/wO9FgwF6hRDCeFH0-grafik.png) [![grafik.png](https://wiki.stadtfabrikanten.org/uploads/images/gallery/2025-11/scaled-1680-/T9l8Vhn69CF0Lvnp-grafik.png)](https://wiki.stadtfabrikanten.org/uploads/images/gallery/2025-11/T9l8Vhn69CF0Lvnp-grafik.png) [![grafik.png](https://wiki.stadtfabrikanten.org/uploads/images/gallery/2025-11/scaled-1680-/mcgBjjBSC73De4aS-grafik.png)](https://wiki.stadtfabrikanten.org/uploads/images/gallery/2025-11/mcgBjjBSC73De4aS-grafik.png) [![grafik.png](https://wiki.stadtfabrikanten.org/uploads/images/gallery/2025-11/scaled-1680-/s6On5tQWv4O7xUJV-grafik.png)](https://wiki.stadtfabrikanten.org/uploads/images/gallery/2025-11/s6On5tQWv4O7xUJV-grafik.png) [![grafik.png](https://wiki.stadtfabrikanten.org/uploads/images/gallery/2025-11/scaled-1680-/7Xvi14RKUYdbyqqT-grafik.png)](https://wiki.stadtfabrikanten.org/uploads/images/gallery/2025-11/7Xvi14RKUYdbyqqT-grafik.png) [![grafik.png](https://wiki.stadtfabrikanten.org/uploads/images/gallery/2025-11/scaled-1680-/QjWRsfDUghpDltmN-grafik.png)](https://wiki.stadtfabrikanten.org/uploads/images/gallery/2025-11/QjWRsfDUghpDltmN-grafik.png) [![grafik.png](https://wiki.stadtfabrikanten.org/uploads/images/gallery/2025-11/scaled-1680-/y9T3yrDhFRhoDNyY-grafik.png)](https://wiki.stadtfabrikanten.org/uploads/images/gallery/2025-11/y9T3yrDhFRhoDNyY-grafik.png) [![grafik.png](https://wiki.stadtfabrikanten.org/uploads/images/gallery/2025-11/scaled-1680-/ZSlcP6AfijAvGGpf-grafik.png)](https://wiki.stadtfabrikanten.org/uploads/images/gallery/2025-11/ZSlcP6AfijAvGGpf-grafik.png) [![grafik.png](https://wiki.stadtfabrikanten.org/uploads/images/gallery/2025-11/scaled-1680-/eWplWkfPt7wWeG2j-grafik.png)](https://wiki.stadtfabrikanten.org/uploads/images/gallery/2025-11/eWplWkfPt7wWeG2j-grafik.png) [![grafik.png](https://wiki.stadtfabrikanten.org/uploads/images/gallery/2025-11/scaled-1680-/yzwbQZ3peBDzHXd3-grafik.png)](https://wiki.stadtfabrikanten.org/uploads/images/gallery/2025-11/yzwbQZ3peBDzHXd3-grafik.png) [![grafik.png](https://wiki.stadtfabrikanten.org/uploads/images/gallery/2025-11/scaled-1680-/4n4zR5JyHY8RyRBm-grafik.png)](https://wiki.stadtfabrikanten.org/uploads/images/gallery/2025-11/4n4zR5JyHY8RyRBm-grafik.png) [![grafik.png](https://wiki.stadtfabrikanten.org/uploads/images/gallery/2025-11/scaled-1680-/WmfpoGGMP6Hq5OYr-grafik.png)](https://wiki.stadtfabrikanten.org/uploads/images/gallery/2025-11/WmfpoGGMP6Hq5OYr-grafik.png) [![grafik.png](https://wiki.stadtfabrikanten.org/uploads/images/gallery/2025-11/scaled-1680-/APb4Y8dqZsWNfwx4-grafik.png)](https://wiki.stadtfabrikanten.org/uploads/images/gallery/2025-11/APb4Y8dqZsWNfwx4-grafik.png) [![grafik.png](https://wiki.stadtfabrikanten.org/uploads/images/gallery/2025-11/scaled-1680-/gLKLcaqp6PH5uRRh-grafik.png)](https://wiki.stadtfabrikanten.org/uploads/images/gallery/2025-11/gLKLcaqp6PH5uRRh-grafik.png) [![grafik.png](https://wiki.stadtfabrikanten.org/uploads/images/gallery/2025-11/scaled-1680-/EBCi6EWb7Ez7GuF9-grafik.png)](https://wiki.stadtfabrikanten.org/uploads/images/gallery/2025-11/EBCi6EWb7Ez7GuF9-grafik.png) [![grafik.png](https://wiki.stadtfabrikanten.org/uploads/images/gallery/2025-11/scaled-1680-/2Nhvr8ymzJRaQgzh-grafik.png)](https://wiki.stadtfabrikanten.org/uploads/images/gallery/2025-11/2Nhvr8ymzJRaQgzh-grafik.png) [![grafik.png](https://wiki.stadtfabrikanten.org/uploads/images/gallery/2025-11/scaled-1680-/xPqyVGSntuxnE5we-grafik.png)](https://wiki.stadtfabrikanten.org/uploads/images/gallery/2025-11/xPqyVGSntuxnE5we-grafik.png)