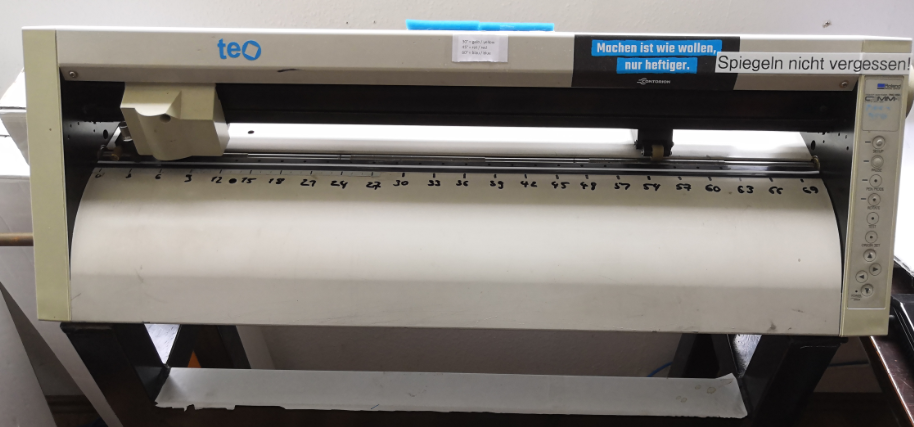
# Roland PNC-950 Schneidplotter | "Ronaldo"
Unser alter aber guter Schneidplotter, Baujahr 1995. Wir nutzen ihn mit Linux Mint, Inkscape und Inkcut.
# Anleitung zum Schneidplotten
[](https://wiki.stadtfabrikanten.org/uploads/images/gallery/2025-10/dejifLTzKJ8896si-grafik.png)
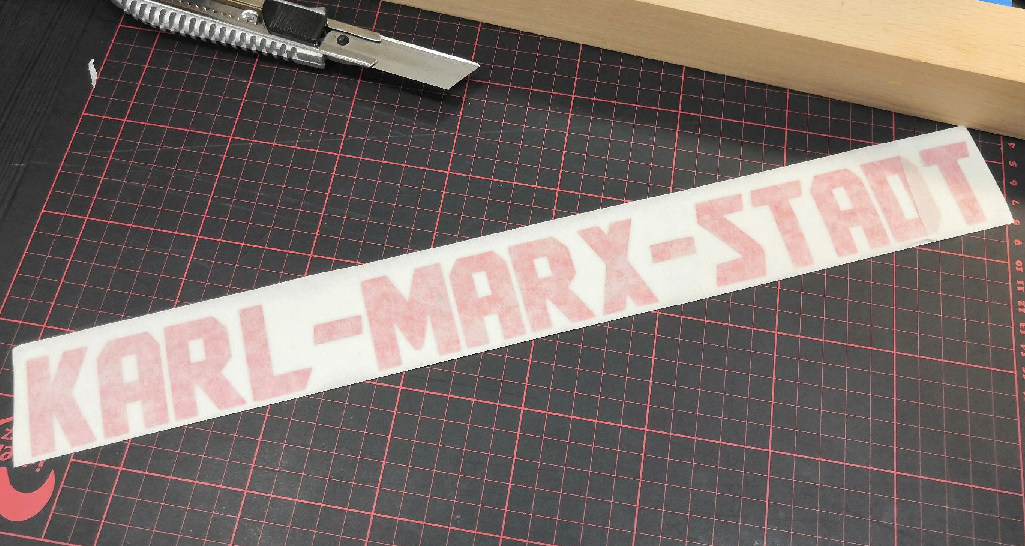
## Plotterbeispiele
[](https://wiki.stadtfabrikanten.org/uploads/images/gallery/2025-09/80UUdoEUN41riBRk-grafik.png) [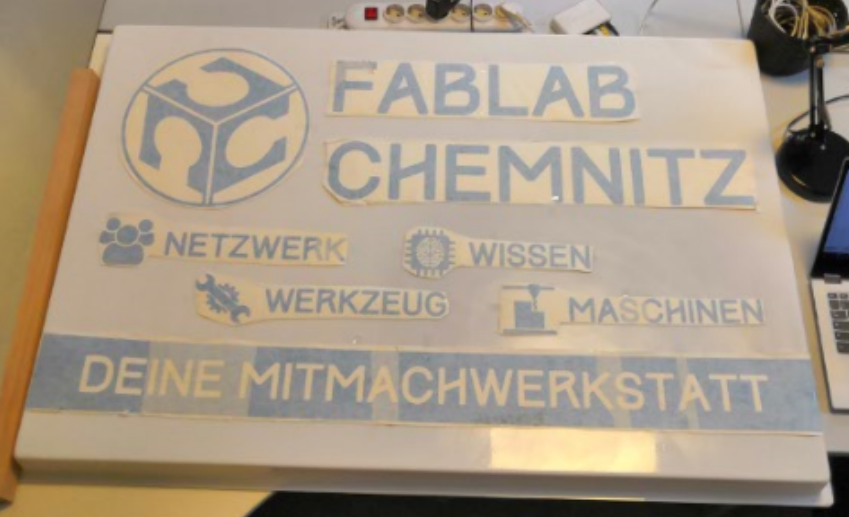](https://wiki.stadtfabrikanten.org/uploads/images/gallery/2025-10/WP1I1CpC1B5XuTlY-grafik.png)
## Der Plotter in Aktion
## Bedienungsanleitung und Gerätefotos → [things.fablabchemnitz.de](https://things.fablabchemnitz.de/#/document/view/cac7d29a-ce53-4679-85c9-1920dc8b40d8/content)
## Benutzung im FabLab
Der Plotter kann als Stift- oder Schneidplotter via [Inkcut](https://wiki.stadtfabrikanten.org/books/equipment/page/usb-anschluss-und-inkcut-setup "USB-Anschluss und Inkcut Setup") verwendet werden.
### Papier/Plottmedium einspannen
[](https://wiki.stadtfabrikanten.org/uploads/images/gallery/2025-10/H0qMDsZtDW5zL2w1-grafik.png) [](https://wiki.stadtfabrikanten.org/uploads/images/gallery/2025-10/mwgpeuavGzDEG99E-grafik.png)
### Die richtigen Einstellungen für den Schneid-Plot finden und setzen
- Material einspannen und Sensoren beachten. Hinterer Sensor muss von Folie überdeckt, der vordere hingegen darf beim Einlegen nicht bedeckt sein. [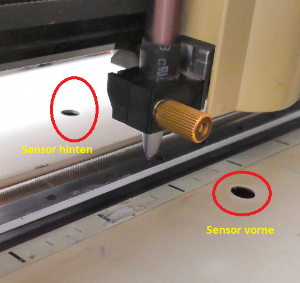](https://wiki.stadtfabrikanten.org/uploads/images/gallery/2025-10/iIQWjnuSx5kGsTkB-grafik.png)
- Probe-Plot durchführen
- Ein Testlauf sollte stets ohne Schneidmesser, sondern mit einem Stift, durchgeführt werden, um die Langlebigkeit des Messers zu gewähren.
- Skalierung / Größe der Grafik
- Schneidgeschwindigkeit / Plotgeschwindigkeit → Ist das Motiv sehr filigran oder kleinteilig, kann es notwendig sein, Druck und/oder Geschwindigkeit schrittweise zu reduzieren, damit die Kleinteile nicht verschoben oder gerissen werden.
- ggf. die Nadelbaugruppe reinigen, falls zu viele Klebe- und Folienreste im Inneren sein sollten. Diese könnten die Beweglichkeit des Messers beeinträchtigen.
Größe ermitteln über maximale Anschläge links und rechts (nach dem "Setup"-Taste gedrückt wurde)
[](https://wiki.stadtfabrikanten.org/uploads/images/gallery/2025-10/bVyB84qS8mrcx3Ks-grafik.png) [](https://wiki.stadtfabrikanten.org/uploads/images/gallery/2025-10/wjp8bewbXOoR6Eu2-grafik.png) [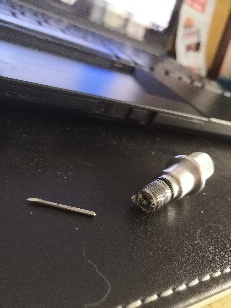](https://wiki.stadtfabrikanten.org/uploads/images/gallery/2025-10/J5g7Z9DQJiZStm1g-grafik.png)
## Designen
Ziel ist es Vektorgrafiken zu erstellen, welche in abfahrbare Bahnen umgerechnet werden können. Die Linien müssen als Haarlinien (0,001 inch dick) gezeichnet werden, um erkannt zu werden.
Möglichkeiten
- Vektorbildbearbeitung, z.B. via
- Inkscape
- Adobe Illustrator
- CorelDraw
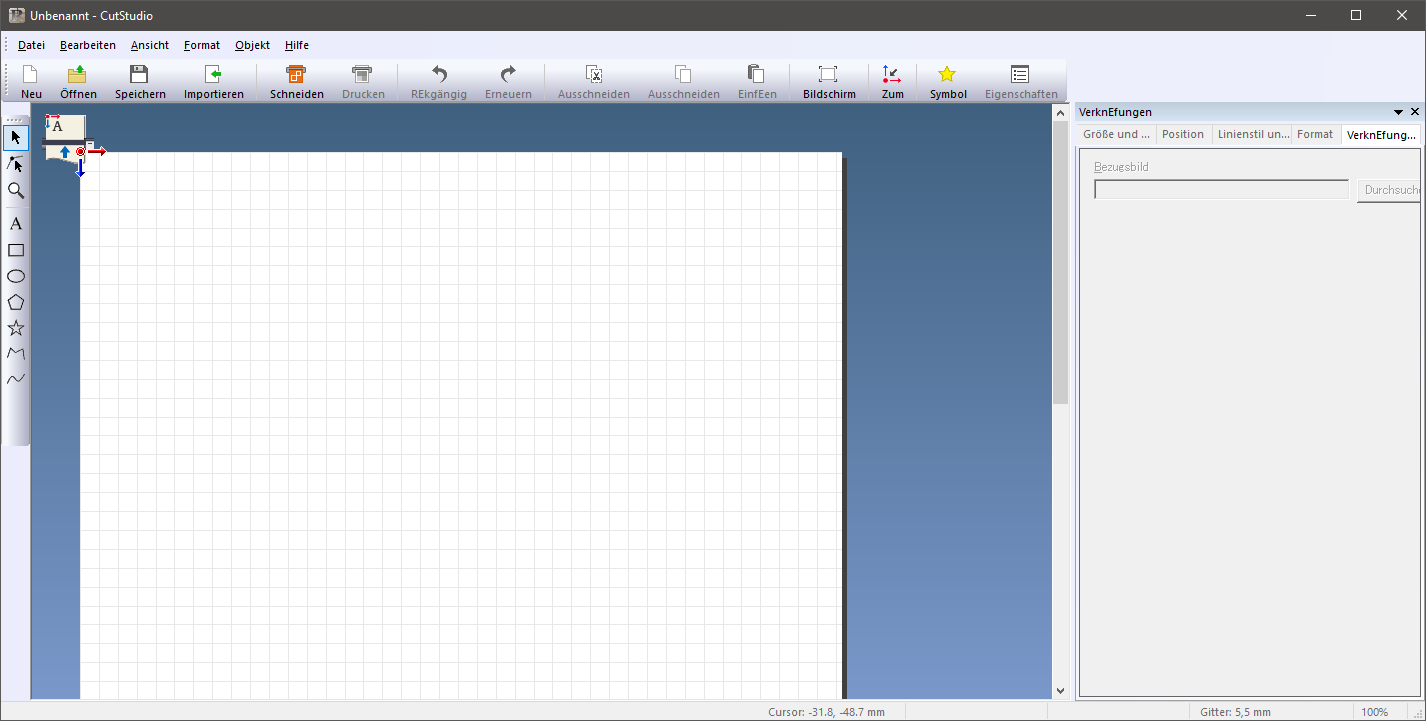
- Roland CutStudio
- Code manuell schreiben
[](https://wiki.stadtfabrikanten.org/uploads/images/gallery/2025-10/XxjVPnrhcM0mR7p6-grafik.png)
## Allgemeine Möglichkeiten der Ausgabe an den Drucker
- Roland CutStudio → [Software Setup - Roland CutStudio](https://wiki.stadtfabrikanten.org/books/equipment/page/roland-cutstudio "Roland CutStudio")
- via beliebigem Programm mit Druckausgabe für Plotter
- via Command Line → File direkt an Drucker senden
- Windows: `copy test.plt com3`[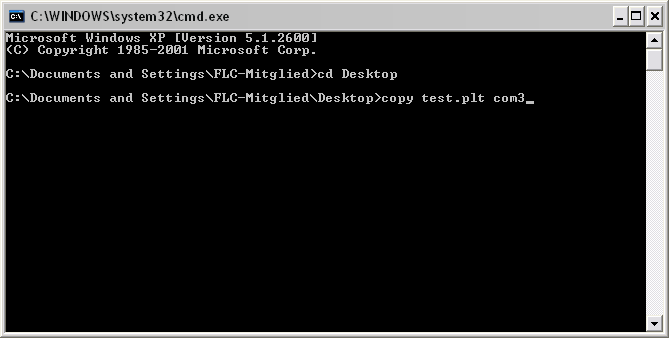](https://wiki.stadtfabrikanten.org/uploads/images/gallery/2025-10/NCg0ld54HswwB6d9-grafik.png)
- Linux:
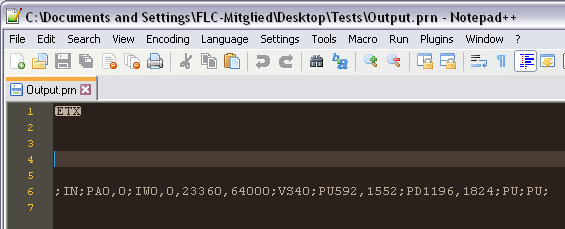
- aus Datei, z.B. `cat test.hpgl > /dev/usb/lp0`, oder
z.B. ein 50x50mm großes Rechteck direkt: `echo ";IN;PA0,0;IW0,0,23360,64000;VS40;PU0,2000;PD2000,2000;PD2000,0;PD0,0;PD0,2000;PU;PU;" > /dev/usb/lp0`
## Fehlerbehebung (Troubleshooting)
### Der Plotter plottet etwas komplett anderes, als ich gesendet habe
Falls der Plotter z.B. so etwas ausdruckt, dann handelt es sich um Debug-Ausgaben:
[](https://wiki.stadtfabrikanten.org/uploads/images/gallery/2026-01/NI1I2NvkmIo8tX6z-img-20260119-191854.jpg)
Plotter ausschalten, ca. 10 Sekunden warten, wieder einschalten!
### Der Druckjob hängt fest und wird nicht abgearbeitet
- - Gerät ausschalten und wieder einschalten
- Prüfen, ob der USB-zu-Centronics Adapter korrekt am PC steckt
- möglicherweise hat die Grafik- oder Job-Datei ein Problem (SVG, HPGL)
### Print-Queue leeren (Job abbrechen)
Der PNC-950 hat keine Abbruch-Taste, um den Spooler zu leeren. Der Spooler kann wie folgt geleert werden:
1. am Plotter "Pause" drücken
2. Druckerwarteschlange leeren durch Beenden von Inkcut
3. Plotter ausschalten
4. ca. 10 Sekunden warten
5. Plotter einschalten
6. Falls der Plotter noch immer druckt: wiederholen
Einfache Alternative: Job pausieren, Messer ausspannen und Job durchlaufen lassen
### Plotterfiles erzeugen (Legacy-Weg)
Neben der Direktausgabe an den Plotter können die Programme (ähnlich GCode) auch in Dateien umgeleitet werden. Ein paar Möglichkeiten:
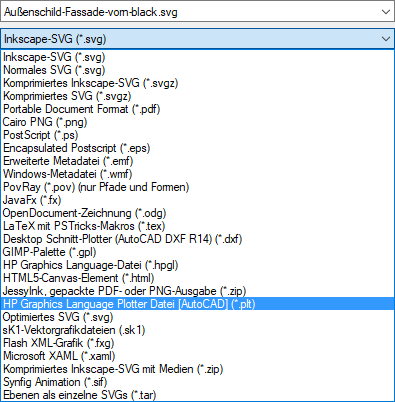
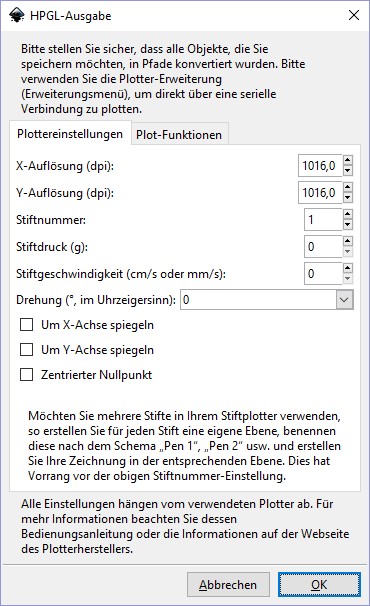
| **Inkscape \*.plt** | **Inkscape \*.hpgl** | **Roland CutStudio** |
| "Speichern unter..." → "HP Graphics Language Plotter Datei \[AutoCAD\] (\*.plt)"
[](https://wiki.stadtfabrikanten.org/uploads/images/gallery/2025-10/dVGuSLCP9nRLSff8-grafik.png)
| "Speichern unter..." → "HP Graphics Language-Datei (\*.hpgl)"
[](https://wiki.stadtfabrikanten.org/uploads/images/gallery/2025-10/ZaOth17h1upo2Byh-grafik.png)
| "Cutting" → "Print to file"
[](https://wiki.stadtfabrikanten.org/uploads/images/gallery/2025-10/XA8mqpQ69IelO9FJ-grafik.png)
|
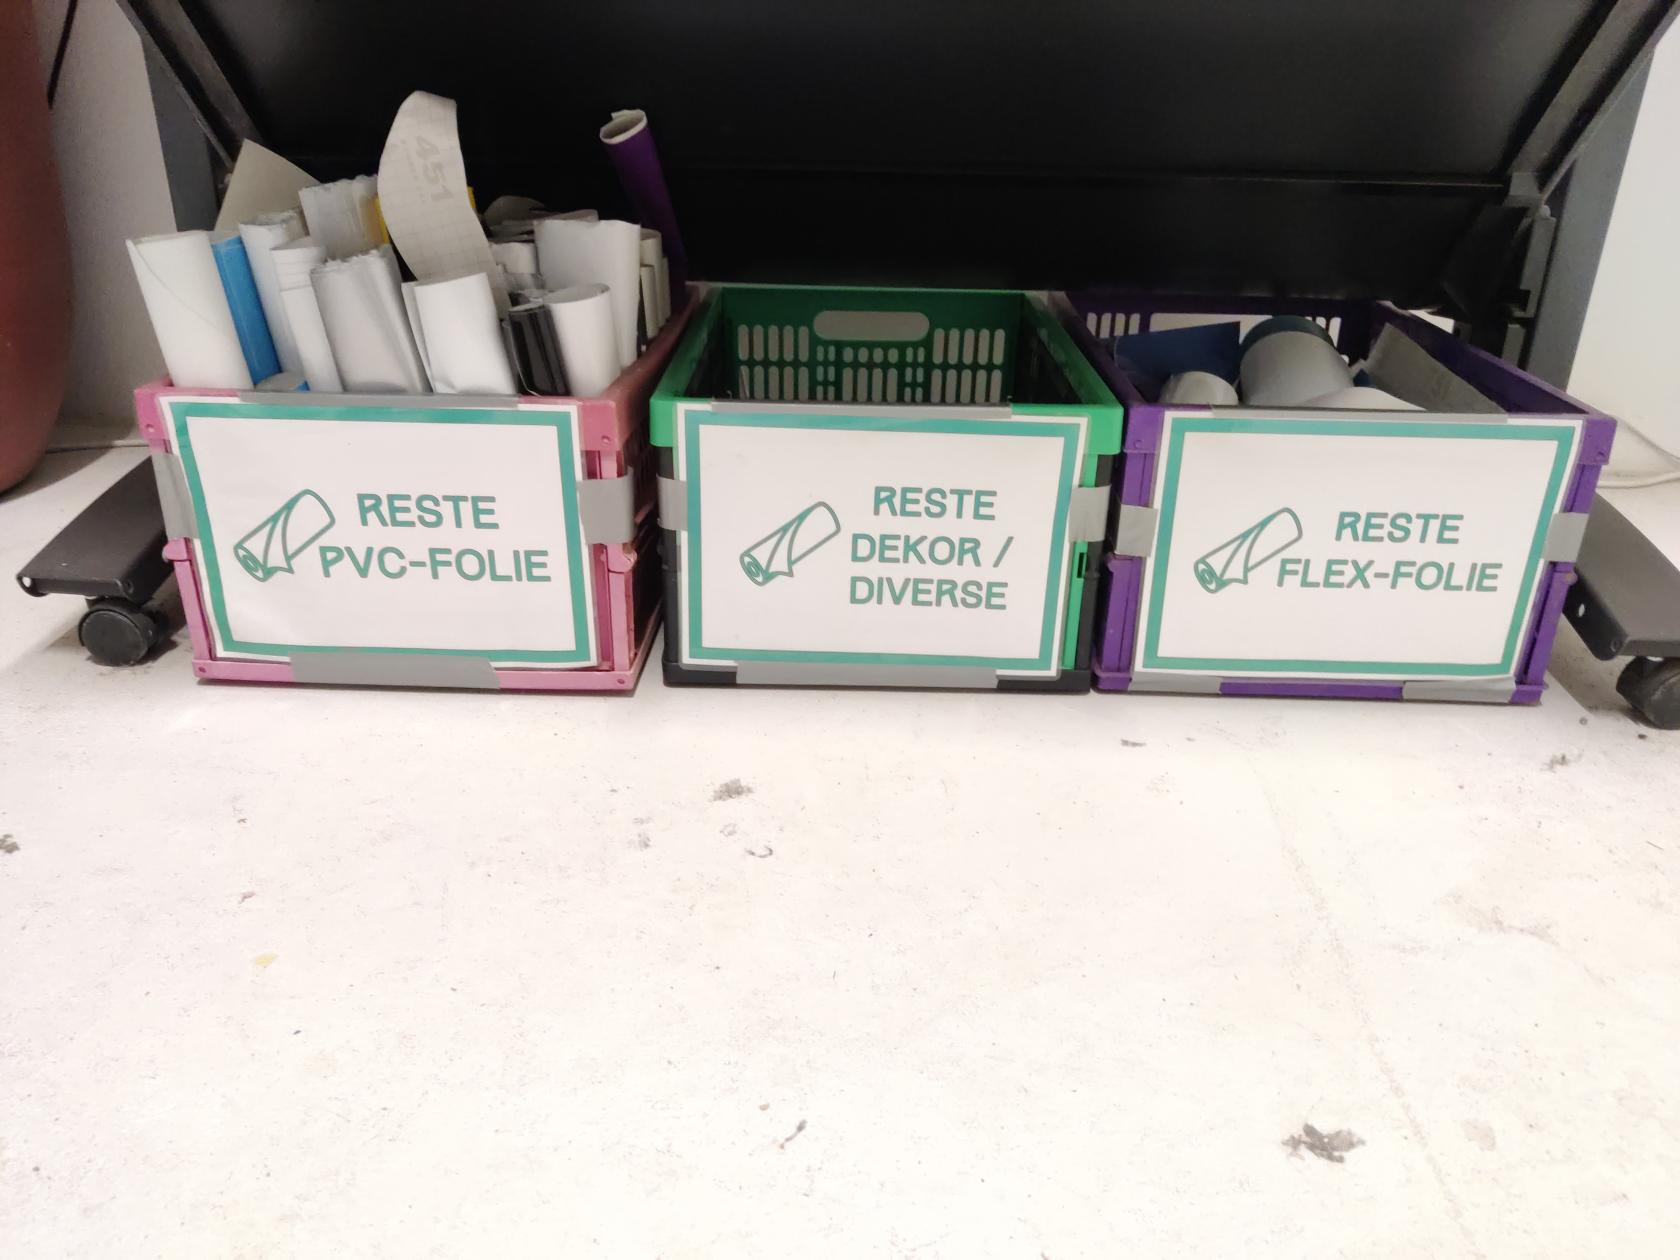
## Plotterfolienreste
Übriges Material, was nicht mehr sinnvoll mit dem Plotter genutzt werden kann, kann in die unter dem DesignJet stehenden Restekisten einsortiert werden. Damit lassen sich noch kleinere Kunstwerke realisieren.
[](https://wiki.stadtfabrikanten.org/uploads/images/gallery/2026-03/X2tIPHv5clfDsoJk-img-20260309-163217.jpg)
# Roland CutStudio
Roland CutStudio ist die proprietäre Software von Roland DG zum Nutzen der Plotter auf Windows. Wir nutzen jedoch [Inkcut](https://wiki.stadtfabrikanten.org/books/equipment/page/usb-anschluss-und-inkcut-setup "USB-Anschluss und Inkcut Setup"), da die Treiber für unseren Plotter für x64 Systeme nicht existieren. Weitere Infos: [USB-Anschluss und Inkcut Setup](https://wiki.stadtfabrikanten.org/books/equipment/page/usb-anschluss-und-inkcut-setup "USB-Anschluss und Inkcut Setup")
## Downloads
Alle Roland CutStudio Downloads finden sich in unserer [Cloud](https://cloud.stadtfabrikanten.org) oder hier:
- [Basisinstallation und Updates 1.27 - 2.00](https://www.technoplot.de/service/downloads/category/35-cut-studio)
- [Update 3.10](https://www.rolanddga.com/support/products/cutting/camm-1-pro-series-gx-300-30-vinyl-cutter/article?pm=GX-300&articleId=cutstudio-updater-enduser)
- [Update 3.14](https://downloadcenter.rolanddg.com/GS-24#software)
- [Release Notes](https://downloadcenter.rolanddg.com/softwareparts.php?item_id=366e557b1d2ced712f04396caa90c916315fe297&software=baab8ded818600dd0864434421674c84b90583e3&id=54a4bba9f1effa86dd09ed2408e522d4560b2409&type=note_history_html)
## Hilfe
[https://files.rolanddga.com/Files/CutStudioManual/CutStudio/!SSL!/Responsive\_HTML5](https://files.rolanddga.com/Files/CutStudioManual/CutStudio/!SSL!/Responsive_HTML5)
## Problemlösung: Menü-Kopfleiste fehlt - Registry Fix
[](https://wiki.stadtfabrikanten.org/uploads/images/gallery/2025-05/9bryPaROpgcjcmMQ-grafik.png)
## Lösung: Registry Keys löschen
1. CutStudio schließen, falls noch offen
2. Registry Editor öffnen (`regedit`)
3. Navigieren zu `Computer\\HKEY\_CURRENT\_USER\\Software\\Roland DG Corporation`
4. Schlüssel-Backup erstellen von "Roland DG Corporation" → Speichern auf Desktop
5. "Roland DG Corporation" per Rechtsklick löschen
6. Roland CutStudio neu starten und testen
[](https://wiki.stadtfabrikanten.org/uploads/images/gallery/2025-05/SMkGQR9hOgWCylCF-grafik.png)
Siehe auch
- [Open in Roland CutStudio](https://wiki.stadtfabrikanten.org/books/fablab-chemnitz/page/open-in-roland-cutstudio)
- [Weeding lines with Inkscape](https://old.stadtfabrikanten.org/display/IFM/Weeding+lines+with+Inkscape)
- [Roland PNC-950 Schneidplotter | "Ronaldo"](https://wiki.stadtfabrikanten.org/books/equipment/chapter/roland-pnc-950-schneidplotter-ronaldo "Roland PNC-950 Schneidplotter | "Ronaldo"")
# Schneidplotter Messer
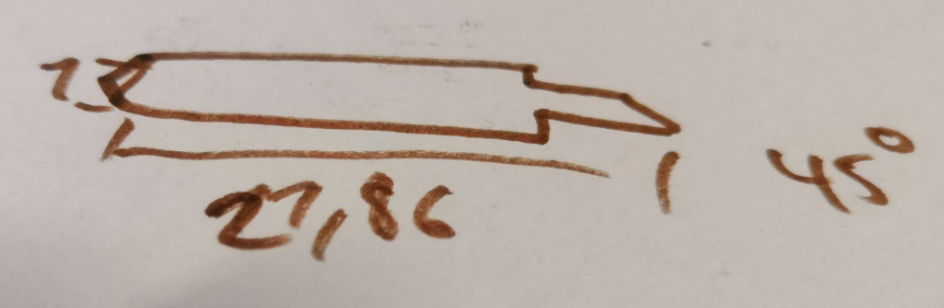
## Plottermesser Abmaße für Roland CAMM-1 PNC-950
In unserem Plotter sind die folgenden Schneidmesser installiert:
- 1 mm Durchmesser
- ca. 22 mm lang
- Schneidenwinkel 45°
[](https://wiki.stadtfabrikanten.org/uploads/images/gallery/2025-09/G2dFWoAAlgErw1F3-grafik.png) [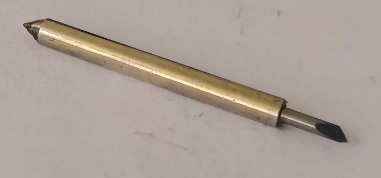](https://wiki.stadtfabrikanten.org/uploads/images/gallery/2025-09/nfmarTA7jk6gd4S1-grafik.png) [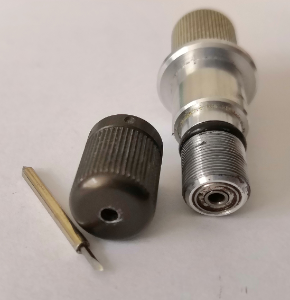](https://wiki.stadtfabrikanten.org/uploads/images/gallery/2025-09/50tCNzQ8mLHd821j-grafik.png) [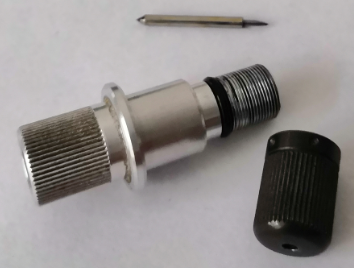](https://wiki.stadtfabrikanten.org/uploads/images/gallery/2025-09/ZwyMzn3Dwfwd1HW4-grafik.png) [](https://wiki.stadtfabrikanten.org/uploads/images/gallery/2025-09/ahm6BNN8JrZtn49w-grafik.png) [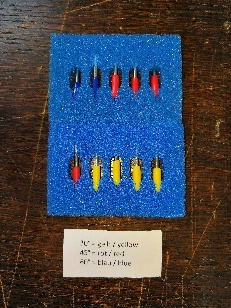](https://wiki.stadtfabrikanten.org/uploads/images/gallery/2025-09/MiP7fPwo2mvJyBLy-grafik.png)
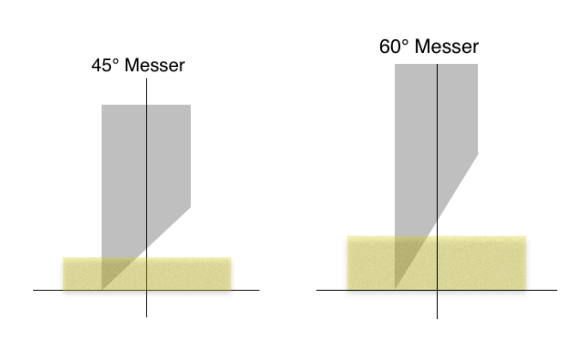
# Schneidmesser
Das richtige Schneidmesser sorgt dafür, dass der Plott qualitativ hochwertig wird und das Entgittern entsprechend einfach oder schwer wird. Je nachdem, welche Stärke und Beschaffenheit die zu schneidende Folie hat, muss sollte das Messer auf Eignung geprüft werden. Wichtige Parameter sind:
- Schneidwinkel
- Schneidtiefe (der Klinge)
- Anpressdruck des Messers
- Schneidgeschwindigkeit
- Folienstärke/Beschaffenheit der Folie
Plottermesser sind 360° drehbar gelagert (Kugellager), um sauber schneiden zu können. Dieser Mechanismus geht aber nur solange korrekt von statten, bis das zu schneidende Medium nicht zu dick ist! Je dicker das zu schneidende Material ist, desto größer wird die Auflagefläche des Messers. Liegt dann irgendwann der Mittelpunkt des Messers nicht mehr über der Folie, sondern „in“ der Folie, klappt die Richtungsänderung nicht mehr und das Schneideergebnis wirkt ausgefranst.
Hier kommen die verschiedenen Messerwinkel ins Spiel, denn ein Messer mit einem Winkel von 45° kann nur bis zu einer gewissen Materialdicke korrekt schneiden. Bei einem 45°-Messer liegt der Drehpunkt etwas höher. Daraus resultiert, dass man dickere Materialien exakt zuschneiden kann. Nachteile gibt es aber leider auch bei den Messern mit spitzeren Schneidewinkeln. Da diese Messer schmälere Spitzen haben, können sie leichter brechen als Messer mit kleinerem Schneidewinkel und werden in der Regel schneller stumpf. Ein weiterer Nachteil besteht bei den größeren Schneidewinkeln darin, dass das Schneideplottermesser im Medium mehr Auflagefläche hat, als bei kleineren. Dadurch physikalisch bedingt ist auch die Kraft, die benötigt wird um das Messer zu bewegen, höher.
[](https://wiki.stadtfabrikanten.org/uploads/images/gallery/2025-09/aYWQ9qQtEjwNSQUa-grafik.png)
# USB-Anschluss und Inkcut Setup
## Konfiguration der Dip Switches am Plotter
Die Dip-Switches können alle unverändert auf Werkseinstellung belassen werden, da wir keine serielle Schnittstelle, sondern die parallele Schnittstelle, verwenden.
Nach jeder DIP Switch Änderung muss der Plotter für min. 10 Sekunden ausgeschalten und erneut angeschalten werden, damit dieser neu initialisiert!
## USB-Anschluss
Es gibt zwei Möglichkeiten, um den Plotter anzuschließen.
Parallel Port zu USB (Centronics Adapter)
### Parallel Port zu USB (Centronics Adapter)
Wir nutzen einen einfachen USB Centronics Adapter!
[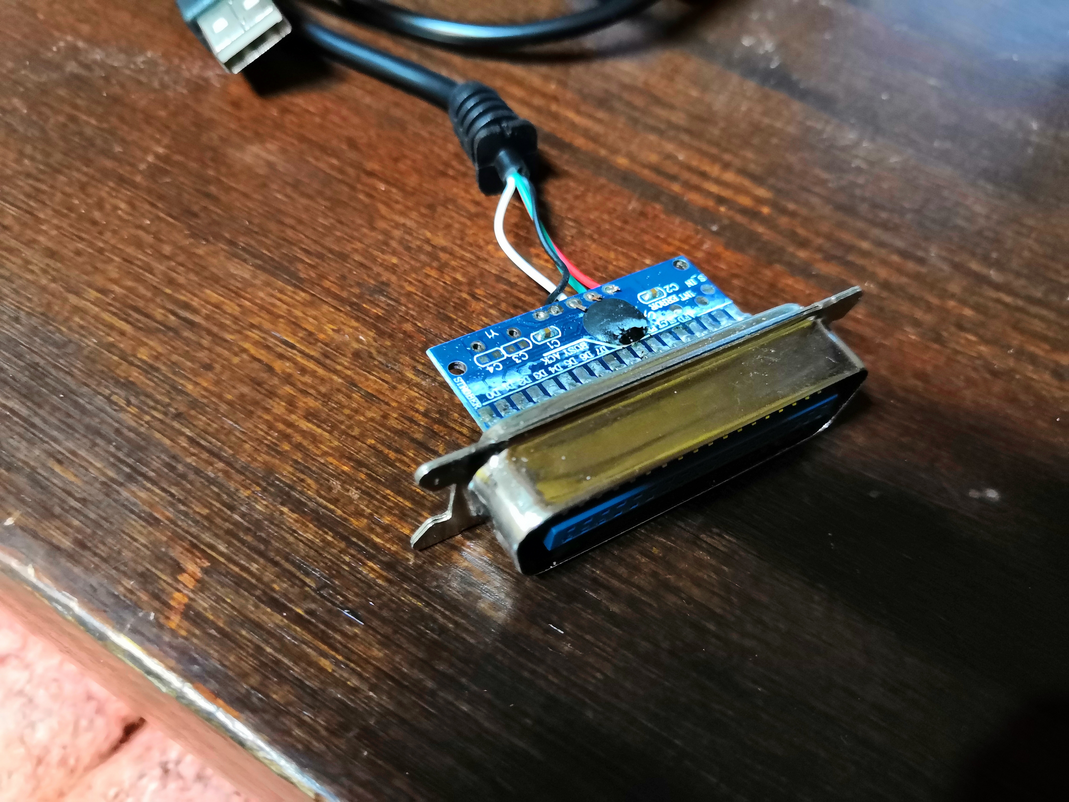](https://wiki.stadtfabrikanten.org/uploads/images/gallery/2025-09/yywwJz2154k3QmgI-grafik.png) [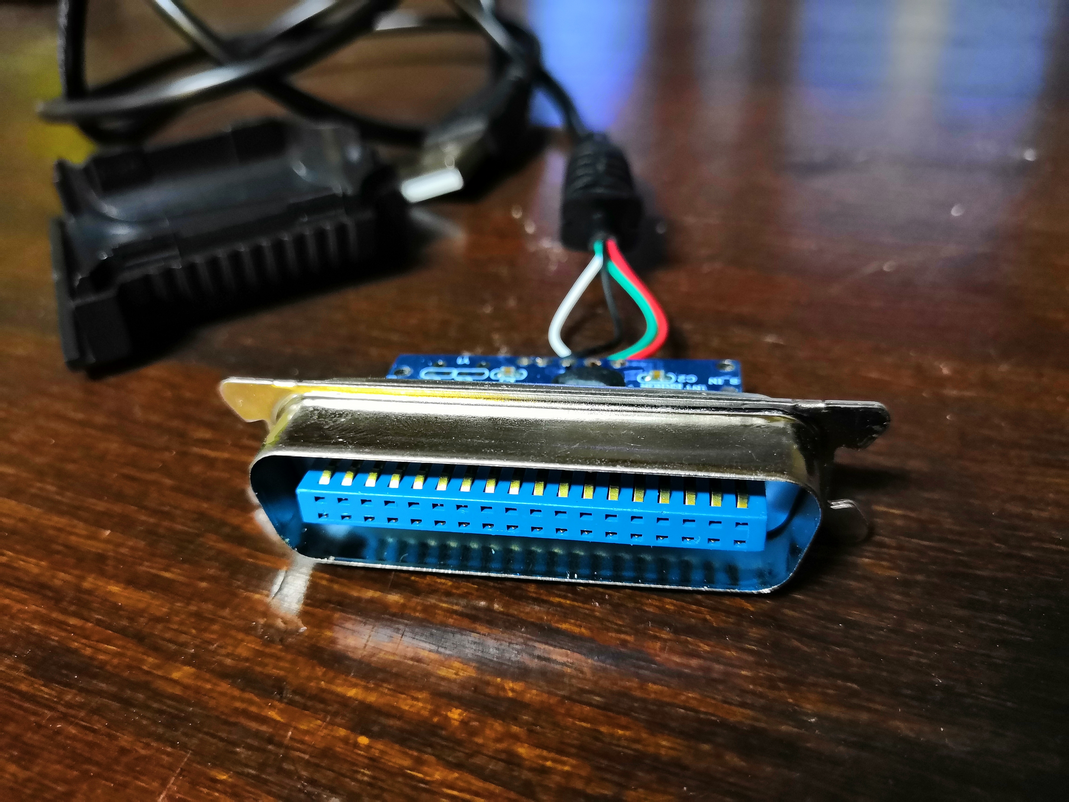](https://wiki.stadtfabrikanten.org/uploads/images/gallery/2025-09/npIag0k0jIZBKNmr-grafik.png) [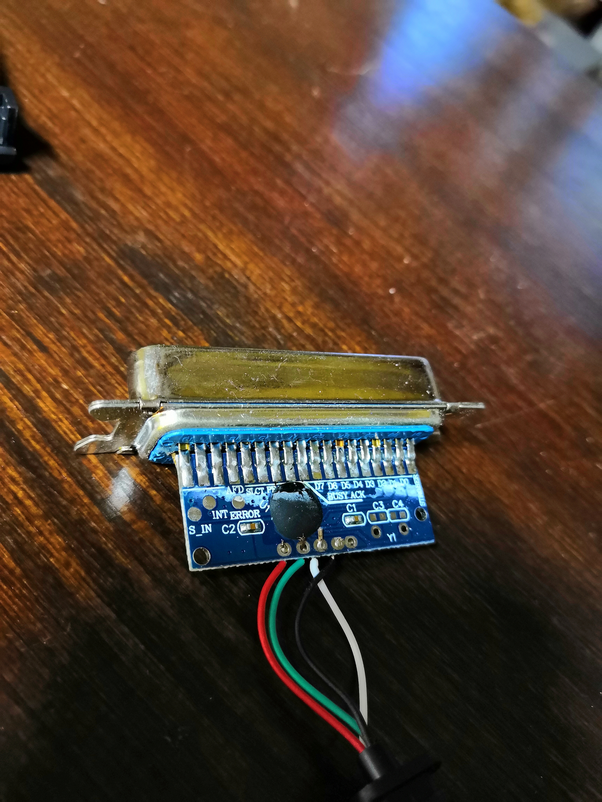](https://wiki.stadtfabrikanten.org/uploads/images/gallery/2025-09/O5JTx8LAay0IV78C-grafik.png)
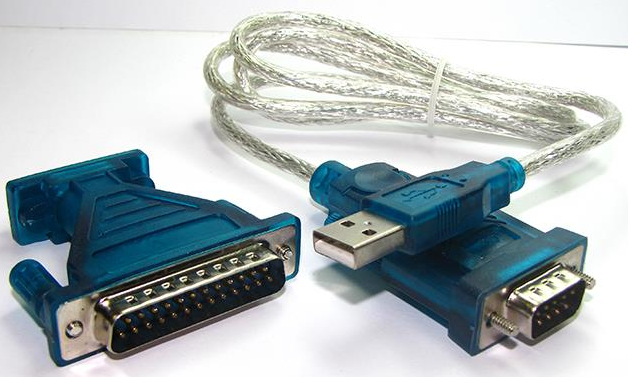
Serielles Interface zu USB (nicht verwendet)
### Serielles Interface zu USB
Wir haben alternativ auch solche Adapter da. Wir verwenden jedoch den Parallel Port.
Plotter mit Windows XP (nicht mehr in Verwendung)
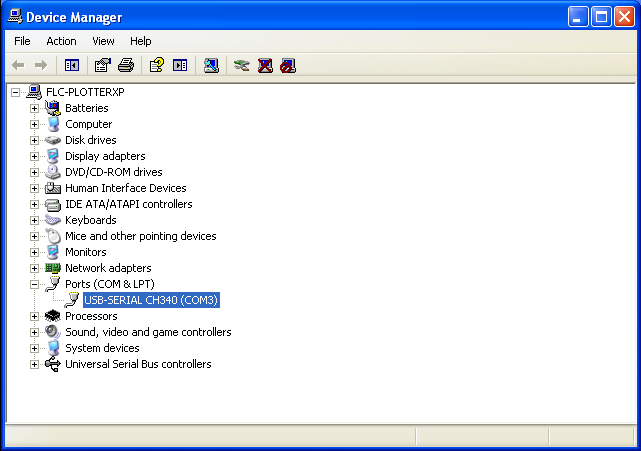
### Konfiguration der Treiber in der virtuellen Maschine (PlotterXP) und Gerätegrundkonfiguration
Es müssen insgesamt zwei Treiber installiert werden. Zum einen der Treiber für den RS232-zu-USB Wandler, zum anderen der eigentliche Plottertreiber selbst.
**RS232 zu USB (CH340G Chip)**
Dieser Treiber ist für einen chinesischen Chip-Satz. Die Hardware-ID lautet `vid_1a86`.
[](https://wiki.stadtfabrikanten.org/uploads/images/gallery/2025-09/06tnzigCTJawGnF5-grafik.png)
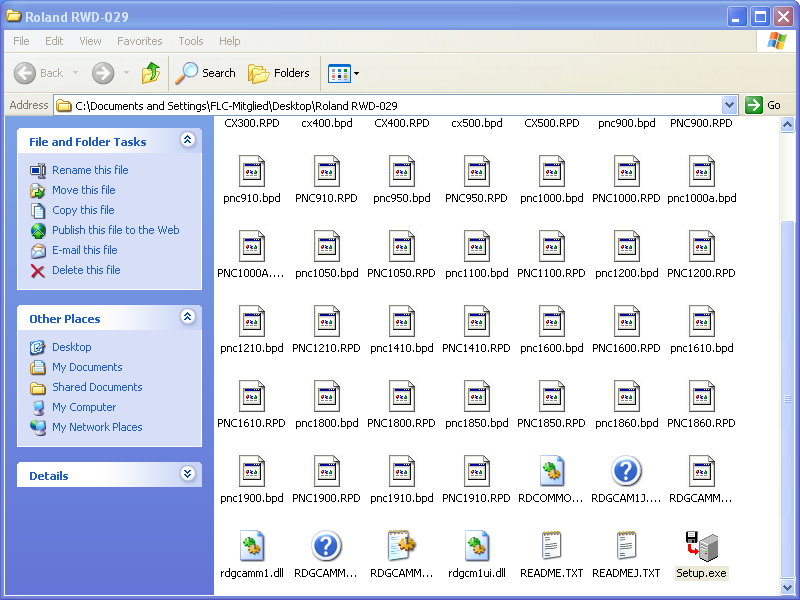
**PNC 950 CAMM-1 Roland Treiber**
1. Download des Treibers beim Hersteller → [https://www.rolanddga.com/support/products/cutting/camm-1-pnc-950-24-vinyl-cutter](https://www.rolanddga.com/support/products/cutting/camm-1-pnc-950-24-vinyl-cutter)
2. Setup.exe starten und PNC-950 auswählen
[](https://wiki.stadtfabrikanten.org/uploads/images/gallery/2025-09/eofMJV0NCN4FiJlM-grafik.png) [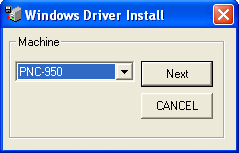](https://wiki.stadtfabrikanten.org/uploads/images/gallery/2025-09/fixodThjfAoFK2Re-grafik.png)
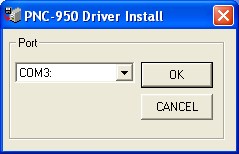
3. Den COM-Port auswählen, wie er bei der CH340G Installation konfiguriert ist (Settings können später jederzeit angepasst werden, sollten diese falsch sein)
[](https://wiki.stadtfabrikanten.org/uploads/images/gallery/2025-09/nFNH4ddNBoyWaFkO-grafik.png) [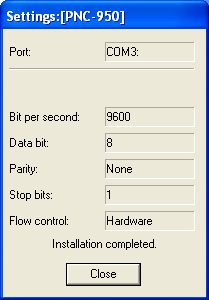](https://wiki.stadtfabrikanten.org/uploads/images/gallery/2025-09/IyA3KlxxEcfaXyXH-grafik.png)
## USB-Routing Gast zu Virtueller Maschine
**Warnung:** Der COM-Port wechselt beim Neustart der VM manchmal. Deshalb muss ggf. bei jedem Neustart zunächst der richtige Port erneut ausgewählt werden! Dies kann in der Systemsteuerung unter "Druckereinstellungen" vorgenommen werden.
03.09.2025: Der Compile läuft durch, aber aktuell ist das Paket noch nicht 100% funktionsfähig. Benutzung auf eigene Gefahr!
```bash
163312 WARNING: Library not found: could not resolve 'MSVCR90.dll', dependency of 'C:\\Users\\usr\\AppData\\local\\inkcut\\venv\\Lib\\site-packages\\OpenGL\\DLLS\\gle64.vc9.dll'.
163322 WARNING: Library not found: could not resolve 'MSVCR100.dll', dependency of 'C:\\Users\\usr\\AppData\\local\\inkcut\\venv\\Lib\\site-packages\\OpenGL\\DLLS\\freeglut64.vc10.dll'.
163324 WARNING: Library not found: could not resolve 'MSVCR100.dll', dependency of 'C:\\Users\\usr\\AppData\\local\\inkcut\\venv\\Lib\\site-packages\\OpenGL\\DLLS\\freeglut32.vc10.dll'.
163326 WARNING: Library not found: could not resolve 'MSVCR100.dll', dependency of 'C:\\Users\\usr\\AppData\\local\\inkcut\\venv\\Lib\\site-packages\\OpenGL\\DLLS\\gle32.vc10.dll'.
163332 WARNING: Library not found: could not resolve 'MSVCR100.dll', dependency of 'C:\\Users\\usr\\AppData\\local\\inkcut\\venv\\Lib\\site-packages\\OpenGL\\DLLS\\gle64.vc10.dll'.
163334 WARNING: Library not found: could not resolve 'MSVCR90.dll', dependency of 'C:\\Users\\usr\\AppData\\local\\inkcut\\venv\\Lib\\site-packages\\OpenGL\\DLLS\\gle32.vc9.dll'.
163337 WARNING: Library not found: could not resolve 'MSVCR90.dll', dependency of 'C:\\Users\\usr\\AppData\\local\\inkcut\\venv\\Lib\\site-packages\\OpenGL\\DLLS\\freeglut64.vc9.dll'.
163344 WARNING: Library not found: could not resolve 'MSVCR90.dll', dependency of 'C:\\Users\\usr\\AppData\\local\\inkcut\\venv\\Lib\\site-packages\\OpenGL\\DLLS\\freeglut32.vc9.dll'.
```
# Notizen Crash-Kurs "Howto" Plotter benutzen
## Checkliste - was brauche ich, um im FabLab mit dem Plotter zu arbeiten?
1. **Vorgedanken - Material**
1. Welche Folientypen gibt es? (z.B. PVC, Flex, Flock, etc.)
2. Wie verarbeitet man diese? (Druck, Temperatur, Zeit)
3. Wo werden diese Folien eingesetzt?
4. Was muss beachtet werden? Welche Besondernheiten gibt es bei den verschiedenen Folien?
2. **Vorgedanken - Motiv / Software (Inkscape)**
1. gibt es mein Motiv schon fertig? Muss ich es vektorisieren? In beiden Fällen: ist die Grafikdatei qualitativ brauchbar?
2. Exkurs zu Tools und Methoden, um eine Vektorgrafik für's Plotten zu Optimieren bzw. zu Analysieren
3. Vorbereiten und Nachbereiten der Dateie(n) in Inkscape
3. **An der Maschine & Steuersoftware (Inkcut) & Fehlerbekämpfung**
1. Wie und wo einschalten? FabAccess + Laptop + Maschine herself
2. Das Handbuch des Plotters zeigen ;-)
3. Howto Folie einspannen
1. Min. + Max. X-Achse + Niederspanner
2. Optische Sensoren
4. Spooler händeln / Blinke-LED verstehen
5. Testschnitte machen und Job korrekt einrichten
6. Trockenlauf machen
7. echten Schnitt machen
4. **Nach dem Plotten: Entgittern / Freistellen**
1. Wo finde ich Entgitterwerkzeuge und wie arbeite ich damit? (Nadeln, Pinzetten, Lineale, Messer, Skalpelle, etc.)
5. **Umgang mit Transferfolie**
1. Howto "Spiegeln nicht vergessen", Rakeln und Transferhelfer (Spülmittel, Föhn und Co.)
6. **Transfertechniken**
1. Wie bekomme ich die Folie auf mein Zielmedium appliziert? Welche Geräte gibt's und welche haben wir? Wie funktionieren ...
1. Transferpresse
2. Dampfbügelpresse
3. (ggf. gedanklicher Exkurs zur Tassenpresse)
7. **Links und Quellen zur bestehenden Doku mitgeben für das Selbststudium**
1. Inventar / Handbuch
2. Wiki